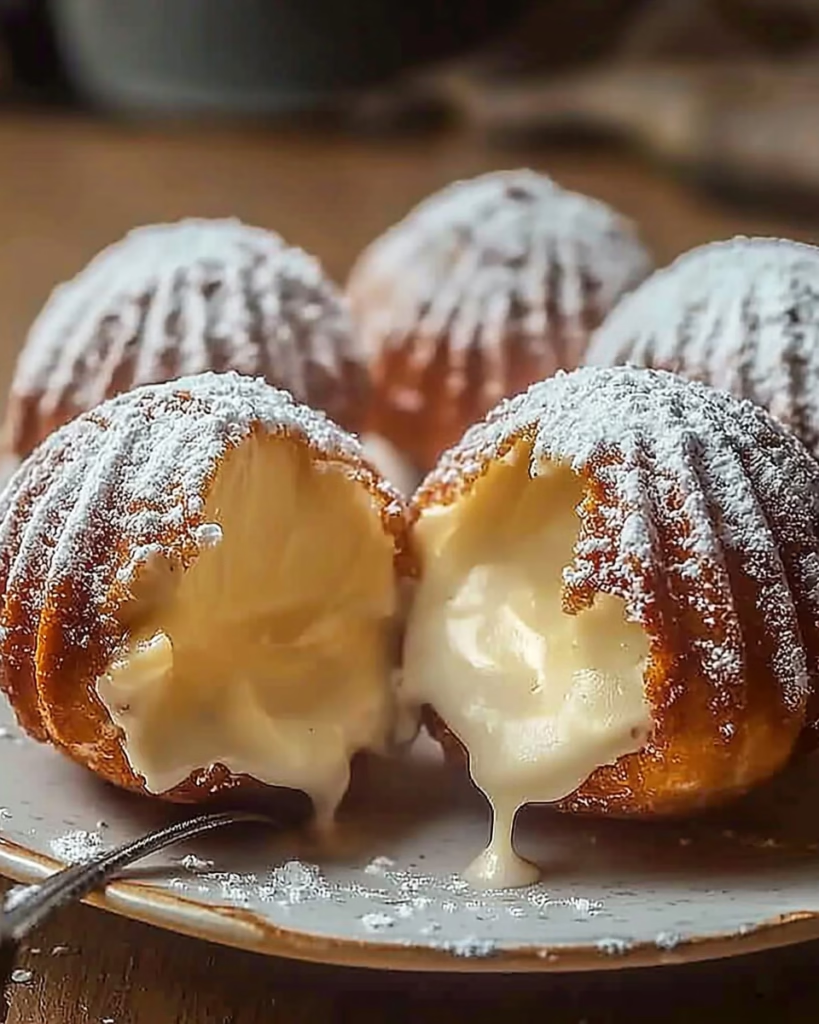
Italian Cream Bombs are those pillowy, golden pastries that feel like a warm hug from an old friend. I still remember the first time I tried them at a bustling café in Florence—they were hot from the fryer, dusted with powdered sugar, and so unexpectedly comforting that they instantly became my favorite treat. What makes them truly special is the contrast between their delicate, airy shell and the creamy custard oozing from the center. Whether you’re feeding a crowd or satisfying a quiet afternoon craving, these Italian Cream Bombs will become your kitchen’s star performers. Let me show you how to make the soft, sweet dough and the custard that pulls everything together.
There’s something undeniably magical about the process—watching the dough rise until it’s twice its size, then gently rolling it into rounds that fry up into perfect little mounds of joy. The custard filling, though simple, feels indulgent when paired with that tender, slightly crisp shell. I’ll walk you through every step, from the best way to test your oil temperature to how to get the filling just right. This is a recipe that feels like home, and I can’t wait to share it with you. Let’s dive in.
What is Italian Cream Bombs?
Italian Cream Bombs, or Bomboloni, are a traditional Florentine pastry beloved for their soft, hollow center. While similar in concept to cream puffs or beignets, their unique character comes from the airy dough (a mix of flour, butter, and eggs) and the slow-frying method that gives them a delicate exterior. The name “bombs” isn’t an exaggeration—they explode with flavor when you take a bite, especially with that silky custard filling.
The dish dates back to the Renaissance, where they were enjoyed for early morning coffee accompaniments or festive occasions. What makes them stand out is that the custard filling is typically homemade, using fresh milk, egg yolks, and vanilla for a depth that store-bought versions can’t match. Unlike denser pastries, Bomboloni maintain a light, almost doughnut-like texture. Their charm only grows when you add toppings like powdered sugar or a swirl of chocolate sauce, making them both a breakfast staple and an afternoon indulgence.
Reasons to Try Italian Cream Bombs
These pastries are more than just a sweet fix—they’re a lesson in simplicity and patience. With just four core ingredients in the dough and a few in the custard, they’re perfect for home cooks. Their versatility shines too: you can fill them with fruit compote instead of custard or even make them vegan-friendly. Even if you’re new to working with yeast, this recipe is forgiving—trust in the process, and let your kitchen instincts guide you.
If you’re juggling a busy week, these pastries freeze beautifully, letting you prep in advance. For families, they’re a great project—kids help shape the dough and pipe the filling, learning techniques while creating something delicious. Busy mornings? These bombs come straight out of the fryer into the fridge or freezer if filled in advance, ready to warm up at a moment’s notice. Best of all, they turn even the most ordinary kitchen into a gathering place. I’ve hosted countless afternoons where friends lined up for their warm, sugared bite, and the conversation always flows as freely as the custard they’re sharing.
Italian Cream Bombs also offer a creative outlet. I’ve tested dozens of variations—swap the custard for fruit marmalade, or drizzle them with melted dark chocolate after they cool. No matter how you tweak them, the combination of crunch and cream makes them unforgettable. They’re the kind of treat that reminds us why we cook: for flavor, for joy, and for those quiet moments where something homemade brings out the best in us.
Ingredients Needed to Make Italian Cream Bombs
Here’s everything you need to make your own batch:
For the dough: 4 cups all-purpose flour (for structure and rise), 1 cup whole milk, warmed until slightly hot to the touch (activates the yeast), a pinch of salt (to enhance the flavor), ⅓ cup granulated sugar (for sweetness), 25g fresh yeast (or 1 packet instant dried yeast for convenience), 4 oz (1 stick) sweet butter, softened (not melted so the dough stays light), and 2 large eggs, lightly beaten until frothy.
For the custard filling: 2 cups whole milk (low-fat options will result in a thinner texture), 4 egg yolks (the whites can go into the dough or discard), ⅓ cup granulated sugar (adjust to taste), 3 tablespoons cornstarch (for a smooth, thick filling), and 1 teaspoon vanilla extract (ensure it’s pure for the best flavor).
For the finish: powdered sugar, sifted into a fine dusting shaker (no clumps!), and vegetable oil for frying (choose neutral oils like canola or sunflower for the best results).
Instructions to Make Italian Cream Bombs – Step by Step
Step 1: Start by combining the dry ingredients in a large mixing bowl. Toss the flour, salt, and sugar together until evenly mixed. Using your hands or a dough whisk, create a well in the center. Pour in the warm milk and sprinkle the fresh yeast over it—let this sit for 5 minutes. You’ll see small bubbles forming on the surface, a sign the yeast is happy. Now blend in the softened butter bit by bit, letting each piece dissolve before adding more. Incorporating the beaten eggs next will create a silky texture. Kneading by hand takes about 8 minutes; use the heel of your hand for broad strokes until the dough is smooth and stretchy. If using a stand mixer, a paddle attachment works wonders.
Step 2: The first rise is critical for lightness. Grease your mixing bowl lightly with oil, place the dough inside, and cover with a damp cloth. Set it in a warm nook—like your oven with the light on or a sunny countertop. The dough will double in size, usually within 90 minutes. When ready, gently flatten the dough with cupped fingers (avoid punching it to prevent collapsing). This is the same technique I’ll use when shaping the dough rounds—keeping the air pockets intact.
Step 3: With the dough ready, dust your rolling pin with flour and roll out a rectangle about ½ inch thick. Use a 2¼-inch cutter for uniformity—press straight down and avoid twisting, as that can seal the edges. Transfer each cut-out to parchment paper, leaving an inch between them to prevent sticking. Cover the tray loosely and let the dough rest for 10 minutes. This brief pause ensures the rounds hold their shape when fried.
Step 4: Fry the bombs in batches for control. Pour 1 inch of oil into a large pot and heat to 350°F. Test readiness by dropping in a small dough bit—if it sizzles but doesn’t brown in 10 seconds, you’re all set. Gently lower the dough rounds into the oil, frying 3-4 minutes per side until golden and puffed up. Flip carefully with a spider strainer, then drain on paper towels. Let them cool slightly before moving to a wire rack—this stops the dough from getting soggy during filling.
Step 5: While the pastries cool, make the custard. Heat milk gently in a saucepan, whisking constantly to prevent scorching. In a separate bowl, blend the yolks, sugar, and cornstarch until pale and thickened. Slowly pour the hot milk into this mixture, whisking nonstop to temper the eggs. Return the custard to the saucepan and cook over medium heat until it coats the back of a spoon. Remove from heat and stir in vanilla. Let it cool completely by placing the saucepan in an ice bath. I’ve found that chilling the custard for at least 30 minutes helps it pipe smoothly later.
Step 6: Filling is the final flourish. Use a thin-bladed paring knife to make a small slit in the side of each pastry. Transfer the custard to a piping bag fitted with a small round tip—aim for 1 teaspoon per pastry for the perfect balance of filling. Seal the slit gently by crimping the edge with a thumb and forefinger. Now dust each bomb with powdered sugar (don’t skip the sifter, even if it’s an extra step) and serve fresh or refrigerate until ready. Watching custard ooze as you take a bite is part of the magic.
Chef’s Tips for a Perfect Result
- Use room-temperature eggs: they blend more easily into the butter and milk base.
- Don’t skip the first rise: cold dough yields denser, less fluffy pastries.
- Fry in batches of no more than 7 pastries at a time: overcrowded oil sags the heat, leading to greasy results.
- Firmly chill the custard before piping: warm filling causes the dough to collapse slightly when injected.
- Experiment with dough thickness: ½ inch rolls work best for even expansion.
- Test oil temperature first: use a kitchen thermometer to avoid under- or over-browning.
Variations and Substitutions
Need to adapt the recipe? These swaps keep it delicious:
- Dairy-Free Twist: Substitute plant-based butter for regular and coconut milk for whole milk in the custard. Use cornstarch to maintain its thickening power.
- Flavor Boost: Add a tablespoon of ground cinnamon or nutmeg to the custard for a spiced variation. Or infuse the milk with a vanilla bean pod.
- Gluten-Free Option: Replace all-purpose flour with a 50/50 mix of gluten-free flour and cornstarch for that same airy texture.
- Vegetarian-Friendly: For a richer flavor, add a splash of almond milk to the custard instead of regular milk.
- Budget Hack: Use store-brand vanilla extract and buy day-old bread to make your own flour blend.
How to Serve and Pair
These pastries shine on their own but also adapt beautifully. Serve them warm with a dusting of powdered sugar for a morning treat. For a dessert spin, add a drizzle of melted dark chocolate or a swirl of whipped cream before dusting. Pair with strong Italian espresso or a rich cappuccino—the coffee’s bitterness balances the sweetness perfectly.
On presentation, arrange in a tiered cake stand to show off their golden tops. For an extra flourish, roll them in crushed pistachios or cinnamon-sugar before the final flour dusting. They’re fantastic for picnics, parties, or even a cozy movie evening—just make sure everyone has napkins on hand. I like to freeze unfilled bombs for later, then thaw them and assemble when the time is right. It’s always exciting to hand them out, knowing they’ll bring instant smiles.
Storage and Reheating
Refrigerator: Store filled Bomboloni in an airtight container for 2-3 days. Separate layers with parchment paper to prevent sticking. To revive them, microwave on high for 10-second bursts until warm.
Freezer: Freeze either filled or unfilled pastries in a single layer on wax paper then transfer to a freezer-safe bag. Filled bombs last 1 month; unfilled keep for 2 months. When ready to serve, thaw at room temperature and fry for an extra minute until crisp again.
Room Temperature: For unfilled pastries, lay them flat on a wire rack up to 4 hours. Once filled, avoid room temperature storage beyond 1-2 hours to prevent custard from sweating into the dough.
Reheating: Oven reheating is best. Place on a baking sheet at 300°F for 5 minutes to restore warmth and crisp. Avoid air fryers—they’ll harden the custard. If using the microwave, wrap in a damp paper towel to retain moisture but still warm through instantly.
Nutritional Values
- Calories: 200 kcal
- Protein: 4g
- Carbohydrates: 25g
- Fat: 9g
- Saturated Fat: 4g
- Sodium: 50mg
Approximate values.
Frequently Asked Questions
Can I Use Store-Buy Custard?
Store-bought custard lacks the homemade texture. The custard in this recipe is designed to complement the dough. For a richer flavor, you can mix in a splash of vanilla into store varieties if necessary.
How Do I Know When They’re Done Frying?
Watch for their color and texture. When they float to the surface and turn a deep golden hue, they’re fried enough. A toothpick inserted near the center (avoid the custard-filled area) should come out clean and warm.
Why Is My Dough Sticking to the Rolling Pin?
This happens when the dough is too hot. Roll it into a log when working, which limits exposure to air. If sticking persists, lightly flour the counter—don’t panic, it’s a common issue even in professional kitchens.
Can I Make These in Advance?
Sure they’re ideal in advance! Fill and freeze them uncooked. Thaw for 30 minutes before frying, and add a minute to the cooking time. This trick works beautifully for parties and busy mornings.
What Toppings Work Best With This Dough?
Powdered sugar is classic, but think beyond! Try crushed nuts, cocoa powder, or even a tangy fruit glaze for variety. Just keep the custard center the focus—it’s the real star here.
Conclusion
Italian Cream Bombs are a celebration of Italian comfort and craft, wrapping creamy richness in a soft, fried shell. With the right techniques and a bit of practice, you’ll master this recipe in no time. Every bite brings warmth and sweetness, proof that simple ingredients can create something truly unforgettable.
Print
Italian Cream Bombs – A Luscious Pastry Treat for Any Occasion
- Prep Time: 30
- Cook Time: 45
- Total Time: 75
- Yield: 12 large pastries 1x
- Category: desserts
- Method: Frying
- Cuisine: Italian
- Diet: Vegetarian
Description
These golden, pillowy pastries (Bomboloni) are filled with silky homemade custard and dusted with powdered sugar. Perfect for breakfast or a cozy treat, their light dough and rich interior create a delightful contrast.
Ingredients
2 cups all-purpose flour
1 cup unsalted butter
1/4 cup granulated sugar
4 large eggs
3/4 cup milk
1 teaspoon baking powder
1/2 teaspoon salt
4 egg yolks
1 cup whole milk
3/4 cup sugar
2 tablespoons cornstarch
1 teaspoon vanilla extract (alcohol-free)
Powdered sugar, for dusting
Instructions
Whisk flour, baking powder, sugar, and salt in a bowl.
Melt butter in a saucepan, swirl to coat, then remove from heat.
Add eggs and milk to the melted butter, stirring to combine.
Pour the hot liquid into the dry ingredients; mix until a dough forms.
Knead gently, cover, and let rest 30 minutes.
Shape dough into rounds, cut with a biscuit cutter, and fry in 375°F oil until golden, 1-2 minutes per side.
Poke a small hole in each cooled pastry; fill with custard using a piping bag.
Dust with powdered sugar before serving.
Notes
Test oil temperature carefully to avoid greasy pastries.
Custard can be made a day ahead for convenience.
Freeze unfilled pastries for up to 2 months; fry from frozen, adding 30 seconds to cooking time.
Vegan option: Use plant-based butter, milk, and egg substitutes.
Nutrition
- Serving Size: 1 pastry
- Calories: 240
- Sugar: 18g
- Sodium: 150mg
- Fat: 12g
- Saturated Fat: 7g
- Carbohydrates: 28g
- Fiber: 1g
- Protein: 4g
- Cholesterol: 60mg