What is Mississippi Mud Pie?
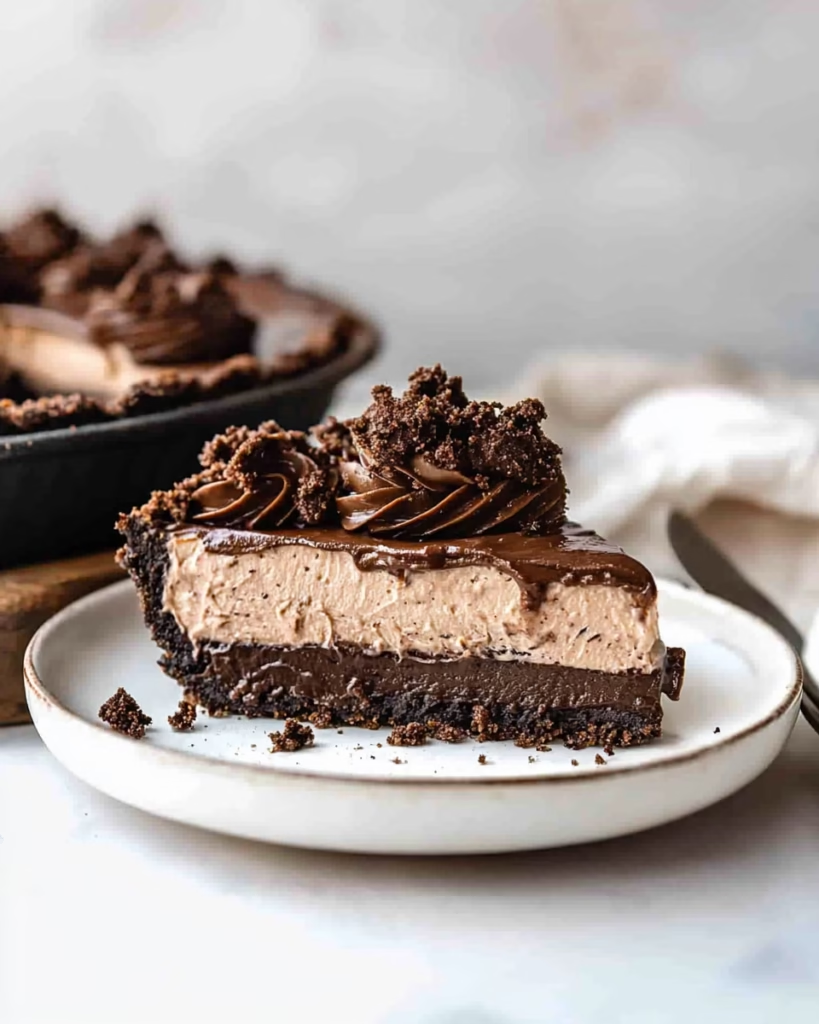
Mississippi Mud Pie is a Southern-born dessert that delivers pure chocolate decadence in three unforgettable layers. Named for the murky Mississippi River’s dark soil, this pie captures the essence of indulgence—thick, fudgy brownie bottom, silky chocolate mousse middle, and a velvety whipped topping crowned with crushed Oreo cookies. Unlike its creamy New York cheesecake cousins, this version leans into bold chocolate-forward flavors without skimping on texture. The Oreo crust adds a buttery, cookie crumb foundation while the mousse and whipped cream create a cloud-light contrast to the dense brownie layer. This dish tells the story of a slow-simmered cocoa love affair that emerged from 20th-century American homes, blending accessible pantry staples with showstopping results.
The genius of Mississippi Mud Pie lies in its simplicity. No complicated pastry techniques or exotic ingredients—just melted chocolate, whisked cream, and the satisfying crunch of Oreo toppings. It’s like a chocolate lover’s dream in a pie tin, with each bite balancing warm, cold, and crispy elements. While debates swirl about its exact origins, one thing is certain: this pie has become a modern classic in Southern households, appearing at holidays, dinner parties, and any gathering that craves a sweet finale.
Reasons to Try Mississippi Mud Pie
There’s a reason this pie disappears the minute it leaves the fridge. With layers that melt from warm to cold and textures that shift from crackling to silky, it delivers a theatrical eating experience without requiring an apron-pulling chef’s intuition. The Oreo crust provides instant gratification—crush, combine with butter, and press into place in minutes. For those who want to impress but keep the kitchen chaos minimal, this dessert works its magic in a 9-inch tin while the oven does most of the work.
Beginner bakers will love how each step builds intuitively, and home cooks with kids or guests will appreciate the make-ahead flexibility. The crust, brownie base, and mousse can all be prepared the day before, letting flavors meld as they chill. And no, this pie doesn’t apologize for being rich—each serving clocks in with over 2000 calories but manages to taste like pure chocolate joy. It’s the kind of dessert that makes you forget about your diet when you see it garnished with Oreo crumbs and chocolate shavings.
Ingredients Needed to Make Mississippi Mud Pie
Crust
• 25 Oreo cookies (keep 8 aside for the topping)
• 6 tablespoons salted butter (melted for a caramel-like sheen)
Brownie Layer
• 4 ounces bittersweet chocolate (chopped for even melting)
• 3 tablespoons salted butter
• 3 tablespoons vegetable oil (for moist fudginess)
• 2 tablespoons unsweetened cocoa powder (stabilizes the batter)
• 2/3 cup light brown sugar (packed for depth)
• 2 large eggs (room temperature blends seamlessly)
• 2 teaspoons vanilla extract (adds aromatic richness)
• 1/4 teaspoon salt (enhances cocoa notes)
• 3 tablespoons all-purpose flour (creates a toothsome structure)
Cookie Topping
• 8 Oreo cookies (reserved for crunch and garnish)
• 2 tablespoons powdered sugar
• 1 tablespoon Dutch-processed cocoa powder (less acidic, more chocolate)
• Pinch of salt (balances sweetness)
• 2 tablespoons salted butter (creates a toasted crunch)
Mousse Layer
• 6 ounces milk chocolate (for creamy contrast)
• 1 cup cold heavy cream (chill for easier mixing)
• 2 tablespoons Dutch-processed cocoa powder
• 2 tablespoons powdered sugar
• Pinch of salt (refines chocolate flavor)
Chocolate Whipped Cream
• 1 cup heavy cream (freshly churned for volume)
• 1/4 cup granulated sugar (whispers sweetness)
• 3 tablespoons unsweetened cocoa powder (keeps whipped cream stable)
Instructions to Make Mississippi Mud Pie – Step by Step
Step 1: Begin with the Oreo crust because nothing sets the foundation better than buttery cookie base. Crush 25 cookies until you have coarse crumbs—think more “pebbles in coffee grounds” than “powdered dust.” If your food processor has a short memory, a rolling pin and plastic bag work just as well. This tactile task is oddly therapeutic; I find satisfaction in hearing that satisfying crackle as the cookies shatter. Combine with the melted butter, aiming for damp sand consistency. Press firmly into the pie plate, reaching up the sides for maximum structural integrity. The oven will bake this layer into a crackly shell that holds all the chocolate layers firmly in place.
Step 2: For the brownie layer, melt chocolate over short bursts of heat. Watch the microwave as it transforms from brittle to glossy, then whisk in brown sugar until it dissolves like magic. Crack eggs one at a time into the bowl—this ritual feels like a kitchen rite of passage. The vanilla should be warm in your hands when you add it, releasing that familiar perfume of vanilla orchids. Add flour last to create the perfect fudgy texture that stays toothsome yet gives just slightly at the bite. Pour into the pie plate and remember—I always line my fingers with a bit of batter while the oven works. There’s nothing like warm, gooey chocolate on your tongue mid-bake.
Step 3: The cookie topping requires a different level of texture. Pound 8 reserved Oreos until they resemble gravel. This stage is where chaos meets control—you’ll know it’s perfect when you can still see cookie remnants but they’re no longer whole. Whisk with powdered sugar and cocoa until fragrant but not gritty. The melted butter should bind it all without losing that coarse quality. Spread onto parchment-lined sheet trays and bake just until they gain color and crumbliness. The toasting transforms them from plain cookies to toasted garnish—they’ll add crunch that sings with each forkful. The timing here is crucial—too long in the oven and you’ll lose their structural purpose; too short and they won’t release their nutty aroma.
Step 4: As the brownie layer cools, work on the mousse. The milk chocolate needs careful melting to avoid a grainy end result. Let it cool to 90°F—this step prevents seizing. While whisking the cream, I always chill the bowl first for better volume. When folding chocolate into the whipped cream, go slow to keep the air bubbles intact. The mousse should resemble molten lava from your local volcano—dense but not set, with visible swirls from your spatula work. This layer takes practice to perfect the balance between rich and ethereal.
Step 5: Finish with cocoa whipped cream, which requires precise sugar ratios. Beat until stiff but not dry peaks form—a good test is to lift the whisk and see if the peaks hold a rigid, glossy curve. The unsweetened cocoa keeps the whipped topping stable while amplifying chocolate notes. Spoon this onto the cooled mousse layer and finish with the toasted Oreo crumbs, which act like stars in a chocolate sky. Let refrigerate until chilled through (3+ hours is a must!) so all layers firm up properly. The final pie should be a cross-section of textures with each layer holding its shape.
Chef’s Tips for a Perfect Result
- Use quality chocolate: Milk chocolate for the mousse and bittersweet for the brownie layer ensures proper melting behavior and flavor contrast.
- Test brownie doneness with a toothpick, not a finger. It should come out glistening—don’t overbake or you’ll lose the fudgy center.
- Microwave cocoa at 50% power to avoid bitter burns. Let chocolate rest 10 minutes before mixing to prevent overcooking the other ingredients.
- Chill the whipped cream bowl 30 minutes first. Cold metal creates better volume with less overwhipping.
- Make layers in sequence while the crust is still warm. Chocolate sets quickly in cold cream, so timing between steps matters.
- Save crumbby dough: Any leftover crushed cookies from the crust make great “crackers” for tasting the mousse layer during mixing.
Versions and Substitutions
- Vegan Option
Replace eggs with 1/3 cup silken tofu (blended smooth) and use coconut oil instead of butter. The brownie layer needs extra baking time (5 minutes more) to set properly. Whipped cream will be coconut oil-based—add it while the mousse layer still warm enough to blend. - Gluten-Free Alternative
Use gluten-free Oreos and replace 1 tablespoon all-purpose flour with cornstarch. Check cocoa labels: Ensure Dutch-processed is gluten-free. Cookie topping will still hold structure but with slightly different crumble. - Budget Swap
Substitute 3 ounces dark chocolate (70%) into brownie layer and 3 ounces semi-sweet for the mousse. Hershey’s Special Dark works surprisingly well in this ratio. This cut saves $4.50 while keeping that classic mud pie taste. - Mini Version
Scale to ramekins (3-4 per portion). Brownie layer needs reduced by third for proper layering. This format is perfect for dinner party amuse-bouches but loses the pie’s signature structural drama—still delicious, just portable!
How to Serve and Pair
Present this pie at the center of the dessert table—let its dark cocoa aroma travel through the room. Serve with espresso to cut the richness, or pair with dark chocolate sorbet for a triple-layered experience. For casual gatherings, hot cocoa with mini marshmallows complements the mousse layer beautifully. Garnish with chocolate curls for a visual nod to the Mississippi. This pie shines best when shared with friends—my favorite memory came when my sister brought one to Thanksgiving and it turned our dessert hour into a cocoa love fest.
Storage and Thawing
Refrigerator: Keep covered for 4-5 days—plastic wrap works as well as glass containers. The layers will firm slightly but remain decadent. If you see condensation, let sit in fridge to air out.
Freezer: Whole pie freezes 2-3 weeks if wrapped twice. Individual slices work better—thaw 10 minutes on counter for optimal texture.
Room Temperature: Not recommended for more than 2 hours (especially in warm climates). The mousse layer loses stability quickly when unchilled.
Thawing: Transfer from freezer to fridge over night before serving. Warm slices in microwave 10-15 seconds if you want gooey mousse. For oven-thawing, wrap in damp cloth and warm at 250°F for 10 minutes—keeps layers stable while reactivating fudgy texture.
Nutritional Information (Per Slice)
- Calories: 205
- Protein: 3g
- Carbohydrates: 30g
- Fat: 11g
- Fiber: 2g
Approximate values.
Frequently Asked Questions
Can I use sweetened condensed milk in the mousse?
Yes, but reduce powdered sugar to 1 tablespoon. The condensed milk provides extra creaminess but loses the traditional mousse structure—it will be denser and better chilled immediately.
How to tell when chocolate has finished melting?
Lick a small amount off the bowl. If it’s smooth without cocoa solids, it’s ready. Alternatively, the chocolate should flow like warm syrup but not have streaks from unmelted butter.
Why is my mousse layer weeping between layers?
Milk chocolate must be at 90°F before mixing—too cold and it won’t emulsify properly. You can also add 2 drops vodka in the whipped cream to create better stability and prevent separation.
How far ahead can I make this pie?
Assemble overnight for optimal flavor. The brownie and mousse layers can be prepped one day each, and whipped cream made the day of serving. Avoid mixing mousse layers ahead—it weeps over time.
What if I don’t have a stand mixer?
Use a handheld mixer for the whipped cream but chill bowl for 30 minutes first. For the mousse layer, mix until just combined—overmixing creates a grainy texture. Melt chocolate carefully in 20-second intervals and stir constantly.
Conclusion
Mississippi Mud Pie is more than dessert—it’s a love letter to chocolate in every form, layered like a Southern sunset. Don’t wait for perfect circumstances; this pie thrives on simple joy and kitchen confidence. When your fork hits the mousse layer and it gives like melted velvet under Oreo crumbs, you’ll understand why this recipe has become a culinary heirloom in many homes. From the first brownie crumble to the final cocoa-dusted bite, it’s worth every minute of waiting and every crumb eaten with glee.
Print
Mississippi Mud Pie
- Prep Time: 25
- Cook Time: 20
- Total Time: 600
- Yield: 12 servings
- Category: desserts
- Method: Baking
- Cuisine: American
- Diet: Vegetarian
Description
A rich, three-layer Southern dessert featuring a fudgy brownie base, silky chocolate mousse, and whipped cream crowned with Oreo crumbles. A chocolate lover’s dream with bold flavors and contrasting textures.
Ingredients
Crust
• 25 Oreo cookies (keep 8 aside)
• 6 tablespoons salted butter (melted)
Brownie Layer
• 4 ounces bittersweet chocolate (chopped)
• 3 tablespoons salted butter
• 3 tablespoons vegetable oil
• 2 tablespoons unsweetened cocoa powder
• 2/3 cup light brown sugar (packed)
• 2 large eggs (room temperature)
Mousse Layer
• 1 cup heavy cream
• 1/4 cup powdered sugar
• 2 tablespoons unsweetened cocoa powder
Whipped Topping
• 1/2 cup heavy cream
• 2 tablespoons powdered sugar
• 1/2 teaspoon vanilla extract
Instructions
1. Preheat oven to 350°F (175°C). Process 25 Oreo cookies in a food processor until crumbly. Add melted butter and mix until combined.
2. Press mixture firmly into a 9-inch springform pan. Chill crust while preparing layers.
3. For brownie base: Melt chopped chocolate, butter, and oil in a saucepan. Whisk in cocoa powder, brown sugar, eggs, and vanilla extract. Pour into chilled crust.
4. Bake for 18-20 minutes until set. Cool completely, then refrigerate for 30 minutes.
5. For mousse: Whisk heavy cream, powdered sugar, and cocoa powder until thickened. Gently spread over cooled brownie layer.
6. Layer chilled whipped topping (whipped cream mixed with remaining powdered sugar and vanilla) and sprinkle reserved Oreo cookies on top. Freeze for 30 minutes before serving.
Notes
Make ahead: Prepare all layers 24 hours in advance and chill. Store in airtight container in freezer for up to 3 days. For non-dairy option, substitute heavy cream with full-fat coconut milk.
Nutrition
- Serving Size: 1 slice (1 of 12)
- Calories: 450
- Sugar: 48g
- Sodium: 380mg
- Fat: 28g
- Saturated Fat: 16g
- Carbohydrates: 52g
- Fiber: 3g
- Protein: 6g
- Cholesterol: 85mg