Strawberry Shortcake Cake is a love letter to summertime in slice form. With its tender sponge, velvety whipped cream, and jewel-like strawberries, this dessert feels like a slice of Southern charm with a bakery-level finish. Whether celebrating a birthday, summer picnic, or simple family dinner, this cake bridges the gap between home-baked heartiness and elegant indulgence. Its layers are forgiving for novice bakers, yet refined enough to impress guests. Let’s dive into how we transform fresh berries, cream, and cake into a masterpiece.
I still remember the first time I made this cake for my grandmother’s 75th birthday. The kitchen smelled like sunshine, and the table buzzed with laughter as everyone dipped their forks into the syrupy strawberry filling. That’s the magic of strawberry shortcake cake: it’s a recipe that invites connection. Today, you’ll learn how to recreate this nostalgic flavor with step-by-step guidance and tips to make it your own.
What is Strawberry Shortcake Cake?
This dessert is a modern twist on the classic strawberry shortcake, reimagined as a layered cake with sponge bases instead of biscuit dough. The roots of shortcake trace back to 18th-century English bakers, but the American version we know today was popularized by Southern cooks. Here, the cake’s genius lies in its harmony of textures: pillowy sponge, juicy berry filling, and silken whipped cream. The strawberries are lightly sweetened and reduced with lemon for brightness, while the cake gets a buttery, slightly tangy edge from sour cream and buttermilk. The result? A dessert that feels both rustic and refined.
Why You’ll Love This Recipe
Strawberry Shortcake Cake is perfect for anyone who craves a show-stopping dessert but wants a recipe with manageable steps. No complicated pastry techniques are required—just a whisk, an electric mixer, and a bit of patience. The cake holds up well for parties or potlucks, and leftovers are devoured so quickly, no one will notice if they don’t last. It’s also a versatile base for experimentation; think chocolate glaze, blueberry swirls, or a spiced streusel topping.
Ingredients Needed
For the strawberries:
- 2 pounds strawberries (halved and fresh, never frozen)
- ¼ cup granulated sugar
- Juice of ½ lemon (about 1 tablespoon)
- Pinch salt
- 1 teaspoon cornstarch
For the cake:
- 6 tablespoons coarse sugar (for pan bottom)
- 12 tablespoons unsalted butter (room temperature)
- 1½ cups granulated sugar
- 2 large eggs (room temperature)
- 2½ cups cake flour (sifted and measured properly)
- 1¼ teaspoons baking powder
- ¾ teaspoon baking soda
- ½ teaspoon salt
- 1 cup sour cream (full-fat for moisture)
- ½ cup milk (room temperature)
- 2 teaspoons vanilla bean paste or extract
For the whipped cream:
- 2 cups heavy whipping cream (chilled)
- 8 ounces cream cheese (room temperature, softened)
- ⅔ cup powdered sugar (sifted to avoid lumps)
Step-by-Step Instructions
Step 1: Preparing the Strawberries
Gather a large mixing bowl and add the halved strawberries, sugar, lemon juice, and salt. Gently toss until the fruit is evenly coated, like a sweet glaze. The sugar will draw out the juice, creating a natural syrup. Cover the bowl and let it sit at room temperature for 2 hours. During this time, the strawberries release their liquid, and the flavors deepen into a vibrant, jam-like consistency. This step is crucial for that glossy, syrupy filling that ties the cake together.
Step 2: Making the Cake Batter
Preheat your oven to 350°F and grease three 8-inch round pans. Sprinkle 2 tablespoons of coarse sugar on the bottom of each pan and swirl it around so the sugar creates a caramelized crust as the cake bakes. Set the pans aside. In a stand mixer, beat the room-temperature butter and granulated sugar on medium speed until pale and fluffy, about 3-4 minutes. This aeration is what gives the cake its tender crumb, so don’t skip the mixer or settle for under-beating. Add the eggs one at a time, ensuring each is fully incorporated before adding the next. The batter will look curdled briefly, but it will come together as you continue mixing.
Step 3: Dry and Wet Ingredients
In a separate bowl, whisk together the cake flour, baking powder, baking soda, and salt. This ensures even distribution of leaveners, preventing tunnels or under-risen areas. In another bowl, whisk the sour cream, milk, and vanilla until smooth. Adding these two component bowls to the batter is key to balance. Alternate between the dry and wet mixtures, starting and ending with the dry ingredients. After mixing, scrape down the bowl’s sides to eliminate pockets of unmixed flour or wet ingredients. Stop as soon as everything is just combined—over-mixing will lead to a dense cake.
Step 4: Baking and Cooling
Divide the batter evenly between the three pans. Use a flexible spatula to smooth the tops and create an even layer, as this helps the cake hold vertical slices cleanly. Bake for 20-25 minutes, rotating the pans halfway through to ensure even browning. The cake is done when a toothpick inserted into the center comes out clean, and the edges start to pull away from the pan. Transfer the pans to a wire rack and let the cakes cool for 10 minutes before unmolding. This short cooling time prevents the delicate layers from collapsing. Let the cakes cool completely before assembling—this avoids the whipped cream from melting prematurely.
Step 5: Strawberry Syrup and Whipped Cream
After the strawberry syrup sits, pour it into a fine-mesh strainer set over a bowl. The liquid will be ruby red and slightly syrupy. Measure out ¼ cup of this syrup and microwave with the cornstarch until thickened, creating a glaze to keep the cake layers moist. For the whipped cream, beat the cream cheese and powdered sugar in a mixer on medium speed until no streaks remain. Gradually add the heavy cream and switch to high speed until stiff peaks form. This filling is rich and stable, holding its shape even in a warm kitchen.
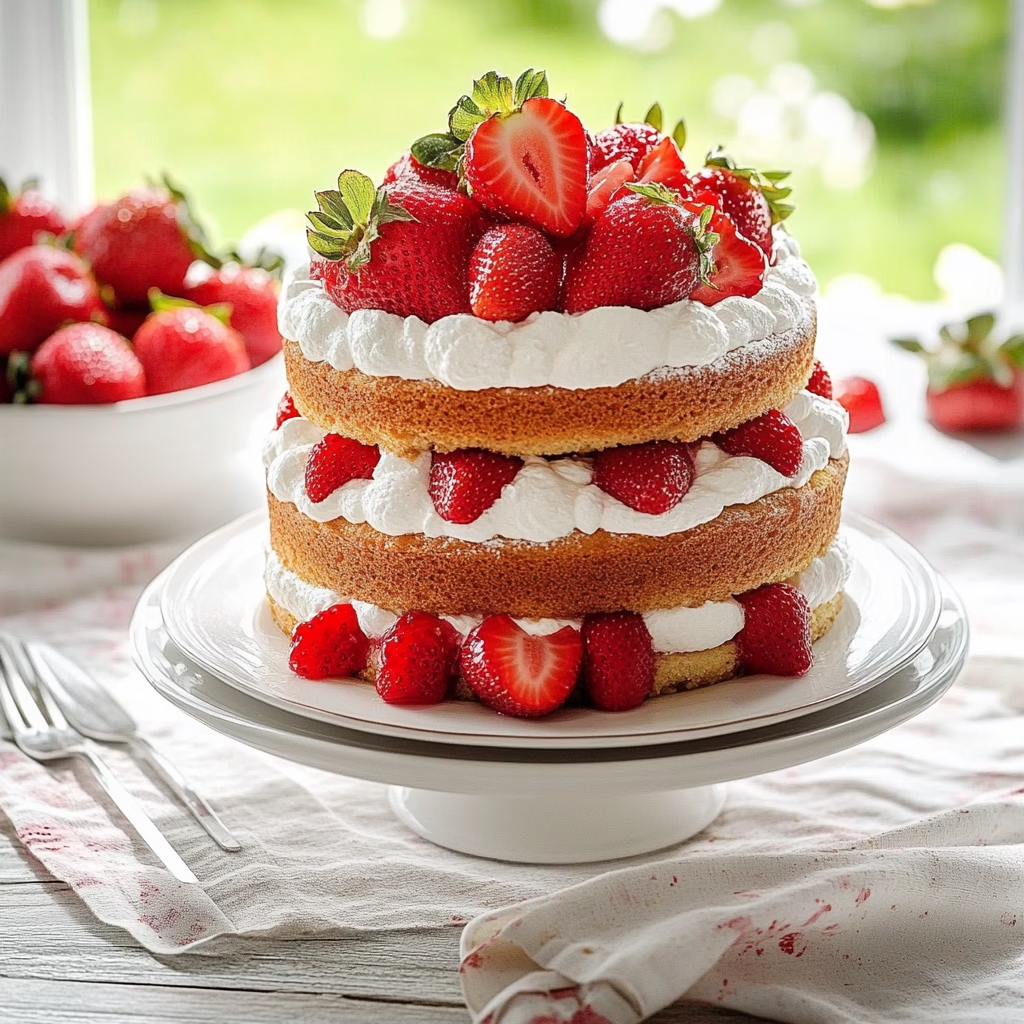
Step 6: Assembling the Cake
Using a flat surface or cake plate, place the first cooled cake layer. Spoon one-third of the whipped cream onto the center, leaving a border for structure. Arrange the strawberries in a pattern—think rose petals or overlapping halves—to make the layering look intentional yet cozy. Continue with the second layer, another third of the cream, and half the strawberries. Repeat until all layers are stacked. Press the final whipped cream mound and strawberries on top, drizzle the thickened strawberry syrup over the cake, and let it refrigerate for at least 30 minutes. This rest allows the layers to set and the flavors to meld.
Chef’s Tips for a Perfect Result
- Bring ingredients to room temperature: Chilled butter won’t aerate properly, and cold eggs will curdle when mixed into the sugar. Plan to start 2 hours before baking.
- Don’t skip the sugar on the pans: The coarse sugar creates a subtle sweet texture under each cake layer and caramelizes slightly, adding depth.
- Carefully rotate layers during assembly: If your whipped cream layers sag, gently press the next cake on top while still in the refrigerator to hold its shape.
- Use a serrated knife for slicing: This prevents crushing the berries and ensures clean, even portions.
Variations and Substitutions
Vegan Option: Swap heavy cream with full-fat coconut milk (chilled overnight), use vegan butter and sour cream, and replace eggs with a flax-oil mixture (1 tbsp ground flax + 3 tbsp water per egg). The cake will have a faint coconut note but remains moist.
Gluten-Free Alternative: Use a 1:1 gluten-free flour blend with xanthan gum. Test a small batch first, as some brands may yield a denser texture.
Low-Carb Version: Substitute granulated sugar with erythritol or a sugar alternative blend. Opt for almond flour for the cake and use heavy cream instead of sour cream for lower carbs.
Budget Swap: Use frozen strawberries (thawed and drained) for the filling. They won’t caramelize as neatly, but they save cost, and their liquid makes up for the missing syrup.
How to Serve and Pair
Serve this cake with a side of vanilla ice cream for a classic combination, or pair with a tangy fruit compote, like blueberry or rhubarb, to balance the sweetness. For a modern twist, dust the sliced berries with edible gold dust or garnish with mint leaves. This dessert pairs best with iced tea, lemonade, or a dry white wine to complement the tangy strawberries. Use a decorative cake stand for parties or serve it in smaller slices at casual gatherings—its rustic charm fits both.
Storage and Reheating
Refrigerator: Store the assembled cake in an airtight container for up to 2 days. The fresh strawberries will degrade after 48 hours, but the cake itself remains edible for 3-4 days. If refrigerating, cover the top with plastic wrap to prevent the fillings from drying out.
Freezer: Freeze individual layers unfilled for up to 1 month. Wrap each layer in plastic wrap and place in a resealable bag. Thaw in the refrigerator for 2 hours before assembling.
Room Temperature: Keep the cake in a cool, shaded place for up to 4 hours. Avoid serving in direct sunlight during summer, as the whipped cream will melt quickly.
Reheating: For cake-only leftovers, warm a slice in a 250°F oven for 5-10 minutes to restore moisture. Avoid reheating whipped cream or strawberry layers, as the texture will degrade.
Nutritional Values
- Calories: 120kcal per serving
- Protein: 3g
- Carbohydrates: 16g
- Fat: 6g
- Fiber: 1g
Approximate values based on 8-10 servings. Adjust for dietary swaps as outlined in the variations section.
Frequently Asked Questions
Can I substitute sour cream in the cake?
Yes, Greek yogurt (full-fat) or buttermilk can replace sour cream. Use 1 cup Greek yogurt instead, and reduce the milk by 2 tablespoons to maintain moisture. The texture will be slightly denser but still delicious.
How do I know the cake is done?
Insert a toothpick into the center. If it comes out clean and the top springs back when touched, it’s done. Avoid overbaking, as the layers can become dry and crumbly.
My whipped cream keeps collapsing—why?
Chilled ingredients and a cold bowl are key. Chill the mixer and all components for at least 30 minutes before beating. If the cream overwhips, try adding ½ tsp cream of tartar to stabilize it next time.
Can I make this cake 2 days ahead?
Bake the layers and store them in an airtight container at room temperature for up to 24 hours. Prepare the strawberry syrup and whipped cream the day before, storing separately in the fridge. Assemble the cake just before serving.
What’s the best way to customize the toppings?
Try adding dark chocolate shavings, crushed nuts, or a drizzle of raspberry coulis. For kids, edible glitter or sugar flowers work beautifully. Keep the balance of textures in mind so the additions don’t overwhelm the strawberries.
Conclusion
Strawberry Shortcake Cake is a tribute to the joy of simple, honest ingredients. With its tender layers, creamy filling, and glistening strawberry topping, it’s a dessert that feels both comforting and celebratory. By following these steps and tips, you’ll master a classic that’ll become a staple for summers to come. There’s something truly special about that first bite of warm cake and fresh berries—proof that cooking, at its heart, is about making memories.
Print
Classic Strawberry Shortcake Cake
- Prep Time: 45
- Cook Time: 35
- Total Time: 170
- Yield: 12 slices 1x
- Category: desserts
- Method: Baking
- Cuisine: American
- Diet: Vegetarian
Description
Tender sponge layers, velvety whipped cream, and a juicy strawberry filling come together in this elegant Southern dessert. A perfect balance of sweet and tangy, it’s a make-ahead treat for birthdays, picnics, or family dinners.
Ingredients
For the strawberries:
2 pounds strawberries (fresh and halved)
1/4 cup granulated sugar
1 tablespoon lemon juice
Pinch of salt
1 teaspoon cornstarch
For the cake:
6 tablespoons coarse sugar
12 tablespoons (1 1/2 sticks) unsalted butter (room temperature)
1 1/2 cups granulated sugar
2 large eggs (room temperature)
2 1/2 cups cake flour
1 1/4 teaspoons baking powder
3/4 teaspoon baking soda
1/2 teaspoon salt
1 cup sour cream (full-fat)
1/2 cup milk (room temperature)
2 teaspoons vanilla bean paste or extract
For the whipped cream:
2 cups heavy whipping cream
8 ounces cream cheese (room temperature)
1/4 teaspoon salt
1/4 cup powdered sugar
Instructions
1. Prepare the strawberries: In a large bowl, combine strawberries, granulated sugar, lemon juice, salt, and cornstarch. Toss gently and let macerate for at least 15 minutes. Set aside.
2. Preheat the oven to 350°F (175°C). Grease and flour two 9-inch round cake pans. Press 3 tablespoons of coarse sugar into the bottom of each pan for a textured crust.
3. Prepare the cake: In a bowl, cream the butter and 1 1/2 cups granulated sugar until light and fluffy. Add eggs one at a time, beating well after each addition.
4. In another bowl, sift together cake flour, baking powder, baking soda, and salt. Alternately add the dry ingredients and the sour cream to the butter mixture, mixing until just combined. Stir in the milk and vanilla extract until smooth.
5. Divide the batter between the prepared pans. Smooth the top and sprinkle the remaining 3 tablespoons of coarse sugar over the batter.
6. Bake for 30-35 minutes, or until a toothpick inserted in the center comes out clean. Let the cakes cool in the pans for 10 minutes, then run a knife around the edges and turn out onto a wire rack to cool completely.
7. Prepare the whipped cream: In a cold mixing bowl, whip the heavy whipping cream until soft peaks form. Add the cream cheese, salt, and powdered sugar and continue whipping until stiff, glossy peaks form.
8. Assemble the cake: Place one cake layer on a serving plate. Spread half the whipped cream on top, then layer half the macerated strawberries, pressing down slightly. Add the second layer of cake and spread the remaining whipped cream on top. Cover the strawberries with the second layer of strawberries and gently press to adhere.
9. Chill the cake in the refrigerator for at least 2 hours to allow the layers to set before serving.
Notes
The cake can be prepared up to a day ahead of serving for easier assembly. For easier unmolding, chill the assembled cake in the refrigerator for at least two hours. Leftover strawberries can be used in a fruit salad for a sweet breakfast or snack.
Nutrition
- Serving Size: 1 slice (1/12 of the cake)
- Calories: 380
- Sugar: 42g
- Sodium: 400mg
- Fat: 21g
- Saturated Fat: 13g
- Carbohydrates: 48g
- Fiber: 3g
- Protein: 5g
- Cholesterol: 130mg


