Creamy Garlic Chicken is the answer to that age-old question: “What on earth am I making for dinner tonight?” We have all been there, staring into the fridge at 5:30 PM while the kids are asking for snacks and the dog is barking at a leaf. You need something fast, but you also want something that tastes like it came from a fancy bistro. This dish delivers a feast of flavors without making you spend hours over a hot stove. Because let’s be real, after a long day of work or managing a household, the last thing anyone wants is a mountain of dishes and a complex manual. This recipe is simple and incredibly satisfying. The chicken stays tender, while the sauce is so rich and velvety it feels like a genuine hug in a pan. Honestly, it is the kind of meal that makes you feel like a kitchen rockstar, even if you are still wearing your morning yoga pants.
What is Creamy Garlic Chicken?
At its heart, Creamy Garlic Chicken is a classic comfort dish that pairs golden-seared poultry with a luxurious, savory sauce. It is a massive favorite in American households because it uses pantry staples to create something extraordinary. Think of it as the more sophisticated cousin of your standard pan-seared chicken. The garlic provides a bold punch, while the heavy cream and Parmesan cheese create a thick, indulgent coating that clings to every bite. It is surprisingly easy to whip up, yet it looks and tastes like a professional creation. Whether you are cooking for a picky toddler or trying to impress your partner, this dish hits the mark every single time. It is all about that balance of crispy texture on the outside and a juicy, flavorful interior that practically melts in your mouth.
Reasons to Try Creamy Garlic Chicken
You should definitely give Creamy Garlic Chicken a go because it is a total lifesaver for busy schedules. First off, it takes less than 30 minutes from start to finish, which is a miracle when you are running on fumes. Plus, it is a one-pan wonder, meaning you won’t be stuck scrubbing five different pots later. If you are watching your carbs, this is a fantastic low-carb option that doesn’t feel like “diet food” at all. It is crammed with protein and healthy fats, keeping you full and focused for the rest of the evening. Another big plus? It is totally kid-approved. Even the pickiest eaters usually can’t resist a cheesy, garlic-infused sauce. It is an authentic crowd-pleaser that brings a bit of magic to the dinner table without requiring a huge amount of effort or expensive ingredients.
Ingredients Needed to Make Creamy Garlic Chicken
- 4 boneless, skinless chicken breasts: These provide a lean, high-quality protein base that cooks quickly and evenly.
- ½ cup all-purpose flour: Used for dredging to create a beautiful golden crust that helps the sauce stick.
- 1 teaspoon garlic powder: Adds a foundational layer of flavor directly to the meat.
- 1 teaspoon paprika: Gives the chicken a lovely, warm color and a hint of sweetness.
- Salt and pepper to taste: The fundamentals for bringing out all the other flavors in the dish.
- 2 tablespoons olive oil: Provides the healthy fat needed for a perfect sear.
- 2 tablespoons unsalted butter: Adds a rich, nutty flavor that oil alone just can’t match.
- 4 cloves garlic, minced: The star of the show, providing that pungent, aromatic kick we all love.
- 1 cup chicken broth: Used to deglaze the pan and add a savory depth to the liquid base.
- 1 cup heavy cream: The key to achieving that insanely smooth and velvety sauce texture.
- ½ cup grated Parmesan cheese: Brings a salty, umami punch that thickens the sauce perfectly.
- 1 teaspoon Italian seasoning: A handy blend of herbs that keeps the flavor profile interesting.
- 1 tablespoon fresh parsley (optional): A fresh garnish to add a pop of color and a clean finish.
Instructions to Make Creamy Garlic Chicken – Step by Step
Step 1: Prep and Dredge Your Chicken
The first part of our Step by Step guide involves getting that chicken ready for its big moment. Take your chicken breasts and pat them dry with paper towels; this is a secret trick to getting a better sear. In a shallow bowl, whisk together your flour, garlic powder, paprika, salt, and pepper. Take each piece of chicken and coat it thoroughly in the mixture. Make sure to shake off the excess because we want a light dusting, not a heavy suit of armor. This step is vital because that flour coating eventually helps thicken our sauce later on, making the final result absolutely stunning.
Step 2: Searing to Golden Perfection
Next in our Step by Step process, grab your favorite large skillet and set it over medium-high heat. Add the olive oil and butter, watching for that butter to foam up—that is your cue to drop the chicken in. Lay the breasts away from you to avoid any oil splashes. Let them cook undisturbed for about 4 to 5 minutes per side. You are looking for a deep, golden brown color that looks almost like a treasure from the pan. Once they are cooked through and looking delicious, move them to a plate and let them rest. Don’t worry about the little brown bits left in the pan; those are flavor gold mines!
Step 3: Creating the Garlic Base
Now we move to the sauce phase of our Step by Step journey. Turn the heat down to medium so you don’t burn the stars of the show. Toss in that minced garlic and stir it constantly for about a minute. You will know it’s ready when the kitchen starts smelling like an Italian villa. Quickly pour in the chicken broth to deglaze the pan. Use a wooden spoon to scrape up all those delicious browned bits from the bottom. This part is surprisingly satisfying and ensures every drop of flavor ends up in your sauce.
Step 4: Simmering the Creamy Sauce
As we continue this Step by Step tutorial, it is time to get creamy. Stir in your heavy cream, Parmesan cheese, and Italian seasoning. Bring the mixture to a gentle simmer. You don’t want a violent boil here; a nice, steady bubble will do the trick. Keep stirring for 3 to 4 minutes. You will see the sauce transform from a thin liquid into a rich, thick gravy that looks like a total prize. Taste it and add a little more salt or pepper if you feel it needs a boost. This is where the magic really happens!
Step 5: The Grand Finale
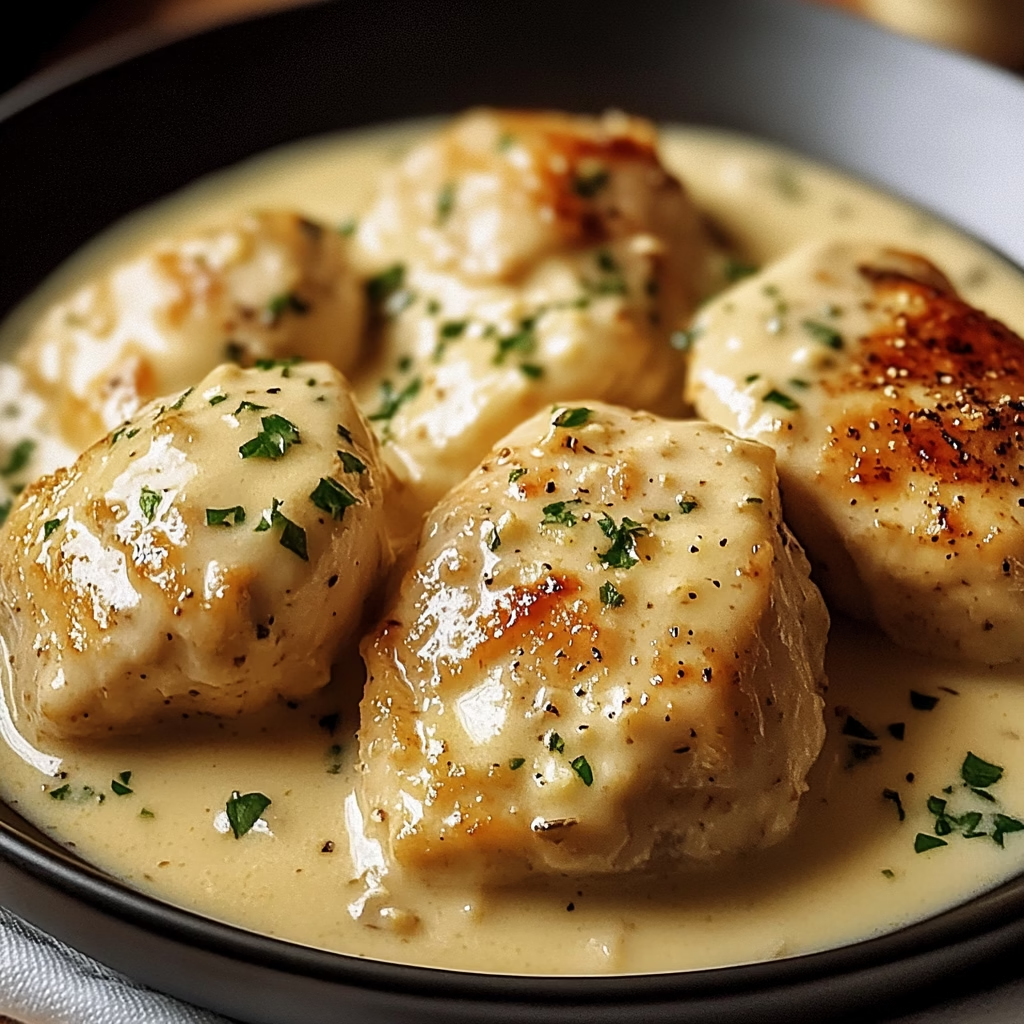
The final phase of our Step by Step instructions is the reunion. Place those beautiful chicken breasts back into the bubbling sauce. Use a spoon to bath the chicken in that liquid gold, ensuring every inch is covered. Let it all simmer together for another 2 to 3 minutes. This allows the chicken to warm back up and soak in all that garlicky goodness. If you are feeling fancy, sprinkle on some fresh parsley for a vibrant look. Now, take a second to admire your work—you just made a spectacular meal that is sure to be a hit.
What to Serve with Creamy Garlic Chicken
This chicken is so versatile, it plays well with almost anything on your plate. For a classic feel, serve it over a bed of buttery mashed potatoes or a pile of al dente fettuccine. The sauce acts like a built-in gravy that makes everything taste better. If you want to keep things a bit lighter, try it with roasted asparagus, steamed broccoli, or a crisp green salad. Zucchini noodles or cauliflower rice are also excellent choices if you are cutting back on grains. No matter what you choose, make sure you have some crusty bread nearby. You will definitely want to soak up every last drop of that sauce—it is way too good to leave behind!
Key Tips for Making Creamy Garlic Chicken
To get the best results, try using chicken breasts that are similar in size so they cook at the same rate. If one is way thicker than the rest, give it a little pound with a meat mallet to even it out. Another tip: don’t crowd the pan! If the chicken pieces are touching, they will steam instead of sear, and you’ll miss out on that lovely crust. Use fresh garlic if you can; while the jarred stuff is a helpful time-saver, nothing beats the punch of freshly minced cloves. Lastly, if your sauce gets too thick, just splash in a little extra chicken broth or a tablespoon of water to loosen it back up to your liking.
Storage and Reheating Tips Creamy Garlic Chicken
If you actually have leftovers—which is rare because this stuff is addictive—store them in an airtight container in the fridge for up to three days. When you are ready to eat again, be gentle. Reheating cream sauces can be tricky because they like to separate. The best way is to use a skillet over low heat, adding a tiny splash of milk or broth to bring the sauce back to life. If you must use the microwave, do it in short bursts at medium power and stir in between. It is a simple way to ensure your meal stays just as tasty the second time around.
FAQs
Can I use chicken thighs instead? Absolutely! Boneless, skinless thighs work great and stay even juicier, though they might need a few extra minutes of cooking time.
Is there a dairy-free version?
You can try using full-fat canned coconut milk and a nutritional yeast substitute for the Parmesan, but the flavor profile will definitely change.
What if my sauce doesn’t thicken?
Just let it simmer a bit longer. The Parmesan and the flour from the chicken usually do the heavy lifting, so patience is key!
Final Thoughts
Making Creamy Garlic Chicken is a surefire way to turn a boring Tuesday into a special occasion. It is a reliable recipe that balances indulgence with practicality, making it a staple for any home cook. We all deserve a meal that feels like a victory after a long day, and this dish provides exactly that. So, grab your skillet, get that garlic dancing, and enjoy a dinner that is truly outstanding. Once you try it, this recipe will likely become an obsession in your household. Happy cooking, and may your sauce always be perfectly smooth and your chicken always be tender!