
The Best Raspberry Bread
The Best Raspberry Bread is a dream come true for any berry lover. There’s almost more raspberries than bread in my recipe for it! You’ll want to make this one over and over because it’s incredibly soft and just bursting with juicy berries. It fills the kitchen with the most wonderful aroma, a sweet and slightly tart fragrance that just makes you want to curl up with a warm slice.
I remember my early days in the kitchen, fumbling with recipes and feeling a bit overwhelmed. This raspberry bread, though, was one of those early wins that gave me so much confidence. It’s forgiving, forgivingly delicious, and always a hit when I bring it to potlucks or just share it with neighbors. It feels like a little piece of sunshine, even on a cloudy day.
What is The Best Raspberry Bread?
This isn’t just any quick bread; it’s a celebration of fresh fruit baked into a tender, moist crumb. The Best Raspberry Bread is designed to be incredibly approachable, even for those who might feel a little timid in the kitchen. It’s a testament to how simple ingredients can create something truly special, perfect for breakfast, a snack, or even dessert.
What makes this recipe stand out is the generous amount of raspberries and the delightful balance of sweetness and fruitiness. We use a combination of brown and granulated sugar for depth of flavor and a touch of buttermilk for that signature tender texture. The result is a loaf that’s almost overflowing with bright, juicy berries, each bite a delightful surprise.
Reasons to Try The Best Raspberry Bread
Honestly, if you’re looking for a reason to bake something comforting and incredibly delicious, this raspberry bread is it. It’s ridiculously easy to throw together, making it perfect for those days when you need a little something sweet but don’t have a ton of time. The preparation is straightforward, and the bake time is just enough to fill your home with that irresistible bakery-fresh scent.
This recipe is perfect for anyone, from the seasoned baker looking for a reliable go-to to the beginner who wants to impress themselves and their loved ones. It’s a wonderful way to use up a bounty of fresh berries, or even a bag of frozen ones, without any fuss. Imagine serving this warm from the oven, maybe with a dollop of cream or a sprinkle of powdered sugar – pure joy!
Ingredients Needed to Make The Best Raspberry Bread
Here’s what you’ll need to create this delightful loaf:
- 2 cups + 4 tablespoons all-purpose flour, divided (plus extra for tossing berries)
- ¾ cup light brown sugar, packed
- ¼ cup granulated sugar
- 1 teaspoon baking soda
- Pinch of salt (optional, if you like your flavors a little more pronounced)
- ¼ cup unsalted butter, melted
- 1 large egg
- ¾ cup buttermilk (room temperature is best)
- ¼ cup canola or vegetable oil
- 2 teaspoons vanilla extract
- 10 to 12 ounces fresh or frozen raspberries (about 2 cups)
Instructions to Make The Best Raspberry Bread – Step by Step
Let’s get baking! This process is enjoyable, and each step leads you closer to a perfect loaf.
Step 1: First things first, let’s get our oven ready to do its magic. Preheat your oven to 350°F (175°C). While that warms up, prepare a standard 9×5-inch loaf pan. You can do this by lightly spraying it with a floured cooking spray or by greasing it well with butter or oil and then dusting it with a bit of flour. Tap out any excess flour and set the pan aside. This step ensures our beautiful bread won’t stick.
Step 2: In a large mixing bowl, we’re going to combine all our dry ingredients. Add 2 cups of the all-purpose flour, the packed light brown sugar, granulated sugar, baking soda, and that pinch of salt if you’re using it. Give everything a good whisk to make sure it’s all well combined and there are no pockets of leavening agent or sugar. This creates a lovely base for our batter.
Step 3: Now, let’s work on the wet ingredients. In a separate medium-sized microwave-safe bowl or a glass measuring cup, melt your ¼ cup of unsalted butter. A quick 45 seconds on high power in the microwave usually does the trick. It’s important to let this melted butter cool down just a tiny bit before we add the egg, otherwise, you risk scrambling it, and nobody wants that!
Step 4: Once the butter has cooled slightly, whisk in the large egg until it’s nicely combined with the butter. Then, add in the ¾ cup of buttermilk, the ¼ cup of canola or vegetable oil, and the 2 teaspoons of vanilla extract. Whisk this mixture until everything is smooth and well incorporated. This liquid blend will bring moisture and richness to our bread.
Step 5: It’s time to bring the wet and dry ingredients together. Pour the wet mixture into the bowl with the dry ingredients. Stir everything gently with a spatula or wooden spoon until it’s just combined. It’s really crucial not to overmix here; you want the batter to be a bit lumpy. Trying to stir out every last lump can lead to a tough bread, and we are aiming for tender goodness!
Step 6: Let’s prepare our star ingredient: the raspberries. If you’re using fresh raspberries, give them a gentle rinse and pat them dry. If using frozen, you can often use them straight from the freezer. In a medium bowl, add the 10 to 12 ounces of raspberries and toss them carefully with the remaining 2 tablespoons of flour. Coating the berries lightly in flour is a little trick that helps prevent them from sinking to the bottom of the bread during baking.
Step 7: Now, gently fold the flour-coated raspberries into the batter. Be very delicate with this step – we don’t want to mash the berries and turn our batter purple. Just a few gentle folds should be enough to distribute them throughout. The goal is to have pockets of vibrant raspberry goodness waiting to be discovered.
Step 8: Spoon the batter into your prepared loaf pan. Use your spatula to gently smooth the top and encourage the batter to fill into the corners of the pan. This helps ensure an even bake and a nicely shaped loaf. Don’t press down too firmly; we want to keep the batter light and airy.
Step 9: Time for the oven! Place the loaf pan in the preheated oven and bake for about 45 minutes to an hour. The exact baking time can vary quite a bit, especially if you’re using frozen berries. You’ll know it’s ready when the top looks set and is springy to the touch. A toothpick inserted into the center of the loaf, avoiding any berry pockets, should come out with just a few moist crumbs attached, not wet batter. If the top starts to brown too quickly, you can loosely tent the pan with aluminum foil about halfway through baking.
Step 10: Once baked, carefully remove the loaf pan from the oven. Let the raspberry bread cool in the pan for about 15 minutes. This resting period is important for the structure of the bread. After 15 minutes, gently turn the loaf out onto a wire cooling rack to cool completely before you slice and serve it. Patience now will pay off with perfect slices later!
Chef’s Tips for a Perfect Result
- Use room temperature ingredients: Especially for the egg and buttermilk, this helps them incorporate more smoothly into the batter, leading to a more tender crumb.
- Don’t overmix the batter: A few lumps are good! Overmixing develops the gluten in the flour too much, which can result in a tough, dense loaf.
- Lightly coat berries in flour: This classic technique helps suspend the raspberries in the batter, ensuring you get bursts of fruit throughout the bread, not just at the bottom.
- Monitor the crust: If the top of your bread starts browning too quickly before the center is cooked, loosely tent the loaf pan with aluminum foil. This protects the crust while allowing the inside to finish baking.
- Use a mix of fresh and frozen raspberries: While fresh is often preferred for flavor, a mix can be delightful. If using mostly frozen, expect a longer bake time.
- Test for doneness carefully: When inserting a toothpick, try to aim for a section of cake rather than a berry. Moist crumbs are fine, but wet batter means more baking time is needed.
Variations and Substitutions
Fruity Twists
- Other Berries: Swap some or all of the raspberries for blueberries, chopped strawberries, or even a mix of berries. They’ll offer slightly different flavor profiles and textures.
- Lemon Zest: Add the zest of one lemon to the dry ingredients for a bright, citrusy kick that beautifully complements the raspberries.
Dietary Adjustments
- Gluten-Free Alternative: Use a good quality gluten-free all-purpose flour blend in place of the regular flour. You might need to add a pinch more xanthan gum if your blend doesn’t contain it, and the texture might be slightly different.
- Dairy-Free Option: Substitute the buttermilk with a dairy-free milk (like almond or soy) mixed with 1 teaspoon of lemon juice or white vinegar and let it sit for 5 minutes. Use a dairy-free butter substitute for the melted butter. This will yield a slightly different richness but still be delicious.
Sweetness and Texture
- Maple Glaze: Drizzle a simple glaze made from powdered sugar and maple syrup over the cooled bread for an extra touch of sweetness.
- Nutty Addition: Fold in ½ cup of chopped toasted walnuts or pecans along with the raspberries for a delightful crunch and nutty flavor.
How to Serve and Pair
This Best Raspberry Bread is a star on its own, but it’s also wonderful with a few simple accompaniments. For breakfast or brunch, a light dusting of powdered sugar offers a classic touch. It’s also divine served warm with a smear of butter; the heat melts it slightly into the moist crumb, creating a truly comforting experience. A dollop of sweetened whipped cream or a spoonful of vanilla yogurt makes it feel a bit more decadent, perfect for an afternoon treat.
For a more dessert-like experience, consider serving it with a scoop of vanilla bean ice cream or a light raspberry sauce. This bread pairs wonderfully with a cup of hot tea, a smooth latte, or even a glass of cold milk. It’s an ideal treat for a lazy weekend morning, a welcomed addition to any potluck, or a simple yet elegant offering for friends dropping by unexpectedly.
Storage and Reheating
Refrigerator
To keep your raspberry bread fresh for longer, store it in an airtight container or wrap it tightly in plastic wrap or foil. It will stay delicious for up to 4-5 days in the refrigerator. This option is great if you live in a warm climate or prefer your bread slightly chilled.
Freezer
For long-term storage, this bread freezes beautifully. Once completely cooled, wrap the loaf tightly in plastic wrap, then in aluminum foil, or place it in a heavy-duty freezer bag. It can be stored in the freezer for up to 3 months. Freezing whole or in pre-sliced portions both work well.
Room Temperature
The bread is best stored at room temperature for up to 2-3 days, especially if you plan to eat it within that timeframe. Keep it in an airtight container or a bread box to maintain its moisture and prevent it from drying out too quickly. This is ideal for immediate enjoyment.
Reheating
If your bread has been refrigerated or frozen, reheating can bring back its fresh-baked warmth. For a slice, a few seconds in the microwave or a short time in a toaster oven (about 300°F or 150°C for 5-10 minutes) works wonderfully. If reheating a whole loaf from chilled, wrap it in foil and warm it in a 300°F (150°C) oven for about 15-20 minutes, or until heated through. Avoid overheating, which can make the texture dry.
Nutritional Values
- Calories: Approximately 326 kcal per serving
- Protein: Approximately 6.6g per serving
- Carbohydrates: Approximately 44.8g per serving
- Fat: Approximately 13.6g per serving
- Fiber: Approximately 2.5g per serving
Approximate values. Nutrition information is automatically calculated and should be used as an estimation.
Frequently Asked Questions (FAQ)
Can I swap the raspberries for other fruits like blueberries?
Yes, you can absolutely swap raspberries for other berries like blueberries, blackberries, or even chopped strawberries. The texture and flavor will vary slightly, but it will still make a delicious bread.
How do I know when The Best Raspberry Bread is perfectly baked?
Your raspberry bread is done when the top is golden brown and appears set. It should feel springy to the touch, and a toothpick inserted into the center (avoiding berries) should come out with moist crumbs, not wet batter.
My bread sank in the middle, what went wrong?
A sinking center usually means the bread was underbaked or the leavening agents (baking soda) were old. Overmixing the batter can also contribute to a dense, sunken loaf. Ensure your baking soda is fresh and be gentle when combining ingredients.
Can I prepare the batter for this raspberry bread the night before?
While this quick bread is best baked fresh, you can prep the dry ingredients and wet ingredients separately the night before. Combine them and add the berries just before baking the next morning for the freshest results.
What’s the best way to customize this raspberry bread recipe?
You can customize this bread by adding lemon zest for brightness, a sprinkle of streusel topping, or a drizzle of simple glaze once cooled. Even adding a handful of chopped nuts can offer a delightful textural contrast.
Conclusion
The Best Raspberry Bread is a wonderfully moist, tender loaf bursting with bright, fruity flavor. It’s simple to make and always a crowd-pleaser, perfect for any occasion. Give it a try for yourself and discover why its signature sweet-tart combination makes it utterly irresistible.
Print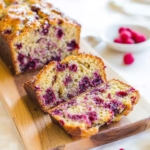
The Best Raspberry Bread
- Prep Time: 10 minutes
- Cook Time: 45 minutes
- Total Time: 55 minutes
- Yield: 1 loaf 1x
- Category: Dessert
- Method: Baking
- Cuisine: American
- Diet: Vegetarian
Description
The Best Raspberry Bread is ultra soft, moist, and loaded with juicy raspberries in every bite, making it the perfect sweet quick bread for breakfast or dessert.
Ingredients
- 2 cups + 4 tablespoons all-purpose flour, divided
- 3/4 cup light brown sugar, packed
- 1/4 cup granulated sugar
- 1 teaspoon baking soda
- Pinch of salt
- 1/4 cup unsalted butter, melted
- 1 large egg
- 3/4 cup buttermilk
- 1/4 cup canola or vegetable oil
- 2 teaspoons vanilla extract
- 10 to 12 ounces raspberries
Instructions
1. Preheat the oven to 350°F and grease a 9×5-inch loaf pan with floured cooking spray or butter and flour.
2. In a large bowl, whisk together 2 cups plus 2 tablespoons flour, brown sugar, granulated sugar, baking soda, and salt.
3. In a microwave-safe bowl, melt the butter and allow it to cool slightly.
4. Whisk the egg, buttermilk, oil, and vanilla extract into the melted butter until combined.
5. Pour the wet ingredients into the dry ingredients and stir gently until just combined without overmixing.
6. In a separate bowl, toss the raspberries with the remaining 2 tablespoons flour.
7. Fold the raspberries gently into the batter.
8. Transfer the batter into the prepared loaf pan and smooth the top lightly.
9. Bake for 45 minutes to 1 hour, or until the center is set and a toothpick inserted comes out clean or with a few moist crumbs.
10. If the top browns too quickly, tent loosely with foil during baking.
11. Allow the bread to cool in the pan for 15 minutes before transferring to a wire rack to cool completely before slicing.
Notes
Fresh raspberries are recommended for the best texture, though frozen raspberries can also be used.
Coating the raspberries in flour helps prevent them from sinking during baking.
Store the bread airtight at room temperature for up to 1 week or freeze for up to 6 months.
Nutrition
- Serving Size: 1 slice
- Calories: 326
- Sugar: 23g
- Sodium: 169mg
- Fat: 14g
- Saturated Fat: 5g
- Unsaturated Fat: 8g
- Trans Fat: 0g
- Carbohydrates: 45g
- Fiber: 3g
- Protein: 5g
- Cholesterol: 87mg


