
Peanut Butter Lasagna is an incredibly decadent, no-bake dessert that has become a fast favorite in so many kitchens. It’s the kind of treat that looks impressive and tastes even better, bringing together the irresistible combination of creamy peanut butter, rich chocolate, and a crisp cookie crust. It feels like such a special occasion dessert, yet it comes together with surprising ease, making it perfect for those moments when you want to impress without a lot of fuss.
We’ve all got those go-to desserts that become legendary in our homes, right? This Peanut Butter Lasagna is definitely one of those for me. It’s inspired by the classic chocolate lasagna but gets a delightful twist with the addition of luscious peanut butter. Imagine layers of smooth peanut butter filling, a rich chocolate pudding, all nestled on a buttery Oreo crust. It’s a delightful dance of textures and flavors that I think you’ll absolutely love.
What is Peanut Butter Lasagna?
Peanut Butter Lasagna is best described as a rich, layered dessert that requires no baking, making it a dream for busy home cooks or for warm weather entertaining. It’s essentially a no-bake cheesecake-style dessert that pays homage to the popular chocolate lasagna, but with a prominent peanut butter flavor profile. The construction is usually a no-bake cookie crust, followed by a creamy, dreamy peanut butter filling, usually made with cream cheese and whipped topping, then a layer of chocolate pudding, and finally, a fluffy topping, often more whipped topping, adorned with peanut butter cups and chips.
While the exact origins can be a bit murky, layered desserts like this are popular in American home cooking, often appearing at potlucks and family gatherings. The genius of it lies in its simplicity and the crowd-pleasing flavor combination. It’s a dessert that evokes comfort and happy memories, and transforming a beloved chocolate dessert into a peanut butter lover’s paradise is a stroke of genius that always gets rave reviews.
Reasons to Try Peanut Butter Lasagna
If you’re looking for a dessert that’s sure to be a showstopper without demanding hours in the kitchen, this Peanut Butter Lasagna is it. The biggest draw is that it’s a no-bake recipe, meaning no oven required! This is a lifesaver during hot summer months or when your oven is already occupied with other dishes. Plus, the anticipation of letting it chill and set is almost as sweet as the first bite, allowing all the flavors to meld into perfection.
It’s wonderfully versatile, too. Whether you’re a beginner baker who wants to build confidence or a seasoned pro looking for a quick but impressive dessert, this recipe is incredibly forgiving and rewarding. It’s perfect for birthdays, holidays, or just a spontaneous weekend treat after a good family meal. The combination of peanut butter and chocolate is universally loved, making it a guaranteed hit with kids and adults alike. It’s simply a delightful way to bring joy to the table.
Ingredients Needed to Make Peanut Butter Lasagna
To create this delightful layered dessert, you’ll need a few key components that come together beautifully. Don’t worry, most of these are pantry staples or easily found at your local grocery store. Having everything measured out and ready to go makes the assembly process a breeze, and before you know it, you’ll have a stunning dessert ready to chill.
- For the Crust:
- 36 Oreo cookies (about 3 cups of crumbs)
- ⅓ cup unsalted butter, melted
- For the Peanut Butter Layer:
- 8 ounces cream cheese, softened to room temperature
- 1 cup creamy peanut butter (use your favorite brand, classic is best)
- 1 cup powdered sugar, sifted to avoid lumps
- ¼ cup milk (whole milk recommended for richness)
- 1 ½ cups whipped topping, thawed (like Cool Whip or homemade)
- For the Chocolate Layer:
- 2 boxes instant chocolate pudding mix (3.4 ounces each, 4-serving size)
- 2 ¾ cups milk
- For the Topping:
- Additional whipped topping, for layering and topping
- 1 Mini Reese’s Peanut Butter Cups, chopped (or your favorite peanut butter candy)
- Peanut butter chips, for garnish
- Chocolate syrup, optional for drizzling
Instructions to Make Peanut Butter Lasagna – Step by Step
Putting together this Peanut Butter Lasagna is a straightforward process that builds flavor and texture with each layer. As you prepare each component, you can almost feel the excitement build, knowing the delicious result that awaits. It’s a fun recipe to assemble, and even better to share.
Step 1:
Begin by preparing the crust, the foundation of our flavorful lasagna. Take your 36 Oreo cookies and place them into a food processor. Pulse them until they are very finely crushed, resembling coarse sand. This ensures a nice, even base that holds together well. In a separate bowl, combine the finely crushed Oreos with the ⅓ cup of melted butter. Stir everything together until all the cookie crumbs are moistened by the butter, creating a texture similar to wet sand. Gently press this mixture evenly into the bottom of a 9×13 inch baking dish or a comparable glass dish. Use the bottom of a measuring cup or your hands to create a compact, flat layer. Once pressed in, place the dish into the freezer to chill and firm up while you move on to the next delicious layer.
Step 2:
Now, let’s create that irresistible peanut butter layer. In a medium-sized mixing bowl, combine the 8 ounces of softened cream cheese, 1 cup of creamy peanut butter, and ¼ cup of milk. Using an electric mixer on a medium speed, beat these ingredients together until they are smooth and fluffy. Scrape down the sides of the bowl as needed to ensure everything is well incorporated. Next, gradually add the 1 cup of sifted powdered sugar to the cream cheese mixture. Continue mixing until it’s fully combined and the mixture is light and airy. Finally, gently fold in the 1 ½ cups of thawed whipped topping until just combined. Be careful not to overmix, as this can deflate the fluffiness. Carefully spread this creamy peanut butter mixture evenly over the chilled Oreo crust in your baking dish. Once spread, return the dish to the freezer for about 10-15 minutes to allow this layer to firm up slightly before adding the next component.
Step 3:
It’s time to prepare the luscious chocolate pudding layer. In a separate bowl, combine both boxes of the instant chocolate pudding mix (each 3.4 ounces) with 2 ¾ cups of milk. Whisk these together vigorously until the pudding begins to thicken. It’s important to note that you’re using less milk than typically suggested on the pudding box; this is deliberate to ensure the pudding is nice and thick, perfect for layering and setting properly. Once the pudding has reached a thickened consistency, carefully spread it evenly over the chilled peanut butter layer. Smooth the top gently with a spatula. After spreading the pudding, place the entire dish into the refrigerator to chill and allow the pudding layer to set for at least 5-10 minutes. This ensures it’s firm enough to support the topping.
Step 4:
We’re in the home stretch for assembling this delightful Peanut Butter Lasagna! Once the chocolate pudding layer has set in the refrigerator, it’s time for the finishing touches. Gently dollop or spread additional whipped topping over the set chocolate pudding layer. You can create a smooth layer or opt for decorative swirls, depending on how fancy you want to get! Next, sprinkle the chopped Mini Reese’s Peanut Butter Cups evenly over the whipped topping. Follow this with a generous scattering of peanut butter chips across the top. If you’re a chocolate syrup fan, this is where you can drizzle it over the entire dessert for an extra touch of indulgence. Cover the dish loosely with plastic wrap or a lid, ensuring the topping isn’t smushed.
Step 5:
Finally, and this is perhaps the most crucial step for its deliciousness, allow the Peanut Butter Lasagna to chill thoroughly in the refrigerator. It needs at least 3 hours, but overnight is even better as it allows all the flavors to meld together beautifully and the layers to fully set. When you’re ready to serve, slice it into squares using a sharp knife, wiping the knife clean between cuts for neat portions. The chilling time is essential for achieving those distinct, clean layers and the perfect creamy texture.
Chef’s Tips for a Perfect Result
- Ensure your cream cheese is truly softened to room temperature; cold cream cheese will result in a lumpy peanut butter layer.
- For the crust, don’t over-process the Oreos into a fine powder; a slightly coarser crumb gives a better texture.
- When mixing the pudding, use your whisk vigorously to incorporate air and ensure there are no lumps of pudding mix.
- Thaw your whipped topping completely but don’t let it become watery; a slightly softened but still airy consistency incorporates best.
- Chill the dessert for the full recommended time. Patience is key to perfectly set layers in this no-bake treat.
- For extra flavor, you can mix a tablespoon or two of peanut butter into the whipped topping for the final topping layer.
Variations and Substitutions
Gluten-Free Alternative
Replace the Oreo cookies in the crust with gluten-free chocolate sandwich cookies. The texture might be slightly different, but the flavor will remain similar.
Dairy-Free Option
Use dairy-free cream cheese and a plant-based milk for the peanut butter layer. For the whipped topping, opt for a coconut-based or other dairy-free whipped topping. Use dairy-free chocolate pudding mix.
Nut-Free Version
For a nut-free approach, substitute the peanut butter with a sunflower seed butter or a tahini for a similar creamy texture. Ensure your chocolate sandwich cookies are nut-free as well.
Cookie Crust Swap
Don’t have Oreos? graham crackers or chocolate wafer cookies can be used for the crust. Adjust the butter amount slightly if needed, as their density can vary.
Rich Chocolate Kick
For an even richer chocolate flavor in the pudding layer, use a dark chocolate instant pudding mix instead of regular chocolate.
How to Serve and Pair
This Peanut Butter Lasagna is a decadent dessert that shines on its own. Serve it chilled, cut into generous squares, allowing the beautiful layers to be visible on each plate. A small dollop of extra whipped topping or a few extra chopped peanut butter cups on the side can elevate the presentation. It’s absolutely perfect for dessert nights, potlucks, holidays, or any gathering where you want to treat your guests to something truly special. For a truly spectacular pairing, a tall glass of cold milk or a rich coffee complements the sweetness beautifully.
Storage and Reheating
Refrigerator
Store any leftover Peanut Butter Lasagna in an airtight container or tightly covered with plastic wrap in the refrigerator. It will keep well for up to 3 to 4 days. The flavors tend to deepen and meld even more beautifully over time, so the leftovers are often just as delicious, if not more so, on the second day.
Freezer
While this dessert is best enjoyed fresh, you can freeze it for longer storage if needed. It’s best to freeze individual portions or the entire dish before it’s fully topped with whipped cream if you plan to freeze it for more than a week. Wrap tightly in plastic wrap and then in foil to prevent freezer burn. It can be stored in the freezer for up to 1-2 months. Thaw overnight in the refrigerator before serving.
Room Temperature
Because this dessert contains cream cheese and pudding, it is not recommended to leave it at room temperature for extended periods. It should remain refrigerated to maintain its texture and food safety, especially once assembled and chilled.
Reheating
This is a no-bake dessert, so reheating isn’t applicable. However, if you’ve frozen portions and they are very cold, allow them to sit at room temperature for about 15-20 minutes to soften slightly for the best creamy texture. If serving directly from the refrigerator, ensure it has had adequate chilling time so the layers are firm.
Nutritional Values
- Calories: 471
- Protein: 11g
- Carbohydrates: 49g
- Fat: 27g
- Saturated Fat: 11g
- Fiber: 2g
- Sugar: 32g
Approximate values.
Frequently Asked Questions (FAQ)
Can I substitute the peanut butter in this recipe?
Yes, you can substitute creamy peanut butter with another nut butter like almond butter or cashew butter, or a seed butter like sunflower seed butter if allergies are a concern. The flavor will change slightly, but the creamy texture will be similar.
How do I know when the Peanut Butter Lasagna is done setting?
The dessert is done setting when all the layers are firm to the touch and hold their shape when sliced. It should be mostly solid, with the pudding layer being fully set and not jiggly.
My peanut butter layer is lumpy, what can I do?
Lumpy peanut butter layers usually happen when the cream cheese isn’t fully softened. For future attempts, ensure your cream cheese is at room temperature before mixing. If it’s already lumpy, you can try beating it longer, but it may not achieve the perfect smoothness.
Can I prepare this Peanut Butter Lasagna a day in advance?
Absolutely. This Peanut Butter Lasagna is actually best made a day in advance. This allows the flavors to meld, and the layers to fully set, resulting in a superior texture and taste.
What’s the best way to customize this Peanut Butter Lasagna for a party?
For a party, you can customize the topping with different candies like chopped Snickers bars or even a drizzle of caramel sauce. Cutting it into individual servings in clear cups can also be a fun presentation for guests.
CONCLUSION
This Peanut Butter Lasagna is a truly spectacular, no-bake dessert that’s almost impossibly rich and delightfully creamy. It’s the perfect treat for any occasion, and I wholeheartedly encourage you to give it a try; you won’t regret it! The irresistible combination of peanut butter, chocolate, and a crunchy cookie crust is what makes this dessert incredibly special and utterly unforgettable.
Print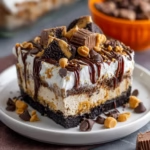
Peanut Butter Lasagna: The No-Bake Dessert You Need
- Prep Time: 20 minutes
- Cook Time: 0 minutes
- Total Time: 3 hours 20 minutes
- Yield: 12 servings 1x
- Category: Dessert
- Method: No-Bake
- Cuisine: American
- Diet: Vegetarian
Description
Peanut Butter Lasagna is a creamy no-bake layered dessert with an Oreo crust, fluffy peanut butter filling, chocolate pudding, and candy toppings.
Ingredients
- 36 Oreo cookies
- 1/3 cup melted butter
- 8 ounces cream cheese, softened
- 1 cup creamy peanut butter
- 1 cup powdered sugar
- 1/4 cup milk
- 1 1/2 cups whipped topping
- 2 boxes instant chocolate pudding mix, 3.4 ounces each
- 2 3/4 cups milk
- Whipped topping, for topping
- Mini Reese’s Peanut Butter Cups, chopped
- Peanut butter chips
- Chocolate syrup, optional
Instructions
1. Finely crush the Oreo cookies in a food processor. Stir in the melted butter.
2. Press the Oreo mixture into a 9×13-inch pan or glass dish. Place in the freezer while preparing the peanut butter layer.
3. With a mixer on medium speed, beat the cream cheese, milk, and peanut butter until fluffy.
4. Slowly add the powdered sugar, then gently fold in the whipped topping.
5. Spread the peanut butter layer over the Oreo crust. Place in the freezer while preparing the chocolate layer.
6. In a bowl, mix both boxes of chocolate pudding mix with 2 3/4 cups milk until thickened.
7. Spread the pudding over the peanut butter layer. Refrigerate for about 5 minutes to set slightly.
8. Top with whipped topping, chopped Reese’s Peanut Butter Cups, peanut butter chips, and chocolate syrup if desired.
9. Refrigerate for at least 3 hours before slicing and serving.
Notes
Use less milk than the pudding box calls for so the chocolate layer stays thick enough to slice.
Keep refrigerated until ready to serve.
Nutrition
- Serving Size: 1 serving
- Calories: 471
- Sugar: 32g
- Sodium: 424mg
- Fat: 27g
- Saturated Fat: 11g
- Unsaturated Fat: 16g
- Trans Fat: 0g
- Carbohydrates: 49g
- Fiber: 2g
- Protein: 11g
- Cholesterol: 38mg


