No Bake Mango Ice Cream Cheesecake. Oh, this dessert holds a special place in my heart. It all started on a sweltering summer afternoon, the kind where the air feels thick and heavy, and all you can think about is something cool, sweet, and utterly refreshing. I remember fumbling through cookbooks, searching for an escape from the heat, when the idea of a mango cheesecake, but *no bake*, struck me. It felt like a little bit of magic, taking a classic dessert and making it effortlessly summery. This No Bake Mango Ice Cream Cheesecake is that dream come true – creamy, bursting with tropical sunshine, and surprisingly simple to whip up, perfect for those lazy days when the kitchen feels more like an oven.
I’ve always loved how certain flavors can instantly transport you. For me, mango is pure sunshine, a taste of faraway beaches and breezy afternoons. Combining that vibrant fruit with the rich, indulgent texture of cheesecake, all without even turning on the oven? It’s a recipe for pure joy. This creation is for anyone who loves a good dessert but prefers less fuss and more flavor, especially when that flavor is a luscious, sweet mango. It’s a dessert that tells a story, a story of simple pleasures and the magic that happens when you bring a few good ingredients together.
What is No Bake Mango Ice Cream Cheesecake?
At its core, this No Bake Mango Ice Cream Cheesecake is a delightful fusion of creamy cheesecake and vibrant mango flavor, achieved with the clever use of mango ice cream. Unlike traditional cheesecakes that require baking and cooling, this version sets beautifully in the refrigerator, making it an ideal choice for warmer weather or when you need a dessert that’s a little less hands-on. The magical ingredient, mango ice cream, not only infuses the cheesecake with an intense, authentic mango taste but also contributes to its incredibly smooth, melt-in-your-mouth texture. It’s a streamlined approach to a beloved dessert, bringing a tropical twist that feels both familiar and excitingly new.
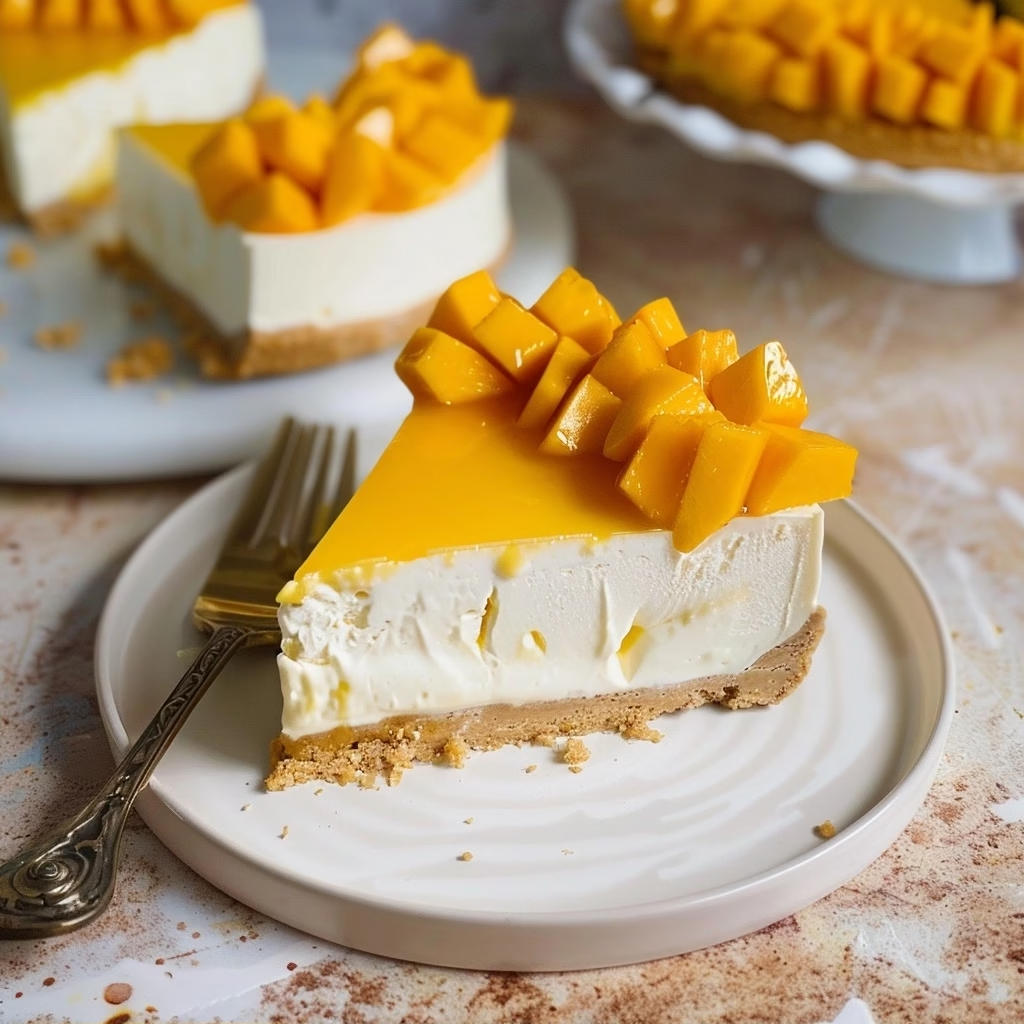
Imagine a crisp, buttery crust forming the base, cradling a filling that’s impossibly smooth, wonderfully tangy from the cream cheese, and bursting with the sweet, tropical notes of ripe mango. It’s a delightful contrast of textures and flavors. Some versions even include an optional, intensely flavored mango pulp cream layer, adding another dimension of fruity goodness. This dessert is born from a desire for effortless indulgence, a way to capture the essence of summer in a chilled, satisfying treat that feels special enough for any occasion.
Reasons to Try No Bake Mango Ice Cream Cheesecake
Why should you absolutely try making this No Bake Mango Ice Cream Cheesecake? For starters, it’s unbelievably easy. If you’ve ever felt a little intimidated by baking cheesecakes, this recipe is your gateway. You skip the water baths, the worry about cracks, and the long baking times. It’s a dessert that welcomes beginners and seasoned bakers alike, promising a fantastic result with minimal stress. Plus, the flavor is simply out of this world – a pure, concentrated taste of mango that’s both bright and luxurious.
This cheesecake is a celebration of ease and flavor, perfect for busy weeknights when you crave a homemade treat or for summer gatherings when you don’t want to be tied to the oven. It’s also incredibly versatile, looking beautiful with simple fresh mango toppings or feeling a touch more elaborate with whipped cream. It’s ideal for anyone who loves tropical fruits, appreciates a good no-bake dessert, or simply wants to create a memorable, delicious treat that brings smiles all around. This is a dessert that tastes like sunshine and feels like a holiday.
Ingredients Needed to Make No Bake Mango Ice Cream Cheesecake
- For the Crust:
- 200g Nilla Wafers or Graham Crackers (about 1 ½ cups finely crushed cookies)
- 5 tablespoons unsalted butter, melted (about 70g)
- For the Mango Cheesecake Filling:
- 24 oz cream cheese, softened to room temperature (about 3 blocks of 8oz cream cheese or 680g)
- 28 fl oz mango ice cream, fully melted at room temperature (about 3 ½ cups or 700g)
- 6 teaspoons gelatin powder
- 6 tablespoons ice-cold water (about 90g)
- For the Mango Pulp Cream Layer (Optional):
- 1 cup mango ice cream, fully melted at room temperature (about 210g)
- 1 cup mango pulp (about 230g), cooked down to ½ cup
- 2 teaspoons gelatin powder
- 2 tablespoons ice-cold water (about 30g)
- For Decoration (Optional but Recommended):
- 1-2 fresh mangoes, peeled and cubed
- 1 cup heavy whipping cream, chilled
Instructions to Make No Bake Mango Ice Cream Cheesecake – Step by Step
Step 1: Prepare Your Pan and Crust. First, gather your baking tools. You’ll need a 9-inch springform pan. Take a little softened butter and brush the inside of the pan, making sure to get all the way up the sides. Then, cut a circle of parchment paper to fit the bottom perfectly and line it with a strip of parchment paper along the entire edge of the pan. This little bit of prep ensures your beautiful cheesecake will slide out cleanly later. Now, let’s make that crunchy base. In your food processor, blitz the Nilla wafers or graham crackers until they’re fine crumbs, like sand. Add the melted butter to the crumbs and pulse a few more times. This mixture should feel like damp sand, just holding together when you squeeze a bit. Pour these delicious crumbs into your prepared pan. Use the back of a measuring cup or a flat-bottomed glass to press them down firmly and evenly across the bottom. This creates a solid foundation for our creamy filling. Pop the pan into the refrigerator to chill and set while you move on to the star of the show: the cheesecake filling.
Step 2: Create the Creamy Mango Cheesecake Filling. Grab your softened cream cheese – it’s important that it’s at room temperature so it blends smoothly without lumps. Place it in a large mixing bowl. Using an electric mixer, either a hand mixer or a stand mixer with a paddle attachment, whip the cream cheese until it’s wonderfully creamy and smooth. Take your time here, and don’t forget to scrape down the sides of the bowl a couple of times to ensure there are no hidden lumps. Next, add your fully melted mango ice cream to the cream cheese. Pour it right in and whisk again on medium speed for about a minute or two. You’re looking for a smooth, slightly fluffy consistency, with everything beautifully combined. Again, scrape down the bowl midway to make sure every bit of cream cheese is incorporated into the luscious mango ice cream mixture. Be careful not to overmix at this stage, as we’re aiming for a smooth, not airy, texture.
Step 3: Bloom and Dissolve the Gelatin. Now, let’s get our gelatin ready. In a small bowl with a wide opening, pour in the ice-cold water. Sprinkle the gelatin powder evenly over the surface of the water. Let it sit undisturbed for about 5 to 10 minutes; you’ll see it absorb the water and thicken into a gel-like consistency – this is called ‘blooming.’ Once bloomed, gently stir it once. To dissolve it completely, you can use a microwave. Heat the bloomed gelatin in 15-second increments, stirring well after each burst, until it’s completely liquid and smooth with no lumps. Be patient, as you don’t want to overheat it. This ensures the gelatin will help our cheesecake set perfectly firm without any grainy texture.
Step 4: Combine Filling and Set the Base. It’s time to bring everything together. Carefully pour the dissolved, lump-free gelatin mixture into the bowl with your creamy mango cheesecake batter. Whisk it in gently but thoroughly until it’s just combined. You want to make sure it’s incorporated without overworking the mixture. Now, take your chilled crust out of the fridge. Gently pour the luscious cheesecake filling over the set crust. You can give the pan a gentle shake back and forth to help the filling spread evenly and create a smooth surface, or use a spatula to gently guide it. Once it looks nice and even, place the entire pan back into the refrigerator. Let it chill undisturbed for at least 2 hours. This initial chill time is crucial for the cheesecake to start firming up before we add the optional layer.
Step 5: Prepare the Optional Mango Pulp Cream Layer. If you’re opting for this extra layer of mango goodness, let’s prepare it. In a small saucepan, combine the mango pulp. Cook it over low heat, stirring occasionally, until it has reduced by about half. This concentrates its flavor and thickens it nicely. Once reduced, remove it from the heat and let it cool slightly for about 5 minutes. In a separate bowl, mix this slightly cooled, concentrated mango pulp with the remaining cup of melted mango ice cream. Now, prepare another small batch of gelatin for this layer. In a small bowl, bloom and then dissolve 2 teaspoons of gelatin in 2 tablespoons of ice-cold water, using the same microwave method as before until it’s smooth and lump-free.
Step 6: Add the Second Layer and Final Set. Once your gelatin mixture is ready, add it to the mango pulp and ice cream mixture. Whisk everything together until well combined and smooth. At this point, your base cheesecake layer should have been chilling in the fridge for at least 2 hours and should feel mostly set. You can test this by carefully pouring just a tiny spoonful of the pulp mixture onto the surface of the cheesecake; if it sits on top and doesn’t sink in or mix, it’s ready. Gently and slowly pour the entire mango pulp cream mixture over the set cheesecake layer. Try to pour it evenly across the surface. Once that luscious second layer is in place, cover the pan loosely (plastic wrap is fine, just don’t let it touch the surface) and return the entire cheesecake to the refrigerator. This is where the real magic happens – it needs to set completely. For the best, firmest result, allow it to chill overnight, or for at least 12 hours.
Step 7: Decorate and Serve Your Masterpiece. The moment of truth has arrived! Your no-bake mango cheesecake should be magnificently set after its long chill. First, prepare your beautiful garnishes. Cube your fresh mangoes into bite-sized pieces, and whip the cold heavy cream until it forms stiff peaks – this creates a lovely, stable topping. When you’re ready to serve, carefully remove the springform pan. Undo the clasp on the pan and gently lift the ring away. Then, very carefully peel off all the strips of parchment paper from the sides of the cheesecake. If any stuck, a gentle nudge should release it. You can then carefully slide the cheesecake off the bottom parchment circle onto a pretty serving stand or platter. Now for the fun part of decorating! Pipe swirls of whipped cream around the edges of the cheesecake, or just dollop it on generously. Finally, arrange the fresh, juicy mango cubes artfully on top. Slice it into generous portions using a sharp knife dipped in hot water and wiped dry between cuts for the cleanest slices. Serve immediately and watch everyone’s eyes light up!
Chef’s Tips for a Perfect Result
- Ensure your cream cheese is truly at room temperature; cold cream cheese will lead to a lumpy filling.
- Use high-quality, creamy mango ice cream (not sorbet) for the best flavor and smooth texture.
- Don’t skip the gelatin blooming step; it’s crucial for a smooth, unset texture in your filling.
- Allow the cheesecake to set undisturbed overnight for optimal firmness and ease of slicing.
- For clean slices, use a sharp knife, dip it in hot water, and wipe it dry between each cut.
- If your mango ice cream is very soft, you might need to freeze the cheesecake for slightly longer before decorating.
Variations and Substitutions
-
Vegan No Bake Mango Cheesecake
- What to change: Replace cream cheese with vegan cream cheese, butter with vegan butter, and use a plant-based mango ice cream.
- Suggested substitute: Use vegan cream cheese, vegan butter, and a good quality vegan mango ice cream. For gelatin, use agar-agar powder, bloomed and cooked according to package directions.
- Impact: The texture might be slightly different, but the mango flavor will still be vibrant. Ensure your vegan ice cream is rich and creamy.
-
Gluten-Free Alternative
- What to change: Substitute the Nilla Wafers or Graham Crackers with gluten-free cookies or a blend of gluten-free oats and nuts.
- Suggested substitute: Use gluten-free graham crackers, almond flour or a combination of gluten-free oats and almond flour with melted butter.
- Impact: A slightly different texture on the crust, but the filling remains the same delicious mango cheesecake.
-
Other Tropical Fruit Flavors
- What to change: Swap the mango ice cream and pulp for other favorite tropical fruits.
- Suggested substitute: Use passion fruit, pineapple, or guava ice cream and pulp. Adjust sweetness as needed, as fruits vary in tartness.
- Impact: Creates a whole new tropical cheesecake experience, adapting the recipe to your preferred fruit.
How to Serve and Pair
This No Bake Mango Ice Cream Cheesecake is a star on its own, but a few thoughtful additions can elevate it further. Serve it chilled, directly from the refrigerator, ensuring it’s perfectly firm and refreshing. For a truly tropical presentation, arrange cubes of fresh, ripe mango around the edge of the cheesecake or on top of the whipped cream swirls. A few fresh mint leaves can add a pop of color and a hint of freshness. This cheesecake pairs beautifully with light, crisp white wines like a Sauvignon Blanc or a Moscato. For a non-alcoholic option, a cold glass of sparkling water with a squeeze of lime or a chilled coconut water is delightful. It’s perfect for any summer barbecue, birthday celebration, or a special dessert to brighten up an ordinary day. Imagine serving this at a tropical-themed party – it would be an absolute showstopper!
Storage and Reheating
Refrigerator Storage
This No Bake Mango Ice Cream Cheesecake is best stored in the refrigerator. Once set and removed from the springform pan, keep it covered tightly with plastic wrap or in an airtight container. It will stay fresh and delicious for up to 3 to 4 days. Ensuring it’s well-covered prevents it from absorbing other odors from your fridge and keeps the surface from drying out.
Freezer Storage
While this cheesecake is designed to be enjoyed fresh, you can freeze portions if you have leftovers. Wrap individual slices tightly in plastic wrap, then in foil, and store them in a freezer-safe container. It can be kept in the freezer for up to 1 month. Thaw frozen slices slowly in the refrigerator overnight for the best texture.
Room Temperature Storage
Due to the gelatin and ice cream base, this cheesecake is best kept chilled. It should not be left at room temperature for more than 2 hours, especially in warm environments, as the gelatin can start to soften and the cheesecake may lose its shape. Once served, any uneaten portions should be returned to the refrigerator promptly.
Reheating
Reheating is generally not necessary or recommended for this no-bake cheesecake, as it is meant to be served cold and chilled. If it has become too firm from being in the refrigerator for a while, simply let it sit at room temperature for about 15-20 minutes before slicing to soften slightly.
Nutritional Values
- Calories: Approximately 400-500 per serving (varies based on exact ingredients and portion size)
- Protein: 5-8g
- Carbohydrates: 40-50g
- Fat: 25-35g
- Fiber: 1-3g
Approximate values.
Frequently Asked Questions (FAQ)
Can I substitute the mango ice cream with other flavors?
You can certainly experiment with other creamy, rich ice cream flavors like passion fruit, coconut, or even a good vanilla bean ice cream. However, the unique creamy texture and intense mango flavor come from using actual mango ice cream, so results may vary.
How do I know if my no-bake cheesecake is set?
The cheesecake is set when the edges are firm and slightly pull away from the sides of the pan, and the center feels firm to a gentle touch. If you gently shake the pan, the entire cheesecake should move as one solid piece, not wobble excessively.
My cheesecake filling is lumpy, what went wrong?
Lumps in the filling usually mean the cream cheese wasn’t softened enough or the gelatin wasn’t fully dissolved. Ensure your cream cheese is completely at room temperature and re-dissolve any gelatin lumps very carefully before adding them to the mixture.
Can I make this cheesecake a day ahead of time?
Yes, this no-bake cheesecake is actually best made a day in advance. Allowing it to chill overnight ensures all the flavors meld beautifully and the filling achieves its perfect firm texture for slicing and serving.
What’s the best way to customize my mango cheesecake?
Beyond fresh mango and whipped cream, consider adding a drizzle of honey or passion fruit coulis, a sprinkle of toasted coconut flakes, or even some finely chopped pistachios for a beautiful contrast in color and crunch.
CONCLUSION
This No Bake Mango Ice Cream Cheesecake is a triumph of simplicity and flavor, offering a luxuriously creamy texture and a burst of tropical sunshine in every bite. It’s the perfect dessert for those seeking an effortless, impressive treat that doesn’t require turning on the oven. Give this delightful recipe a try and experience the irresistible charm of its vibrant mango essence – it’s a taste of paradise you can create right in your own kitchen.
Print
No Bake Mango Ice Cream Cheesecake
- Prep Time: 20
- Total Time: 60
- Yield: 8 servings 1x
- Category: desserts
- Method: No-Bake
- Cuisine: American Fusion
- Diet: Vegetarian
Description
A creamy, no-bake tropical cheesecake with a buttery crust, sweet mango ice cream filling, and tangy cream cheese layers. Perfect for summer, this effortless dessert combines rich flavors and a silky texture for a refreshing treat.
Ingredients
1 and 1/2 cups crushed graham crackers
1/4 cup melted butter
32 oz cream cheese, softened
1 cup sugar
1/2 cup sour cream
1 tsp vanilla extract
2 cups mango ice cream, softened
1/2 cup mango pulp (optional, for a fruity topping)
sprinkles or sliced mango for garnish (optional)
Instructions
Mix crushed graham crackers and melted butter. Press into a 9-inch springform pan.
In a bowl, beat cream cheese, sugar, sour cream, and vanilla until smooth.
Fold in half the softened mango ice cream. Spoon over crust and smooth.
Scoop remaining ice cream on top, then spread to cover. Freeze for 1 hour.
Refrigerate for 4-6 hours until firm. Serve chilled.
Notes
Chill the springform pan beforehand for easier assembling.
Use dairy-free alternatives for the crust and cream cheese for a vegan version.
Store leftovers in the refrigerator for 3-4 days.
Nutrition
- Serving Size: 1 slice
- Calories: 420
- Sugar: 25g
- Sodium: 200mg
- Fat: 28g
- Saturated Fat: 16g
- Carbohydrates: 38g
- Fiber: 1g
- Protein: 8g
- Cholesterol: 80mg


