Decadent Chocolate Mint Icebox Cake: An Easy No-Bake Dessert
Chocolate Mint Icebox Cake is one of those desserts that just feels like magic. It’s a rich, creamy, and intensely chocolatey treat with a refreshing hint of mint, all coming together with minimal effort. As someone who loves creating special moments in the kitchen, I find that dishes like this are perfect for those times when you want something truly impressive without spending hours baking. It’s the kind of cake that brings smiles all around the table, a little bit of cooled, sweet bliss that’s surprisingly simple to achieve.
This recipe is a favorite because it relies on the refrigerator (or freezer) to do most of the work, allowing flavors to meld and textures to soften into a delightfully cake-like consistency. It’s a testament to how simple ingredients, when combined thoughtfully, can create something truly spectacular. Whether you’re a seasoned baker or just starting your culinary adventure, this Chocolate Mint Icebox Cake is sure to become a go-to for any occasion, especially those warm-weather gatherings or after-dinner cravings.
What is Chocolate Mint Icebox Cake?
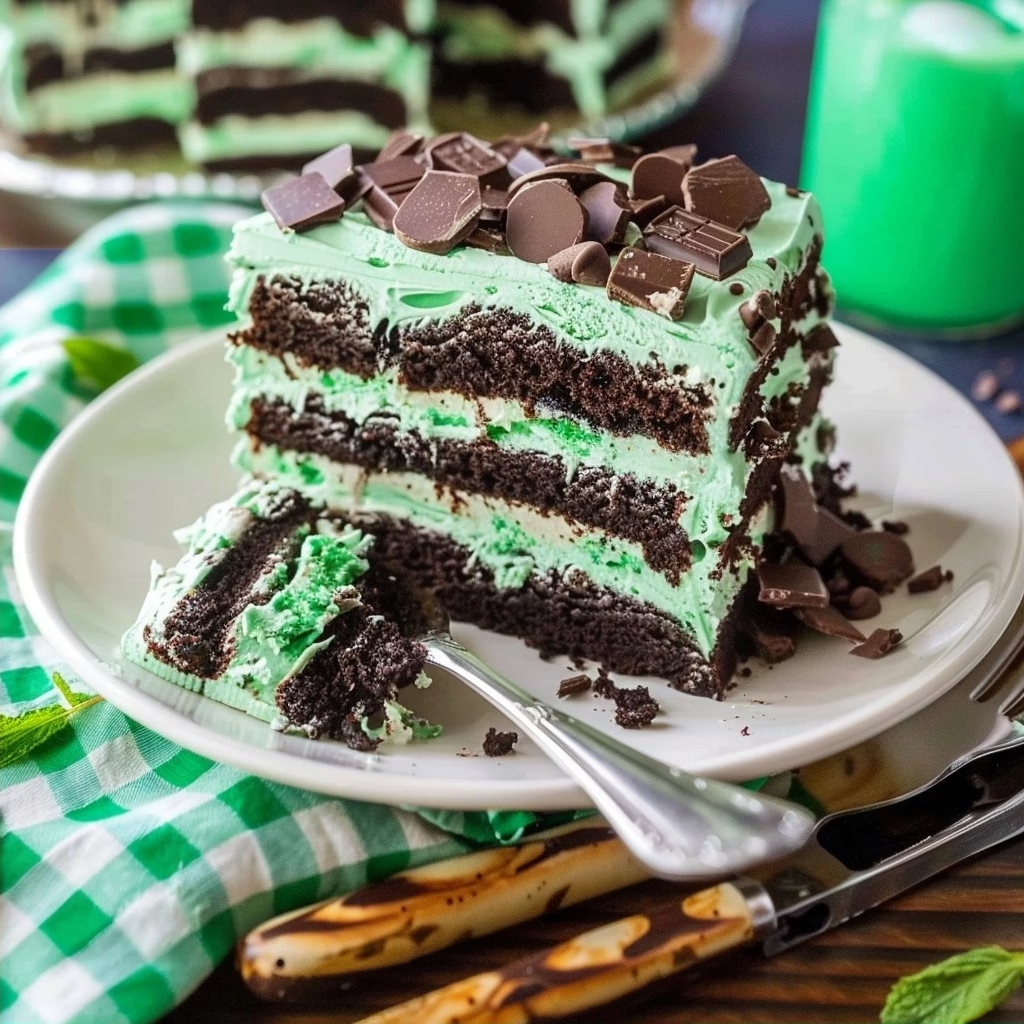
At its heart, a Chocolate Mint Icebox Cake is a no-bake dessert that transforms simple ingredients into a layered masterpiece. It typically features layers of cookies or wafers alternated with a chilled, sweetened cream filling. The magic happens as the cake rests, allowing the cookies to absorb moisture from the cream, softening them into a texture reminiscent of, well, cake! This particular version takes that classic concept and infuses it with the irresistible combination of rich chocolate and cool mint.
The beauty of an icebox cake lies in its simplicity and versatility. While traditional versions might use graham crackers or chocolate wafers, this recipe hones in on the delightful pairing of chocolate and mint, often using mint-flavored sandwich cookies as a base. The cool, creamy filling, enhanced with mint extract and sometimes a touch of green coloring for visual appeal, perfectly complements the chocolatey depth of the cookies and a finished topping. It’s an ideal dessert for those who adore the classic mint-chocolate flavor profile but prefer a fuss-free preparation.
Reasons to Try Chocolate Mint Icebox Cake
There are so many wonderful reasons to bring this Chocolate Mint Icebox Cake into your kitchen. First and foremost, it’s incredibly easy to make! With only a few steps and no oven required, it’s the perfect dessert for busy weeknights or when you’re hosting guests and want to maximize your time. The minimal prep means less stress and more enjoyment, both in the making and the devouring. Plus, who doesn’t love a dessert that gets better as it chills?
This cake is also a crowd-pleaser. The combination of chocolate and mint is a classic for a reason – it’s refreshing, decadent, and appeals to a wide range of palates. It’s perfect for family gatherings, summer potlucks, or even as a special treat to brighten a regular day. If you’re new to dessert making, this recipe is a fantastic starting point because it’s so forgiving and the results are always stunning. The cool, smooth texture and vibrant flavor make it an unforgettable experience.
Ingredients Needed to Make Chocolate Mint Icebox Cake
- 2 (18.71 ounce) packages mint sandwich cookies (like Mint Oreos)
- 4 cups heavy whipping cream (very cold)
- 4 tablespoons powdered sugar (sifted, for smoothness)
- 1 teaspoon pure vanilla extract
- 1 teaspoon mint extract (adjust to your preference)
- A few drops of green food coloring (optional, for a beautiful hue)
- 10-12 Andes mints (or similar chocolate mint candies), chopped, for topping
Instructions to Make Chocolate Mint Icebox Cake – Step by Step
Step 1: Prepare the Whipped Cream Filling
Begin by getting a large bowl, preferably chilled, ready for your whipped cream. Pour in the cold heavy whipping cream. Add the sifted powdered sugar, pure vanilla extract, and mint extract. Using an electric mixer (handheld or stand mixer with whisk attachment), start beating the cream on medium speed. Gradually increase the speed to high and continue whipping until stiff peaks form. This means that when you lift the beaters, the cream should hold its shape beautifully without drooping. If you’re adding green food coloring, this is the time to mix in a few drops until you achieve your desired shade of cool minty green.
Step 2: Layer the Cookies and Cream
Now, grab a 9×13 inch baking dish. Arrange the mint sandwich cookies in a single layer on the bottom of the dish. You might need to place them snugly side-by-side, and for the edges or corners, you can gently break some cookies to fill any gaps. Don’t worry about perfection here; it’s all part of the charm. Once the base layer of cookies is down, take about one-third of your glorious mint whipped cream and spread it evenly over the cookies, creating a smooth, luscious layer. This begins the transformation, truly.
Step 3: Continue Layering
Repeat the layering process for the second tier. Place another single layer of mint sandwich cookies directly on top of the whipped cream. Again, break cookies as needed to ensure a relatively even surface. Carefully spread another third of the mint whipped cream mixture over this cookie layer, making sure to get it close to the edges. This steady building of layers is key to the cake’s structure and its eventual cake-like quality as it chills.
Step 4: The Final Layers and Garnish
Finish off the cake by topping the second cream layer with your final layer of mint sandwich cookies. Gently press them down slightly if needed. Spread the remaining mint whipped cream over the top cookie layer, ensuring the entire surface is completely covered and smooth. This final blanket of cream is what will help soften the top cookies beautifully. For that extra touch of fanciness and a burst of minty chocolate flavor, sprinkle the chopped Andes mints evenly over the top of the whipped cream. This garnish not only looks lovely but adds a delightful crunch and flavor contrast.
Step 5: Chill to Perfection
This is where patience truly pays off! Cover the baking dish tightly with plastic wrap or aluminum foil. Place the entire dish into the refrigerator and let it chill for at least 8 hours, or preferably overnight. This crucial chilling time allows the cookies to soften considerably, absorbing the moisture from the whipped cream to achieve that signature tender, cake-like texture. It also gives all those wonderful mint and chocolate flavors time to meld together into a harmonious delight. Try to resist peeking!
Step 6: Slice and Serve
Once your Chocolate Mint Icebox Cake has had ample time to chill and set, it’s ready to be enjoyed. Carefully remove the plastic wrap. Using a sharp knife, slice the cake into individual portions. The texture should be firm yet tender, with distinct layers that have beautifully softened. Serve immediately and watch as your guests marvel at this delightful, no-bake creation. It’s especially refreshing when served slightly chilled, making it an ideal treat for warmer weather or any time you need a cool, sweet escape.
Chef’s Tips for a Perfect Result
- Use very cold heavy whipping cream and a chilled mixing bowl and whisk attachment for the best volume when whipping cream.
- Sifting the powdered sugar helps prevent any small lumps in the whipped cream, leading to a smoother texture.
- Don’t overmix the whipped cream once it reaches stiff peaks, as it can turn grainy or buttery.
- Break cookies strategically to fill gaps; a perfectly uniform layer isn’t necessary, as they will soften.
- The minimum chilling time is 8 hours, but an overnight chill ensures the cookies soften to their optimal cake-like consistency.
- For a more intense mint flavor, you can add an extra 1/4 teaspoon of mint extract, but be careful not to overpower the chocolate.
Variations and Substitutions
Vegan Option
To make this vegan, substitute the heavy whipping cream with a high-quality, full-fat coconut cream (chilled overnight and scoop out the solid part) or a vegan whipping cream alternative. Ensure your mint sandwich cookies are also vegan, as many varieties are. The Andes mints can be replaced with vegan chocolate chips or chopped vegan chocolate for the topping.
Gluten-Free Alternative
Look for gluten-free chocolate sandwich cookies that have a similar size and texture to traditional ones. Many brands now offer delicious gluten-free options that will work beautifully in this recipe. The rest of the ingredients are naturally gluten-free.
Low-Carb Version
This is trickier due to the cookies. For a low-carb twist, you might consider a base of crushed low-carb chocolate cookies or even a chocolate crust, topped with a sugar-free mint whipped cream. This would drastically alter the texture and experience but could cater to a lower-carbohydrate diet.
Budget Swap
Instead of specialty mint cookies, you could use regular chocolate sandwich cookies and add a touch more mint extract to the whipped cream to compensate. Regular chocolate chips or even shaved chocolate can be used instead of Andes mints for the topping if they’re more budget-friendly.
Different Extracts
Feel free to swap the mint extract for other complementary flavors like peppermint, a touch of almond extract, or even a hint of espresso powder in the whipped cream for a mocha-mint twist. Ensure you use extracts sparingly, as they are potent.
How to Serve and Pair
This Chocolate Mint Icebox Cake is a showstopper on its own, but presentation can elevate the experience. Serve it chilled, straight from the refrigerator. A slightly softened slice is heavenly. For a restaurant-style touch, consider serving with a dollop of extra whipped cream on the side or a sprinkle of finely chopped chocolate and mint leaves. This cake is perfect for summer barbecues, birthday parties, holiday gatherings (especially around St. Patrick’s Day or Christmas), or simply as a delightful end to a family dinner. It pairs wonderfully with a glass of cold milk or a warm cup of coffee.
Storage and Reheating
Refrigerator
Leftovers can be stored in the refrigerator, covered tightly with plastic wrap or in an airtight container, for up to 3 days. The cake will continue to soften slightly as it sits, so it’s best to consume it within the first couple of days for the best “cake-like” texture. Pressing plastic wrap directly onto the surface can help prevent a “crust” from forming on the whipped cream.
Freezer
This icebox cake can also be frozen. If you plan to freeze it, it’s best to let it chill in the refrigerator for at least 4-6 hours first to set up. Once firm, cover it very well with plastic wrap, followed by a layer of aluminum foil, or place it in a freezer-safe airtight container. It can be stored in the freezer for up to 1 month. When ready to serve after freezing, allow it to thaw in the refrigerator for at least 1-2 hours (as noted in the recipe) or longer as needed until it reaches your desired, soft texture.
Room Temperature
It is not recommended to leave this cake at room temperature for extended periods, especially given the dairy-based whipped cream filling. It should be kept chilled to maintain its texture and food safety. If it’s slightly thawed from the freezer, bring it back to the refrigerator to firm up before serving.
Reheating
Reheating is generally not necessary or recommended for this type of dessert, as it is meant to be served chilled and from its cold state after chilling or thawing. Attempting to reheat it would melt the whipped cream and alter the intended texture. If it has been frozen and thawed slightly too much, simply pop it back in the fridge to firm up again before serving.
Nutritional Values
- Calories: Approximately 295 per serving
- Protein: Approximately 2g per serving
- Carbohydrates: Approximately 8g per serving
- Fat: Approximately 29g per serving
- Fiber: Approximately 0g per serving
Approximate values. Nutritional content can vary based on specific ingredients used.
Frequently Asked Questions (FAQ)
Can I use a different type of cookie for this icebox cake?
Yes, you can absolutely use different cookies, but it will change the flavor profile. Regular chocolate sandwich cookies can be used, but you’ll want to ensure you add enough mint extract to the cream to give it that signature chocolate-mint taste. Vanilla wafers or even graham crackers are alternatives, though they offer a less intense chocolate flavor.
How do I know when the icebox cake is ready to slice and serve?
The cake is ready when it has chilled for at least 8 hours, ideally overnight. The cookies should have softened considerably, allowing the cake to be sliced cleanly with a tender, cake-like texture. If the cookies still feel too firm or crisp when you attempt to slice, it needs more chilling time to allow the moisture to penetrate.
My whipped cream isn’t forming stiff peaks, what did I do wrong?
The most common reasons for this are using cream that isn’t cold enough, or overmixing. Ensure your heavy whipping cream was properly chilled. Also, avoid overbeating once stiff peaks start to form; stop the mixer as soon as the peaks hold their shape. Using a chilled bowl and beaters can also help achieve better volume.
Can I make this Chocolate Mint Icebox Cake a day ahead of time?
Absolutely! In fact, making it a day ahead is highly recommended. The extended chilling time allows the flavors to meld beautifully and ensures the cookies are perfectly softened for that classic icebox cake texture. It’s a perfect make-ahead dessert for entertaining.
What are the best ways to customize or serve this icebox cake?
For a richer flavor, you can fold some mini chocolate chips or chopped mint candies into the whipped cream before layering. Garnishing with fresh mint leaves or a dusting of cocoa powder can also add visual appeal. Serving it with a raspberry coulis or some fresh berries can offer a nice tart contrast to the sweet, creamy cake.
CONCLUSION
This Chocolate Mint Icebox Cake is a testament to simple elegance, offering a wonderfully creamy and refreshing dessert without the fuss of baking. It’s the perfect make-ahead treat for any occasion, promising pure delight with every bite. That irresistible combination of cool mint and rich chocolate makes this cake a truly unforgettable experience.
Print
Decadent Chocolate Mint Icebox Cake
- Prep Time: 15
- Total Time: 240
- Yield: 8 servings 1x
- Category: desserts
- Method: Refrigeration
- Cuisine: American
- Diet: Vegetarian
Description
A no-bake dessert with layers of mint sandwich cookies and whipped cream filling, infused with cool mint and rich chocolate. Effortless to assemble and perfect for impressing guests.
Ingredients
18 mint sandwich cookies (like Andes)
2 cups heavy cream
1/4 cup powdered sugar
1 tablespoon pure mint extract
1/2 cup semi-sweet chocolate sauce (store-bought or homemade)
Optional: 1/4 cup crushed candy cane for topping
Instructions
Line a 9×5-inch loaf pan with plastic wrap
In a large bowl, whip cream, powdered sugar, and mint extract until stiff peaks form
Layer half the cookies in the pan
Spread half the whipped cream over the cookies
Repeat with remaining cookies and whipped cream
Pour chocolate sauce evenly over the top
Chill for at least 4 hours or freeze for 2 hours
Remove from pan, slice, and serve with optional crushed candy cane topping
Notes
Use any chocolate sauce of choice (halal-certified if needed)
Chill overnight for best results
Swap mint extract with 1/2 tsp peppermint oil if preferred
Toppings: crushed candy canes, mint leaves, or edible glitter
Nutrition
- Serving Size: 1 slice
- Calories: 420
- Sugar: 38g
- Sodium: 180mg
- Fat: 24g
- Saturated Fat: 15g
- Carbohydrates: 56g
- Fiber: 2g
- Protein: 4g
- Cholesterol: 75mg