Gluten-Free Pumpkin Scones are the ultimate cozy treat for those crisp mornings when you crave something warm, spiced, and comforting without any of the gluten. There is something truly magical about the way the aroma of cinnamon, ginger, and nutmeg fills the house while these golden beauties bake in the oven. For years, I struggled to find a gluten-free pastry that didn’t crumble into dust, but this recipe changed everything, delivering that perfect, slightly flaky texture we all dream of.
Whether you are a seasoned baker or someone who is just starting to experiment with gluten-free flour blends, these Gluten-Free Pumpkin Scones are approachable and incredibly rewarding. They have become a staple in my kitchen, especially when I have friends over for a casual brunch or just want a little extra brightness on a slow weekend morning.
What is Gluten-Free Pumpkin Scones?
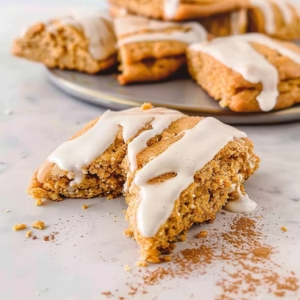
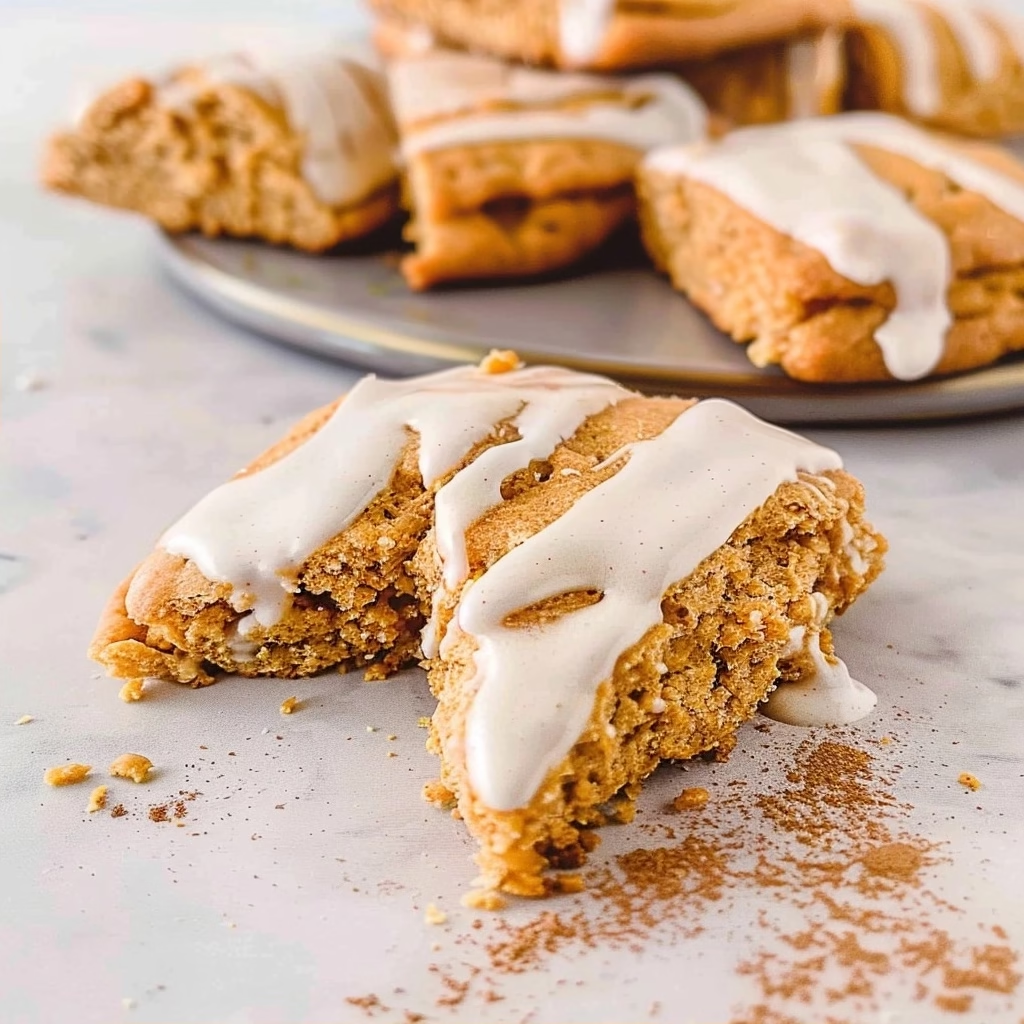
Gluten-Free Pumpkin Scones are delightful, triangular-shaped pastries infused with real pumpkin purée and a blend of warm, autumnal spices like cinnamon, nutmeg, cloves, and ginger. Unlike traditional wheat scones, which rely on gluten for structure, these are carefully balanced with a high-quality gluten-free flour blend to ensure they hold their shape without becoming overly dense or dry.
These treats sit right at the intersection of a biscuit and a cake, offering a tender interior encased in a golden, slightly crisp exterior. The inclusion of pumpkin purée adds natural moisture and a subtle sweetness that pairs perfectly with the decadent vanilla and pumpkin-spiced glazes drizzled over the top.
Reasons to Try Gluten-Free Pumpkin Scones
Beyond being naturally inclusive for those with gluten sensitivities or celiac disease, these scones are a masterclass in seasonal flavor. They are far superior to store-bought alternatives, which often lack freshness and tend to be overly sweet. By making them at home, you control the quality of the ingredients, ensuring every bite is packed with honest, pumpkin goodness.
This recipe is also surprisingly time-efficient, making it ideal for busy families or beginners who want a low-stress baking project. You do not need any fancy equipment to get professional results. Just a little patience with the dough and a love for warm, spiced treats is all it takes to impress your friends or family during your next coffee break.
Ingredients Needed to Make Gluten-Free Pumpkin Scones
- 2 cups high-quality gluten-free flour blend (ensure it contains xanthan gum)
- 1/2 cup brown sugar (packed well for moisture)
- 2 teaspoons baking powder (leavening is key for that rise)
- 1/2 teaspoon baking soda (works with the pumpkin acidity)
- 2 1/2 teaspoons ground cinnamon
- 1/2 teaspoon ground ginger
- 1/2 teaspoon ground nutmeg
- 1/4 teaspoon ground cloves
- 1/4 teaspoon ground allspice
- 1/4 teaspoon salt
- 1/2 cup cold unsalted butter (cubed small for even distribution)
- 1/2 cup pumpkin purée (pure pumpkin, not pie filling)
- 1 large egg (helps with structure)
- 2 tablespoons heavy cream (plus a little extra if needed)
- Vanilla Glaze: 3/4 cup powdered sugar mixed with 1 tablespoon heavy cream
- Pumpkin Glaze: 3/4 cup powdered sugar, 1 tablespoon pumpkin purée, 1 teaspoon pumpkin pie spice, and 1 tablespoon heavy cream
Instructions to Make Gluten-Free Pumpkin Scones – Step by Step
Step 1: Start by preheating your oven to 400°F. Line a large baking sheet with parchment paper to ensure easy cleanup and prevent sticking. Having your space ready before you start mixing is the secret to a stress-free baking session.
Step 2: In a large mixing bowl, whisk together your flour, sugar, baking powder, baking soda, and all those fragrant spices. Add in your cold, cubed butter. Using a pastry cutter or even a clean fork, work the butter into the flour until the mixture resembles coarse, pea-sized crumbs. Keeping the butter cold at this stage is truly vital for a light, flaky texture.
Step 3: In a separate small bowl, whisk the pumpkin purée, egg, and heavy cream until completely smooth. Create a well in your dry ingredients and pour the pumpkin mixture in. Use a spatula to stir gently, just until the dough comes together. Be careful not to overmix, as this can make your scones tough instead of tender.
Step 4: Turn the dough out onto a surface very lightly dusted with gluten-free flour. Gently pat it into a circle about three-quarters of an inch thick. Using a sharp knife, slice the circle into eight even wedges. Think of it like cutting a pizza, but be gentle so you do not compress the dough too much.
Step 5: Carefully transfer your wedges to the prepared baking sheet, keeping about an inch of space between each one to allow for even browning. Bake for 13 to 15 minutes, until the tops feel firm and a toothpick inserted into the center comes out clean. Let them cool completely on a wire rack before you think about adding that delicious glaze.
Step 6: While the scones cool, prepare the two glazes in separate small bowls. Once the scones are cool to the touch, drizzle or spread the vanilla glaze first, letting it set for about five minutes. Finish by piping or drizzling the pumpkin spice glaze on top. Wait another five minutes for everything to set before serving.
Chef’s Tips for a Perfect Result
- Use cold ingredients: Cold butter and chilled wet ingredients ensure the fats do not melt too soon, creating those lovely, light layers.
- Do not overmix: Once the liquid touches the dry, move with purpose but be gentle to keep the scone texture light.
- Flour your surface carefully: Gluten-free dough is often more delicate than wheat dough, so use just enough flour to prevent sticking.
- Watch the bake time: All ovens behave a little differently, so start checking for that light golden color at the 12-minute mark.
- Cool completely: The glaze will slide right off a warm scone, so patience is key before that final step.
Variations and Substitutions
Vegan Option: Replace the butter with a high-quality plant-based butter stick and swap the heavy cream for full-fat canned coconut milk for similar richness.
Crunchy Texture: Add a half-cup of chopped pecans or toasted walnuts into the dough for a wonderful earthy crunch that pairs beautifully with pumpkin.
Lower Sugar: You can slightly reduce the brown sugar in the dough, though keep in mind it provides some structure; consider using a monk fruit sweetener blend if preferred.
How to Serve and Pair
These scones are at their best when served warm alongside a steaming cup of Earl Grey tea or a dark roasted coffee. For a brunch gathering, set them out on a tiered tray with some fresh berries and a small bowl of clotted cream or tangy Greek yogurt. They are the perfect anchor for a cozy autumn morning or a late-afternoon treat when the sunlight starts to dip.
Storage and Reheating
Refrigerator: Store any leftovers in an airtight container for up to three days. They stay moist because of the pumpkin content.
Freezer: Wrap each scone individually in plastic wrap and place them in a freezer-safe bag. They will keep their quality perfectly for up to two months.
Room Temperature: Keep them in a cool, dry place wrapped tightly; however, for longer freshness, the fridge is safer due to the dairy in the glaze.
Reheating: Pop the scone in a 300°F oven for five to seven minutes to refresh that just-baked texture. Avoid the microwave if you can, as it tends to turn the dough soft rather than flaky.
Nutritional Values
- Calories: 283kcal
- Protein: 4g
- Carbohydrates: 60g
- Fat: 4g
- Fiber: 4g
Approximate values.
Frequently Asked Questions (FAQ)
Can I substitute the gluten-free flour blend with almond flour?
Almond flour does not absorb moisture the same way as a 1:1 gluten-free blend, so it is not a direct substitution. Stick to a high-quality blend that specifically lists xanthan gum for the best structure.
How do I know when my scones are perfectly done?
The tops should look set and have a very light golden brown edge, and a toothpick inserted into the thickest part should come out clean. Avoid baking them until they are dark brown, or they will lose their signature tenderness.
My dough is way too sticky to handle, what did I do wrong?
Gluten-free doughs can feel tackier than standard doughs, so simply keep your hands and work surface lightly floured. If it is truly unmanageable, chilling the dough for 15 minutes before shaping can firm up the fats and make it much easier to work with.
Can I make these scones the night before?
You can certainly prepare the dough, cut the wedges, and keep them refrigerated on the baking sheet overnight. Simply bake them fresh the next morning for the best texture and aroma.
What is the best way to customize these if I love spice?
You can add a pinch of freshly ground cardamom or even some finely grated orange zest for a bright, citrusy punch. These additions complement the pumpkin base and make the flavor profile feel even more sophisticated.
Conclusion
Making your own Gluten-Free Pumpkin Scones is a beautiful way to embrace the comfort of home baking with confidence. This recipe proves that dietary restrictions do not mean sacrificing the textures or flavors you love. I hope you enjoy the process of filling your home with these warm, spiced aromas as much as I do. Grab your favorite mug, pour yourself a hot drink, and treat yourself to the perfect, golden-hued fall pastry you truly deserve.
Print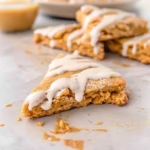
Gluten-Free Pumpkin Scones
- Prep Time: 15
- Cook Time: 18
- Total Time: 33
- Yield: 8 scones 1x
- Category: desserts
- Method: Baking
- Cuisine: American
- Diet: Gluten-Free, Vegetarian
Description
These delightful gluten-free pumpkin scones are the ultimate cozy autumn treat. Featuring a perfectly tender interior and a crisp golden exterior, they are infused with real pumpkin purée and a fragrant blend of warm spices including cinnamon, ginger, and nutmeg. Designed to hold their shape without being dense, these scones are easy to bake and even easier to share during a slow weekend brunch or a quiet coffee break. They are an inclusive, allergen-friendly way to enjoy classic seasonal flavors homemade in your own kitchen.
Ingredients
2 cups gluten-free flour blend (with xanthan gum)
1/2 cup brown sugar, packed
2 teaspoons baking powder
1/2 teaspoon baking soda
2 1/2 teaspoons ground cinnamon
1/2 teaspoon ground ginger
1/2 teaspoon ground nutmeg
1/4 teaspoon ground cloves
1/4 teaspoon ground allspice
1/4 teaspoon salt
1/2 cup cold unsalted butter, cubed
1/2 cup pumpkin purée
1 large egg
1 teaspoon vanilla extract
Instructions
Preheat your oven to 400°F (200°C) and line a baking sheet with parchment paper.
In a large bowl, whisk together the gluten-free flour, brown sugar, baking powder, baking soda, and all spices.
Cut the cold cubed butter into the flour mixture using a pastry cutter or your fingers until the mixture resembles coarse crumbs.
In a separate small bowl, whisk the pumpkin purée, egg, and vanilla extract until smooth.
Add the wet ingredients to the dry ingredients and stir until a soft dough forms.
Turn the dough onto a lightly floured surface and pat it into a circle about 1 inch thick.
Cut the circle into 8 equal triangles using a sharp knife.
Place the scones on the prepared baking sheet and bake for 15-18 minutes until golden.
Let cool on the pan for 5 minutes before transferring to a wire rack.
Notes
Ensure the gluten-free flour blend you use contains xanthan gum to prevent the scones from crumbling. If your flour does not have it, add 1 teaspoon separately. Keep the butter as cold as possible to ensure a flaky texture. Store in an airtight container at room temperature for up to 3 days.
Nutrition
- Serving Size: 1 scone
- Calories: 240
- Sugar: 12g
- Sodium: 280mg
- Fat: 9g
- Saturated Fat: 5g
- Carbohydrates: 38g
- Fiber: 2g
- Protein: 3g
- Cholesterol: 45mg