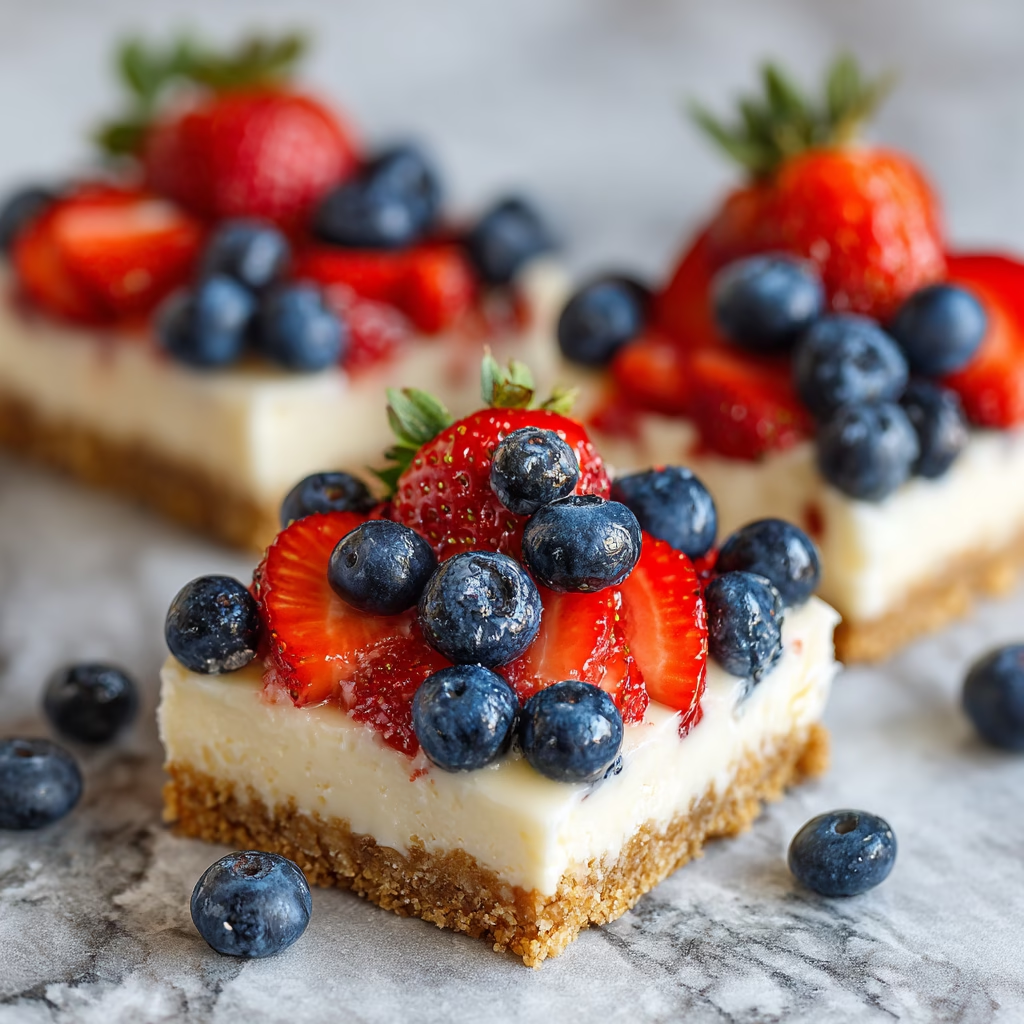
No-Bake Red, White, and Blue Cheesecake Bars are the ultimate flag-waving treat for summer gatherings. This vibrant, no-fuss dessert combines a buttery graham cracker crust, silken cheesecake layer, and a burst of fresh berries—ready to impress without heating a oven. Whether you’re hosting a backyard barbecue or a cozy family picnic, these bars deliver a patriotic pop of flavor that’s as simple to make as it is delightful to eat. The real magic lies in the layers: a crackly golden base, velvety cheesecake center, and juicy strawberry-blueberry topping that tastes like summer in every bite.
What makes these bars special? The no-bake formula cuts prep time in half while letting the fresh ingredients shine. You’ll press the crust, blend the filling, and refrigerate—no complicated steps or specialized tools required. The result is a luscious texture that feels indulgent yet wholesome, with colors that echo the American flag. And since it’s entirely customizable, you can adapt it for dietary needs or swap in seasonal fruits later in the year.
What is No-Bake Red, White, and Blue Cheesecake Bars?
These patriotic dessert bars are a hybrid between cheesecake and a fruit tart, designed for simplicity and visual impact. The foundation is a graham cracker crust made with butter and sugar, which bakes no further than being chilled in the fridge. The cheesecake layer is a light, airy mix of cream cheese, sugar, and whipped topping, giving it a custard-like texture. Fresh strawberries and blueberries are hand-placed on top, creating a marbled red, white, and blue pattern that’s equal parts decorative and delicious.
While the design nods to national holidays like Independence Day, the recipe itself has roots in mid-20th century Americana, when layer desserts began gaining popularity for their visual appeal and ease. The no-bake version emerged in the 1990s as a way to cut kitchen time for large gatherings. What makes these bars enduringly popular are their dual qualities: they’re festive enough for holiday tables yet flexible enough for casual snacking. You could serve them at a baby shower, summer picnic, or even freeze them into single servings for on-the-go treats.
Reasons to Try No-Bake Red, White, and Blue Cheesecake Bars
This recipe is perfect for home cooks who want a show-stopping dessert without the hassle. The entire process takes under 30 minutes, and the only heat involved is from the oven of your freezer (metaphorically speaking!). Unlike traditional cheesecakes that require precise water baths and oven temperatures, these bars simplify the process by leveraging chilled ingredients and ambient setting time. This makes them ideal for beginner bakers or anyone juggling summer entertaining.
They’re also a crowd-pleaser in a box. The mix of sweet and tart flavors works for children and adults alike, while the visual appeal—courtesy of those fresh berries—makes them a camera-ready addition to any table. Want to save time? Make them the day before your event; they actually taste better the next day as the flavors mature. And for health-conscious cooks, the recipe allows swaps like Greek yogurt, low-sugar whipped topping, or gluten-free graham crackers, without losing its signature charm.
Ingredients Needed to Make No-Bake Red, White, and Blue Cheesecake Bars
2 cups graham cracker crumbs
½ cup unsalted butter, melted (room temperature helps it blend smoothly into the crust)
2 tablespoons granulated sugar (adds subtle sweetness to the base)
16 oz cream cheese, softened (preferably full-fat for that creamy texture)
1 cup powdered sugar (gives the filling its gentle sweetness without overloading it)
1 teaspoon vanilla extract (use pure vanilla for the best flavor)
1½ cups whipped topping (store-bought like Cool Whip or homemade whipped cream with stabilizer)
Fresh strawberries and blueberries (gently washed before arranging to avoid sogginess)
Instructions to Make No-Bake Red, White, and Blue Cheesecake Bars – Step by Step
Step 1: Begin by lining a 9×13-inch pan with parchment paper, leaving a 2-inch overhang on the sides for easy lifting. This step is crucial—it prevents the bars from sticking and ensures you can cut neat slices later. In a medium bowl, combine the graham cracker crumbs, melted butter, and granulated sugar. Use your hands or a spoon to press this crust into the pan, working the mixture into every corner and pressing down firmly to create an even base. I find a measuring cup works like a tamper, pressing straight down to compress the crust.
Step 2: Place the pan on the counter for 20 minutes. This chilling time is the secret to crisp crusts in no-bake recipes. Meanwhile, prepare the cheesecake layer. In a large mixing bowl, beat the softened cream cheese until smooth and lump-free. You might need to stop and scrape down the sides with a spatula to ensure even mixing. Gradually add the powdered sugar and vanilla extract, blending until the mixture becomes silky. Don’t rush this step; smooth texture is key for a professional-looking slice.
Step 3: Gently fold in the whipped topping using a spatula. The goal is to maintain as much volume as possible while blending in the lightness of the topping. This creates a filling that’s luxuriously creamy but with a delicate airiness. Pour this mix over the chilled crust, using an offset spatula to spread it smooth and level. Avoid pressing too hard with the spatula; any dents or bumps will be more visible once the topping is added.
Step 4: Arrange the strawberries and blueberries on top. I like to halve the strawberries first for even distribution and place the blueberries around the strawberries to create a speckled flag-like pattern. Don’t press the berries into the filling—they’ll release moisture over time and could soften the crust. Refrigerate for at least 4 hours, but ideally 6-8 hours, to allow the layers to set fully. The longer they chill, the cleaner your slices will be when you cut them.
Chef’s Tips for a Perfect Result
- Use cold cream cheese, not ice-cold, but chilled (about 40°F / 4°C). This makes it easier to blend without overworking.
- Press the crust with the bottom of a glass for even compression, avoiding air pockets that can cause cracking.
- Let the cheesecake mixture rest in the fridge for 10-15 minutes before pouring to reduce heat transfer from the mixing bowl.
- For a professional finish, cut the bars with a heated knife: briefly run the blade under hot water and wipe dry before slicing each layer.
Variations and Substitutions
Vegan Option
Swap cream cheese with a vegan alternative like Tofutti brand or coconut-based cream cheese. Use vegan whipped topping and check your graham crackers are certified vegan.
Gluten-Free Alternative
Replace graham cracker crumbs with crushed gluten-free gluten-free cookies or gluten-free crumb mix. Double-check that your whipped topping is gluten-free.
Budget Swap
Make your own whipped topping by stiffening heavy cream with 1 teaspoon of cream of tartar per cup. This cuts costs and adds a homemade touch.
Low-Sugar Version</n Replace powdered sugar with a 50/50 mix of powdered sugar and erythritol. This works best if substituted early in the cheesecake filling.
How to Serve and Pair
These bars are best chilled. For a festive presentation, cut them into squares and serve with mini spoons. Pair them with sparkling water with lime or a sweet rosé wine for a refreshing contrast. At summer events, I like to arrange them on a platter with fresh mint leaves and edible flowers for extra visual appeal. Leftovers? Stack them in airtight containers and transport them in coolers for picnics or tailgating events.
Storage and Reheating
Refrigerator: Store in an airtight container for up to 3 days. To preserve texture, avoid stacking other items on the container.
Freezer: Wrap individual portions in plastic wrap and store in a freezer-friendly container for up to 2 months. Thaw in the fridge overnight for best results.
Room Temperature: Bars are stable at room temperature for up to 3 hours. Avoid direct sunlight or humid environments to prevent melting or sogginess.
Reheating: While no-bake cheesecakes are best served cold, you can bring frozen bars to room temperature in a sealed container for 1-2 hours before serving. Avoid microwaving, as this can create icy patches or over-melt the whipped topping.
Frequently Asked Questions
Can I use regular cream cheese instead of whipped topping?
Absolutely—full-fat cream cheese gives the best texture and flavor, but you can substitute ½ cup plain Greek yogurt for 1 cup whipped topping to cut calories while maintaining fluffiness.
How do I know when the bars are fully set?
The mixture should be firm to the touch and resist minor indentation. If you run a knife gently through it, it should cut cleanly without oozing. If in doubt, leave it in the fridge for an extra hour.
Why does my crust get soggy?
This usually happens if you don’t chill the crust properly before adding the filling. The cold crust creates a barrier that prevents moisture from the whipped topping from seeping in. Always allow the crust layer to set completely before adding anything on top.
Can I make these 2 days in advance?
Yes! In fact, the flavors are more developed if made a day ahead. Just place them in the fridge to avoid any temperature swings during travel or setup. If you live in a humid climate, refrigerate until serving time.
What’s the best way to customize them for a different holiday?
Swap the berries for orange segments and blackberries for a Halloween twist, or use cherry and white chocolate toppers for Valentine’s Day. Adjust the fruit colors while keeping the structure the same.
Conclusion
No-Bake Red, White, and Blue Cheesecake Bars are a celebration of summer in a single bite—you’ve got the buttery base, creamy center, and sweet-tart fruit topping working in perfect harmony. They’re simple enough for a quick dessert but impressive enough to make guests guess how long they took to make. The tangy cream cheese balances the fresh berries, creating a flavor that’s both familiar and new. Whether you’re marking 4th of July, a backyard cookout, or just craving something colorful and cool, this recipe is a guaranteed hit. Make them, share them, and savor that first chilled slice with the confidence of a seasoned home chef.
Print
No-Bake Red, White, and Blue Cheesecake Bars
- Prep Time: 20
- Total Time: 20
- Yield: 16 bars 1x
- Category: desserts
- Method: No-Bake
- Cuisine: American
- Diet: Vegetarian
Description
A vibrant no-bake dessert with a buttery graham cracker crust, silken cheesecake layer, and fresh strawberry-blueberry topping. Ideal for summer events or casual snacking, these easy-to-make bars combine patriotic colors and flavors with minimal effort.
Ingredients
1 1/2 cups graham cracker crumbs
6 tbsp melted butter
1/4 cup granulated sugar
2 cups cream cheese, softened
1/2 cup powdered sugar
1 cup whipped topping
1 cup sliced strawberries
1 cup blueberries
Instructions
Line an 8×8-inch baking pan with parchment paper.
Combine graham crackers, butter, and sugar in a bowl. Press mixture firmly into the pan.
Spread cream cheese and powdered sugar evenly over the crust.
Top with whipped topping, then arrange strawberries and blueberries in a red-white-blue pattern.
Chill for at least 2 hours before slicing into bars.
Notes
Customize with seasonal fruits like raspberries or blackberries.
For a firmer crust, press mixture into pan using a flat-bottomed glass.
Store leftovers in an airtight container in the refrigerator for up to 3 days.
Nutrition
- Serving Size: 1 bar
- Calories: 285
- Sugar: 22g
- Sodium: 180mg
- Fat: 18g
- Saturated Fat: 11g
- Carbohydrates: 28g
- Fiber: 1g
- Protein: 4g
- Cholesterol: 50mg


