
No Bake Peanut Butter Icebox Cake
No Bake Peanut Butter Icebox Cake – this easy lush dessert layers peanut butter sandwich cookies with peanut butter pudding! It’s the ULTIMATE peanut butter no bake dessert!
There are some desserts that just feel like a warm hug on a plate, and this No Bake Peanut Butter Icebox Cake is absolutely one of them. It reminds me of those summer afternoons when the air was thick and sweet, and the only thing on our minds was finding something cool and delicious to share. This cake isn’t fancy, it doesn’t require any complicated techniques, but it delivers pure, unadulterated joy with every single bite. It’s the kind of recipe that makes you smile just thinking about it, a dessert that brings people together and creates those cozy kitchen memories we all cherish.
The beauty of an icebox cake lies in its simplicity and its uncanny ability to transform humble ingredients into something truly special. This particular version takes that charm and amplifies it with the irresistible allure of peanut butter. If you’re a peanut butter lover, prepare yourself, because this No Bake Peanut Butter Icebox Cake is about to become your new favorite go-to dessert. It’s wonderfully easy, incredibly forgiving, and tastes like heaven.
What is No Bake Peanut Butter Icebox Cake?
At its heart, a no bake icebox cake is a dessert designed to be chilled, allowing the ingredients to meld and soften into a cohesive, cake-like texture without ever seeing the inside of an oven. This No Bake Peanut Butter Icebox Cake takes that concept and infuses it with the beloved flavor of peanut butter. It’s a delightful assembly of readily available ingredients, layered to create a masterpiece that’s both simple to prepare and stunning to behold.
Traditionally, icebox cakes often feature whipped cream and cookies, but this sensational variation swaps out some of those elements for more peanut butter goodness. We’re talking about layers of soft, milk-dipped peanut butter sandwich cookies embracing a creamy, dreamy peanut butter pudding filling, all crowned with a cloud of whipped topping and a sprinkle of peanut butter candy. It’s a symphony of textures and tastes that peanut butter enthusiasts will adore, offering a comforting, nostalgic flavor profile that’s hard to resist.
Reasons to Try No Bake Peanut Butter Icebox Cake
There are so many reasons why this No Bake Peanut Butter Icebox Cake deserves a spot in your recipe collection. Firstly, it’s incredibly easy. If you can dunk a cookie in milk and spread some pudding, you can make this cake! It’s a fantastic option for beginners or for those busy days when you want a showstopper dessert without the stress of baking. The minimal effort required means less time in the kitchen and more time enjoying the company of loved ones, or simply savoring a quiet moment with a delicious treat.
Beyond its ease, the flavor combination is simply irresistible. The creamy peanut butter pudding paired with the slight crunch of the sandwich cookies, all coming together in the refrigerator, creates a texture that’s both satisfying and refreshing. It’s perfect for potlucks, family gatherings, birthday celebrations, or just when that peanut butter craving strikes hard. This cake is a crowd-pleaser, guaranteed to bring smiles and accolades from everyone who tries it. Plus, the flexibility in toppings means you can customize it to suit any occasion or preference!
Ingredients Needed to Make No Bake Peanut Butter Icebox Cake
Here’s what you’ll need to gather for this delightful dessert:
- 27-36 peanut butter sandwich cookies (like Nutter Butter or a generic store brand)
- 1 ¾ cups milk (divided, whole or 2% milk works best for pudding setting)
- 1 box (3.4 ounces) instant vanilla or cheesecake pudding mix
- ½ cup creamy peanut butter
- 8 ounces (1 container) whipped topping, thawed (like Cool Whip)
- 1 cup Reese’s Pieces, for topping (or your favorite candy or cookie crumbles)
Instructions to Make No Bake Peanut Butter Icebox Cake – Step by Step
Step 1: Prepare the Base Layer
Begin by gathering your ingredients and a suitable baking dish, an 8×8 inch pan is perfect for this recipe. Take about half a cup of your milk and pour it into a shallow bowl or a liquid measuring cup. This is for a quick dip, so you don’t want too much liquid to make the cookies too soggy. Working quickly, dip about a third of your peanut butter sandwich cookies into the milk – just a quick dunk on each side is all they need! Arrange these dipped cookies in a single layer across the bottom of your 8×8 inch pan. They form the foundational layer of our delicious icebox cake.
Step 2: Craft the Peanut Butter Pudding Filling
In a larger mixing bowl, whisk together the remaining 1 and ¼ cups of milk with the contents of your instant pudding mix box. Keep whisking until the mixture begins to thicken; this usually takes just a couple of minutes. Let this pudding mixture sit undisturbed for about 5 minutes to allow it to set up properly. Once it has reached a good pudding consistency, gently stir in the creamy peanut butter until it’s fully incorporated and beautifully smooth. Then, carefully fold in about half of the thawed whipped topping. You want to maintain some of that airy lightness as you blend it in, creating a luscious, creamy peanut butter filling.
Step 3: Assemble the First Layers
Now, it’s time to bring our layers together! Carefully spread half of the wonderfully creamy peanut butter filling evenly over the first layer of milk-dipped cookies in your pan. Don’t worry if it’s not perfectly smooth; a rustic look adds to its charm. Next, take another third of your peanut butter sandwich cookies, give them their quick milk dip, and arrange them in a second layer over the peanut butter mixture. This layering is what gives the icebox cake its signature texture and appeal.
Step 4: Build the Remaining Layers and Top
Gently spoon and spread the remaining half of the peanut butter pudding mixture over the second cookie layer. Ensure it’s spread as evenly as you can, creating a smooth surface. For the final cookie layer, dip the remaining peanut butter sandwich cookies in milk and place them on top of the pudding. Once all the cookies are in place, gently spread the rest of the whipped topping over the top cookie layer, covering it completely like a soft, white blanket. This creates the perfect canvas for our finishing touch.
Step 5: Decorate and Chill to Perfection
This is where you can add a bit of your personal flair! Sprinkle the Reese’s Pieces evenly over the top layer of whipped topping. You can also use other candies, crushed cookies, or chopped nuts if you prefer. The colorful candies add a delightful pop of texture and flavor. Once decorated, cover the pan loosely (plastic wrap works well, just don’t let it touch the topping if possible) and place it in the refrigerator. Allow the cake to chill for at least 2 hours. This chilling time is crucial, as it allows the flavors to meld and the cookies to soften, achieving that perfect icebox cake texture.
Chef’s Tips for a Perfect Result
- Use good quality, creamy peanut butter for the best flavor and texture in your filling.
- Don’t over-dip the cookies, a quick soak is all they need to soften without becoming mushy.
- Ensure your whipped topping is fully thawed but still cold; this makes it easier to fold into the pudding.
- Chill the cake for at least 2 hours, but overnight is even better for maximum flavor melding and softening of the cookies.
- Experiment with different cookie bases if you don’t have peanut butter sandwich cookies on hand; almost any cookie works!
- Taste your filling before adding the whipped topping and adjust peanut butter if you desire a stronger flavor.
Variations and Substitutions
- Gluten-Free Alternative: Omit the peanut butter sandwich cookies and use gluten-free graham crackers or gluten-free shortbread cookies as your base layers. You might not need to dip them in milk.
- Dairy-Free/Vegan Option: Use a dairy-free milk alternative (like almond or soy milk) and a dairy-free instant pudding mix. For the whipped topping, opt for a vegan whipped topping that’s made from coconut cream or soy. Ensure your cookies are also vegan.
- Chocolate Lover’s Twist: Add 2-3 tablespoons of unsweetened cocoa powder to the pudding mix before adding milk, or use a chocolate pudding mix. You could also swap Reese’s Pieces for mini chocolate chips on top.
- Nut-Free Version: If nut allergies are a concern, substitute the peanut butter with an equal amount of sunflower seed butter or a cream cheese mixture for a different, but still delicious, creamy layer. Omit peanut butter candies from the topping.
- Cookie Swap: Feel free to use other sandwich cookies like Oreos for a chocolatey twist, or even gingersnap cookies for a spicier note. Adjusting the milk dip time might be necessary depending on cookie sturdiness.
How to Serve and Pair
This No Bake Peanut Butter Icebox Cake is wonderfully versatile and perfect for almost any occasion. Serve it chilled, straight from the refrigerator, allowing each guest to enjoy the distinct layers and creamy texture. For a more elegant presentation, you can scoop individual portions into pretty glasses or small bowls, perhaps adding a dollop of extra whipped cream and a drizzle of chocolate sauce on top.
It pairs beautifully with a cold glass of milk, a warm cup of coffee, or even a scoop of vanilla bean ice cream. It’s a fantastic dessert for casual get-togethers, family dinners, summer barbecues, or as the grand finale to a birthday celebration. Its comforting flavors make it a welcome addition to holiday gatherings when you need a dessert that’s easy to prepare ahead of time.
Storage and Reheating
Refrigerator
This No Bake Peanut Butter Icebox Cake should be stored in the refrigerator. Keep it loosely covered with plastic wrap or foil to prevent it from drying out or absorbing odors from other foods. Properly stored, it will maintain its best quality for up to 3 to 4 days. Though it’s best enjoyed within the first couple of days as the cookies will continue to soften over time.
Freezer
Yes, you can freeze this icebox cake, especially if you used a stabilized whipped topping like Cool Whip. Wrap the entire pan tightly in plastic wrap, then in aluminum foil, or transfer individual slices to airtight containers. It can be frozen for up to 1 month. Thaw overnight in the refrigerator before serving.
Room Temperature
It is not recommended to leave this icebox cake at room temperature for extended periods, as it contains dairy and whipped topping that can spoil. It should be kept chilled until ready to serve.
Reheating
Reheating is not applicable to this no-bake dessert. Its charm lies in its chilled, refreshing texture. Simply ensure it has been properly chilled before serving; if frozen, thaw it gradually in the refrigerator to maintain its creamy consistency.
Nutritional Values
- Calories: 336 kcal
- Carbohydrates: 37g
- Protein: 8g
- Fat: 18g
- Fiber: 2g
Approximate values.
Frequently Asked Questions (FAQ)
Can I substitute the peanut butter sandwich cookies?
Yes, you can substitute the peanut butter sandwich cookies with other types of cookies, such as graham crackers, Oreos, or even shortbread, depending on the flavor profile you desire.
How do I know when my No Bake Peanut Butter Icebox Cake is ready?
The cake is ready when it has chilled for at least 2 hours and the cookies have softened, creating a unified, cake-like texture that can be easily sliced.
What troubleshooting tips can you offer if my cake turns out too mushy?
If your cake is too mushy, ensure you didn’t over-dip the cookies in milk, and allow adequate chilling time for the pudding to fully set and bind the layers.
Is it possible to make this icebox cake ahead of time for a party?
Absolutely, this No Bake Peanut Butter Icebox Cake is perfect for making ahead, as it requires ample chilling time for the flavors to meld and the texture to set.
What are the best ways to serve or customize this cake?
Serve chilled slices with a glass of milk or coffee, or customize by adding different toppings like chocolate chips, caramel drizzle, or fresh berries for an extra touch.
CONCLUSION
The No Bake Peanut Butter Icebox Cake is a wonderfully simple yet incredibly satisfying dessert, perfect for any occasion. Its creamy layers and sweet peanut butter flavor make it a cherished treat that’s a joy to make and share. Dive into this delightful no-bake creation for a taste of pure comfort and irresistible peanut butter bliss.
Print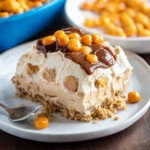
No Bake Peanut Butter Icebox Cake
- Prep Time: 20
- Total Time: 260
- Yield: 12 servings 1x
- Category: desserts
- Method: No-bake
- Cuisine: American
- Diet: Vegetarian
Description
A no-bake dessert that layers peanut butter sandwich cookies, creamy peanut butter pudding, and whipped topping for a rich, dreamy treat. Simple, nostalgic, and perfect for cool summer memories or cozy gatherings.
Ingredients
24 peanut butter sandwich cookies (like Reese’s or homemade)
3 cups milk
2 packages no-bake chocolate pudding mix
1 can (14 oz) non-dairy whipped topping
1/4 cup crushed peanut butter candy (optional garnish)
Instructions
Line a 9×13-inch pan with plastic wrap.
Arrange a layer of cookies in the pan, pressing them tight and crushing some cookies to fill gaps if needed.
In a bowl, whisk 1 package of pudding mix with 1 1/2 cups milk until thick.
Spread one-third of the pudding over the cookies.
Repeat cookie and pudding layers twice.
Cover final layer of pudding with whipped topping, then sprinkle crushed candy on top.
Chill for 4-6 hours to set before slicing.
Notes
Chill time preserves texture and cohesion. Substitute distilled vanilla extract for candy toppings if unavailable. For a flourless version, use lard-free chocolate pudding and non-dairy whipped topping.
Nutrition
- Serving Size: 1 slice
- Calories: 420
- Sugar: 32g
- Sodium: 280mg
- Fat: 24g
- Saturated Fat: 12g
- Carbohydrates: 50g
- Fiber: 1.2g
- Protein: 8g
- Cholesterol: 40mg


