No-Bake Cherry Cheesecake Bars
No-Bake Cherry Cheesecake Bars are the answer to those moments when a craving strikes but the thought of turning on the oven feels like too much. This recipe delivers all the rich, creamy, tangy goodness of classic cheesecake, minus the baking time. Imagine a buttery graham cracker crust hugging a velvety, luscious filling, all crowned with a sweet, bright cherry topping. It’s the kind of dessert that whispers of summer picnics and cozy evenings alike. I remember when I first stumbled upon a recipe like this, my early days in the kitchen were full of experimentation, and the idea of a no-bake dessert felt like a delicious secret weapon.
This is probably one of my go-to recipes when I need a crowd-pleasing dessert that feels special without demanding hours of my time. It’s wonderfully versatile, perfect for birthdays, holidays, or just because. The beauty of these no-bake cherry cheesecake bars lies in their simplicity and the pure joy they bring with every bite. They’ve become a staple in my recipe repertoire, a testament to how simple ingredients can create something truly spectacular and bring smiles to the table.
What is No-Bake Cherry Cheesecake Bars?
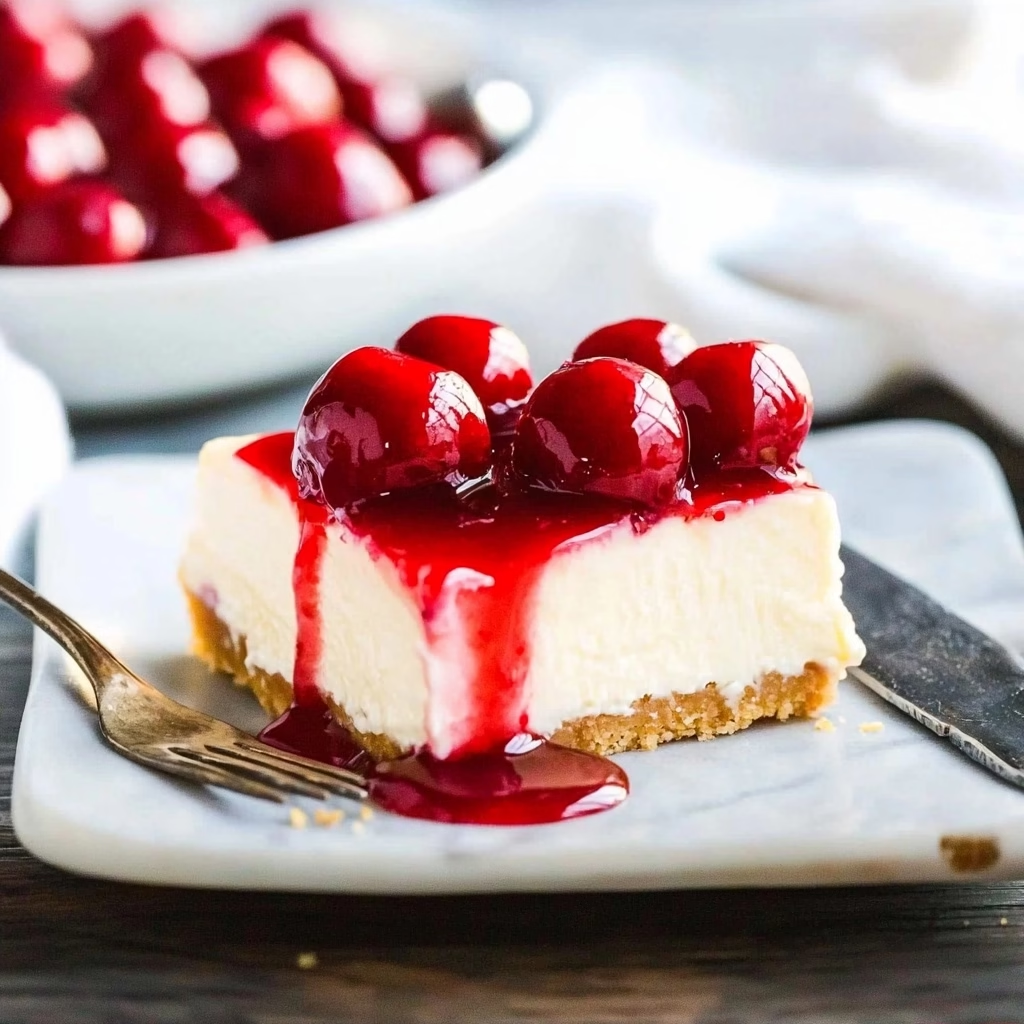
No-Bake Cherry Cheesecake Bars are a delightful dessert rendition that captures the essence of traditional cheesecake in a more accessible, quicker format. Unlike their baked counterparts, these bars skip the oven entirely, relying on refrigeration to set the creamy filling. This method results in an incredibly smooth and light texture that’s often hard to achieve with oven baking, which can sometimes lead to cracking. The foundation is a crumbly, buttery graham cracker crust, providing a wonderful textural contrast to the rich cream cheese filling, while the cherry topping adds a vibrant burst of fruity sweetness and a beautiful pop of color.
The magic of these bars comes from the combination of classic cheesecake flavors elevated by the convenience of a no-bake approach. They are born out of a desire to enjoy decadent cheesecake without the fuss. The star ingredients are cream cheese, which provides that signature tang and creamy base, whipped cream for lightness, powdered sugar for sweetness, and of course, the bright, fruity cherry pie filling that brings it all together. It’s a dessert that’s as charming in its appearance as it is in its ease of preparation, making it a favorite for home cooks looking for a guaranteed win.
Reasons to Try No-Bake Cherry Cheesecake Bars
If you’re looking for a dessert that’s both impressive and incredibly simple, these no-bake cherry cheesecake bars are an absolute must-try. The biggest draw, of course, is the ‘no-bake’ aspect. This means no preheating the oven, no watching for cracks, and significantly less time spent in the kitchen. They are perfect for busy weeknights when you want a special treat, or for summer gatherings when you want to keep the kitchen cool. The creamy, velvety texture combined with the sweet-tart cherry topping is simply irresistible, offering a delightful balance of flavors and textures that most people adore.
These bars are a fantastic gateway into the world of cheesecake for novice bakers. The steps are straightforward, and the forgiving nature of a no-bake recipe means you can feel confident about achieving a fantastic result. They’re also wonderfully versatile – imagine bringing these to a potluck knowing they’ll be a guaranteed hit, or slicing them up for a family movie night. The quick prep time means you can whip them up with minimal fuss, leaving you more time to relax and enjoy your company. It’s the kind of treat that makes any occasion feel a little more special.
Ingredients Needed to Make No-Bake Cherry Cheesecake Bars
For the Graham Cracker Crust:
- 1 1/4 cup graham cracker crumbs (about 10-12 full graham crackers)
- 2 tablespoons granulated sugar
- 1/3 cup unsalted butter, melted
For the Cheesecake Filling:
- 1 cup whipping cream (heavy cream), chilled
- 16 oz brick-style cream cheese, softened to room temperature
- 3/4 cup powdered sugar (confectioners’ sugar), sifted
- 1 teaspoon vanilla extract
- 2 teaspoons fresh lemon juice
- 1 jar (about 21 oz) cherry pie filling
Instructions to Make No-Bake Cherry Cheesecake Bars – Step by Step
Step 1:
Prepare your pan first. You’ll want to line an 8×8 inch square baking pan with aluminum foil. Make sure to leave an overhang on all sides; this makes lifting the bars out of the pan so much easier later on. Gently spray the foil with a bit of non-stick cooking spray. This little trick ensures that your beautiful crust and filling won’t stick.
Step 2:
Let’s get the crust ready. In a medium-sized bowl, combine the graham cracker crumbs with the granulated sugar. Pour in the melted butter and stir everything together until the crumbs are evenly moistened and resemble wet sand. This mixture is then pressed firmly into the bottom of your prepared pan. Use the back of a spoon or the bottom of a glass to get an even, compact layer all the way across.
Step 3:
Now, for the creamy filling. In a separate large bowl, whip the chilled heavy cream using an electric mixer on medium-high speed. Keep going until stiff peaks form. This means when you lift the beater, the cream stands up tall and holds its shape. Don’t over-whip it, or you’ll end up with butter!
Step 4:
In another bowl, beat the softened cream cheese until it’s wonderfully smooth and lump-free. This is a crucial step for a silky texture. Once smooth, add the sifted powdered sugar, vanilla extract, and fresh lemon juice. Beat again until everything is well combined and the mixture is light and fluffy. The lemon juice adds a subtle tang that really brightens the flavor.
Step 5:
It’s time to combine the components of our filling. Take your rubber spatula and gently fold the whipped cream into the cream cheese mixture. The key here is to be gentle, folding until just combined and no streaks of cream cheese or whipped cream remain. You want to preserve as much airiness as possible from the whipped cream to keep the filling light.
Step 6:
Carefully spoon this luscious cheesecake filling over the graham cracker crust in the pan. Use your spatula to spread it into an even layer, making sure the top is as smooth as you can get it. This layer of creamy goodness is what will set the texture for your bars.
Step 7:
Now for the waiting game! Cover the pan and place it in the refrigerator. You’ll need to let the bars chill for at least 6 hours, but overnight is even better for them to set up perfectly. Patience here is rewarded with a firm, sliceable dessert.
Step 8:
Once the bars are fully chilled and firm, it’s time to serve them. Use the foil overhang to lift the entire cheesecake block out of the pan and place it onto a cutting board. Slice into your desired bar shapes. Finally, spoon a generous dollop of the cherry pie filling right on top of each bar. The contrast of the cool, creamy cheesecake and the sweet, gooey cherry topping is just wonderful.
Chef’s Tips for a Perfect Result
- Ensure your cream cheese is truly at room temperature; it’s essential for a smooth, lump-free filling. Cold cream cheese won’t incorporate properly.
- Using full-fat, brick-style cream cheese is non-negotiable for the best texture and set. Lighter or spreadable versions contain more water and will result in a softer, less stable filling.
- Don’t overmix the filling after adding the whipped cream. Gently folding preserves the airiness, leading to a lighter, melt-in-your-mouth texture.
- Chilling time is critical. Allowing the bars to set for at least 6 hours, preferably overnight, ensures they are firm enough to slice neatly.
- For perfectly uniform bars, use a sharp knife and wipe it clean between each cut. A warm knife can also help make cleaner slices.
- If you don’t have graham crackers, digestive biscuits or even shortbread cookies can be used to make a similar crust.
Variations and Substitutions
-
Vegan Option
Replace brick cream cheese with a thick vegan cream cheese alternative (ensure it’s firm). Substitute butter with vegan butter or coconut oil for the crust. For the filling’s whipped cream, use a chilled can of full-fat coconut milk’s solid cream or a store-bought vegan whipping cream. The texture will be slightly different but still delicious.
-
Gluten-Free Alternative
Use gluten-free graham crackers or a mixture of gluten-free cookies (like almond flour ones) for the crust. Ensure all other ingredients are naturally gluten-free, which they generally are in this recipe.
-
Low-Carb Version
Swap graham crackers for a nut-based crust (almond flour and butter work well). Use a sugar substitute (like erythritol or stevia) instead of powdered sugar for the filling. Opt for a sugar-free cherry pie filling or a topping made from fresh berries and a sugar substitute.
-
Budget Swap (Quick Cream)
If you’re short on time or prefer an even quicker shortcut, you can substitute the homemade whipped cream with 1 1/2 cups of thawed Cool Whip (whipped topping). Skip the whipping step (Step 3) and gently fold the Cool Whip into the cream cheese mixture in Step 5.
-
Fruity Topping Alternatives
Instead of cherry pie filling, try a strawberry, blueberry, or mixed berry pie filling. You could also make a quick compote by simmering fresh or frozen berries with a little sugar and lemon juice until slightly thickened, then cooling before topping.
How to Serve and Pair
These No-Bake Cherry Cheesecake Bars are wonderful served chilled, right from the refrigerator. For an elegant presentation, ensure your slices are neat by wiping your knife between cuts. A simple dollop of cherry pie filling on top is classic, but you could also garnish with a fresh mint sprig or a dusting of powdered sugar for an extra touch. They are perfect for any casual gathering, from a backyard barbecue to a potluck dinner. For a more festive occasion, consider serving them alongside fresh berries or even a drizzle of chocolate sauce. They pair beautifully with a glass of milk, a light iced tea, or even a sparkling cider for a non-alcoholic celebratory drink.
Storage and Reheating
Refrigerator
Leftover No-Bake Cherry Cheesecake Bars can be stored in an airtight container in the refrigerator for up to 4 days. It’s best to keep the cherry topping separate until you’re ready to serve each piece to prevent the crust from getting soggy. Ensure they are well-covered to maintain their freshness and prevent them from absorbing other odors in the fridge.
Freezer
Freezing is generally not recommended for these bars as the texture of the cream cheese filling can change, becoming somewhat watery or grainy upon thawing. The no-bake nature aims for a very specific creamy texture that refrigeration best preserves.
Room Temperature
It’s advisable not to leave these cheesecake bars at room temperature for extended periods, as the dairy-based filling requires refrigeration to remain safe and maintain its texture. After about 2 hours at room temperature, they should be returned to the refrigerator.
Reheating
Reheating is not necessary or recommended for these no-bake bars. They are designed to be served cold. Enjoy them straight from the fridge for the best creamy, refreshing experience.
Nutritional Values
- Calories: 318kcal
- Carbohydrates: 18g
- Protein: 3g
- Fat: 26g
- Saturated Fat: 15g
- Cholesterol: 82mg
- Sodium: 187mg
- Potassium: 83mg
- Fiber: 1g
- Sugar: 13g
Approximate values.
Frequently Asked Questions (FAQ)
Can I substitute the cherry pie filling with fresh cherries?
While fresh cherries can be used, they will need to be cooked down into a compote with sugar to achieve a similar consistency and sweetness to pie filling. Simply simmering fresh or frozen cherries with a little sugar and lemon juice until thickened and cooled before topping the bars will yield a lovely result.
How do I know when the cheesecake bars are set?
The bars are set when the filling is firm to the touch and no longer seems soft or jiggly in the center. They should hold their shape when you lift them out of the pan using the foil overhang. Proper chilling time, ideally overnight, is key to achieving this firmness.
My cheesecake filling is lumpy; what went wrong?
Lumpiness usually occurs if the cream cheese was too cold when you started mixing, or if the powdered sugar wasn’t added gradually enough. Ensure your cream cheese is fully softened to room temperature and always beat it until smooth before adding other ingredients, especially the powdered sugar.
Can I make these No-Bake Cherry Cheesecake Bars ahead of time?
Yes, absolutely! These bars are ideal for making ahead. They can be prepared up to one day in advance and kept chilled in the refrigerator. This allows the flavors to meld and ensures the bars are perfectly set for slicing and serving whenever you need them.
What’s the best way to serve or customize these cheesecake bars?
Serve them chilled, topped with the cherry pie filling. For customization, you can swap the cherry topping for other fruit fillings like blueberry or strawberry, or even a fresh fruit salsa. A drizzle of white chocolate or a sprinkle of chopped nuts can also add a delightful personal touch.
CONCLUSION
These No-Bake Cherry Cheesecake Bars are a triumph of simplicity, offering a luxuriously creamy dessert with minimal effort. They are the perfect, fuss-free treat for any occasion and incredibly satisfying to make. The delightful combination of a buttery crust, smooth cheesecake, and sweet cherry topping makes them an irresistible classic for any home cook.
Print
No-Bake Cherry Cheesecake Bars
- Prep Time: 15
- Total Time: 15
- Yield: 12 bars 1x
- Category: desserts
- Method: No-Bake
- Cuisine: American
- Diet: Vegetarian
Description
A luscious no-bake dessert with a buttery graham cracker crust, smooth cream cheese filling, and vibrant cherry topping. Perfect for any gathering, this easy-to-make treat requires no oven and offers a refreshing balance of tangy and sweet. Enjoy the creamy texture and fruity finish without the hassle of baking.
Ingredients
1 1/2 cups graham cracker crumbs
1/2 cup unsalted butter, melted
16 oz cream cheese, softened
1/2 cup powdered sugar
1 cup whipped cream
14 oz cherry pie filling (no alcohol)
Instructions
Combine graham cracker crumbs and melted butter for the crust
Press the mixture into a greased 8×8 inch baking dish
In a bowl, beat cream cheese until smooth
Add powdered sugar and whip until well combined
Fold in whipped cream gently to maintain airy texture
Pour the cream cheese mixture over the crust
Spread cherry pie filling evenly on top
Refrigerate for at least 3 hours to firm up
Cut into 12 bars before serving
Notes
Let the crust chill for 10-15 minutes to firm up for cleaner slices
Use a spatula or knife to gently layer the whipped cream and cream cheese
For a homemade twist, make cherry topping by simmering fresh cherries, sugar, and a touch of lemon juice
Nutrition
- Serving Size: 1 bar
- Calories: 240
- Sugar: 18g
- Sodium: 150mg
- Fat: 14g
- Saturated Fat: 8g
- Carbohydrates: 28g
- Fiber: 2g
- Protein: 4g
- Cholesterol: 55mg


