Drumstick frozen dessert bars capture that iconic crunchy cone, creamy ice cream, and chocolatey goodness in a way that just makes sense. Imagine all your favorite flavors and textures coming together in a single, sliceable treat. This recipe is a testament to how simple ingredients can create something truly special, reminiscent of childhood summers and carefree afternoons. We’re taking the essence of that beloved ice cream truck staple and transforming it into an easy-to-make, no-bake dessert bar that will have everyone asking for seconds.
I remember the first time I tried to recreate that magic in my own kitchen, long before I had fancy mixers or a dedicated baking nook. It was a bit of an experiment, full of hopeful anticipation and a little bit of kitchen chaos. But the result? Pure joy. These Drumstick frozen dessert bars are designed to bring that same simple delight to your table, without any fuss. They’re perfect for a quick treat, a potluck contribution, or simply when you need a little pick-me-up.
What is Drumstick Frozen Dessert?
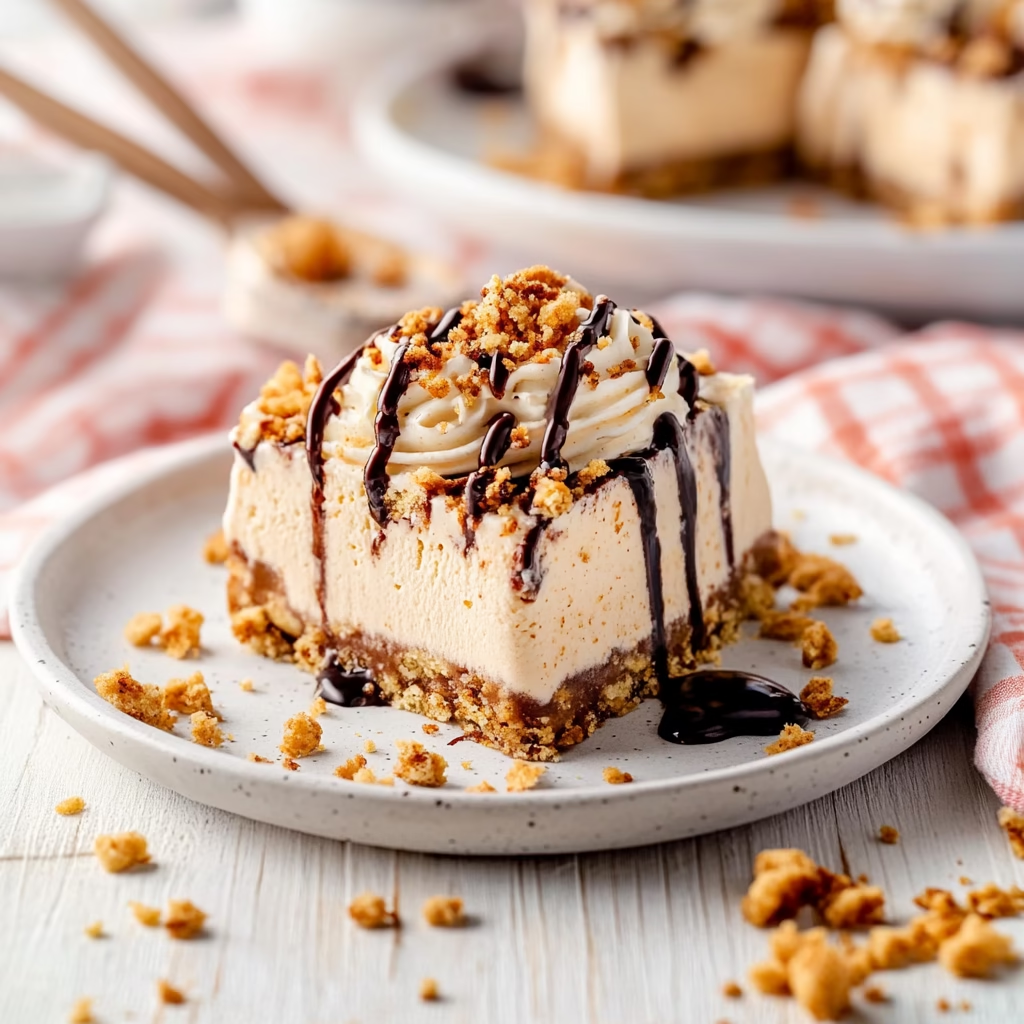
At its heart, a Drumstick frozen dessert is a celebration of contrast: the delightful crunch of a sugar cone mingling with smooth, creamy ice cream, all enrobed in a shell of chocolate. This recipe takes those elements and reimagines them into convenient bars. We start with a buttery, crumbly base that echoes the texture of a crushed cone, then layer it with a rich, creamy filling that’s studded with the nutty flavor of peanut butter. The entire creation is crowned with peanuts and crushed sugar cones, just like the original, ensuring every bite is a journey through familiar yet exciting flavors.
The beauty of this Drumstick frozen dessert recipe lies in its approachable design. It doesn’t require an ice cream maker or complicated tempering of chocolate. It’s about layering simple components to achieve a complex taste and texture that pays homage to the classic frozen treat. The process itself is rewarding, watching the layers come together and knowing that a chilled, delicious masterpiece is just a few hours away from being ready to enjoy.
Reasons to Try Drumstick Frozen Dessert Bars
Why make these Drumstick frozen dessert bars? Because they deliver pure, unadulterated happiness in every bite, and the process is wonderfully uncomplicated. You get that satisfying crunch, the cool, creamy filling, and the irresistible combination of chocolate and peanut butter, all without the need to turn on your oven. This makes them an absolute lifesaver during warmer months or when you’re craving something sweet without the heat. Plus, the bar format is so much easier for serving a crowd than individual cones.
These bars are perfect for anyone who loves the classic Drumstick but wants a more shareable dessert. They are incredibly beginner-friendly; if you can mix ingredients and press them into a pan, you can make these! Busy families will appreciate how quickly they come together, and they are a guaranteed hit at parties, picnics, or movie nights. The adaptability of the recipe also means you can tailor it to your preferences, making it a versatile addition to your dessert repertoire.
Ingredients Needed to Make Drumstick Frozen Dessert Bars
Here’s what you’ll need to bring these delightful Drumstick frozen dessert bars to life:
- 1 ½ cups graham cracker crumbs (about 10-12 full crackers)
- ½ cup peanuts, finely crushed (plus more for topping)
- ¼ cup unsalted butter, melted
- 8 ounces cream cheese, softened
- ½ cup powdered sugar
- ½ cup smooth peanut butter
- 2 teaspoons vanilla extract
- 8 ounces Cool Whip, thawed (or your favorite whipped topping)
- Chocolate sauce, for drizzling
- ¾ cup peanuts, chopped (for topping)
- 4 sugar cones, crushed into small pieces (for topping)
Instructions to Make Drumstick Frozen Dessert Bars – Step by Step
Follow these simple steps to create your very own Drumstick frozen dessert bars:
Step 1: Prepare the Pan and Crust Mixture
First things first, let’s get our pan ready. Grab a 9×13 inch baking pan and give it a good spray with cooking spray. This will prevent our delicious crust from sticking later on. Now, in a medium-sized bowl, combine the graham cracker crumbs, the ½ cup of finely crushed peanuts, and the melted butter. Give it a good stir with a fork or spatula until everything is evenly moistened. It should look like coarse, damp sand, perfect for pressing into a firm base.
Step 2: Press the Crust into the Pan
Take that lovely crumb mixture and carefully press it evenly into the bottom of your prepared 9×13 inch pan. You can use the back of a spoon, a flat-bottomed glass, or even just your clean hands to get it nice and compact. A firm, even crust is key to getting lovely, well-formed bars later on, so take your time with this part. Make sure it goes all the way to the edges for a neat finish.
Step 3: Mix the Creamy Filling Base
In a large bowl, it’s time to whip up the luscious filling. Start by beating together the softened cream cheese, powdered sugar, and peanut butter until the mixture is wonderfully smooth and creamy. Then, stir in the vanilla extract until it’s fully incorporated. This combination forms the rich, flavorful foundation for our dessert bars, promising a delightful contrast to the crunchy crust.
Step 4: Gently Fold in the Whipped Topping
Now, for that airy lightness! Take your thawed Cool Whip and gently fold it into the cream cheese and peanut butter mixture using a spatula. Be careful not to overmix here; you want to keep that fluffiness. The goal is to combine everything until just blended, creating a smooth, luscious filling that’s ready to be spread over our crust. It’s this airy texture that makes the bars so wonderfully light and creamy.
Step 5: Spread the Filling Evenly
Carefully spoon the creamy filling over the pressed crust in your pan. Use your spatula to spread it out evenly, ensuring it reaches all the corners and edges. Smooth the top as best as you can for a beautiful presentation. This thick layer of creamy goodness is what truly makes these bars feel like a decadent frozen treat.
Step 6: Add the Iconic Topping
This is where we bring back that signature Drumstick crunch! Drizzle your desired amount of chocolate sauce generously over the entire surface of the cream cheese filling. Don’t be shy with it! Then, scatter the chopped peanuts and the crushed sugar cone pieces evenly over the chocolate drizzle. This topping provides that essential texture and flavor that defines a Drumstick dessert. It’s that final flourish that makes these bars truly irresistible.
Step 7: Freeze Until Firm
Once your masterpiece is assembled, cover the pan tightly with plastic wrap. Pop it into the freezer and let it chill for at least 2 to 3 hours, or until it’s firm enough to slice. This chilling time is crucial for the bars to set properly, ensuring they hold their shape and deliver that satisfyingly firm texture. Patience here will be rewarded with perfect bars!
Step 8: Slice and Serve Your Delight
When you’re ready to serve, take the pan out of the freezer about 5 to 10 minutes before slicing. This short thawing period makes cutting much easier and prevents the bars from being too hard. Use a sharp knife to cut the frozen dessert into squares or bars. For an extra touch of indulgence, you can drizzle a little more chocolate sauce over each serving. Enjoy the delightful crunch and creamy cool combination!
Chef’s Tips for a Perfect Result
- Ensure your cream cheese is truly softened to room temperature; this prevents lumps and makes blending much smoother.
- Use good quality peanut butter for the best flavor; natural peanut butter may separate, so give it a good stir before measuring.
- Don’t overmix the Cool Whip into the cream cheese mixture; gentle folding preserves its airy texture for a lighter filling.
- Press the crust mixture firmly and evenly into the pan; this helps the bars hold together when sliced.
- Thaw the bars for a few minutes before slicing to make cutting easier and prevent cracking.
- Experiment with toppings! A sprinkle of sea salt or mini chocolate chips can add extra flair.
Variations and Substitutions
Vegan Option
To make these Drumstick frozen dessert bars vegan, substitute the graham crackers with vegan-friendly cookies, use a vegan butter alternative, and swap the cream cheese and Cool Whip for dairy-free cream cheese and a store-bought vegan whipped topping. The peanut butter and chocolate sauce should ideally be dairy-free as well.
Gluten-Free Alternative
For a gluten-free version, use gluten-free graham crackers or crushed gluten-free cookies for the crust. Ensure your peanuts and chocolate sauce are also certified gluten-free. The topping additions like sugar cones would need to be replaced with gluten-free crunchy elements or omitted.
Nut-Free Variation
If you need to avoid nuts, omit the peanuts entirely from the crust and topping. You can substitute them with extra graham cracker crumbs or a mix of crushed gluten-free pretzels for a salty crunch. Ensure your chocolate sauce is nut-free.
Chocolate Lover’s Dream
For an intensified chocolate experience, use chocolate graham crackers for the crust. You could also add a couple of tablespoons of cocoa powder to the cream cheese filling mixture and use a chocolate-flavored peanut butter if available, plus more chocolate sauce for drizzling.
How to Serve and Pair
These Drumstick frozen dessert bars are fantastic served chilled, straight from the freezer. When serving, cut them into neat squares or rectangles. A little extra drizzle of warm chocolate sauce right before serving adds a lovely touch and a delicious contrast in temperature. They pair wonderfully with a cold glass of milk, a refreshing iced coffee, or even a sparkling water with a hint of fruit. These bars are perfect for casual backyard barbecues, birthday parties, movie nights at home, or whenever a sweet craving strikes after dinner.
Storage and Reheating
Refrigerator
Since these are frozen dessert bars, refrigeration is not the ideal long-term storage method, as they will soften considerably. However, if you’ve thawed them and have leftovers, they can be stored covered in the refrigerator for up to 2-3 days. Be aware they will lose their firm texture and become quite soft.
Freezer
The freezer is where these bars truly shine! Store them tightly covered with plastic wrap and then aluminum foil in the freezer. They are best enjoyed within 1 to 2 months for optimal flavor and texture. Properly wrapped, they can last longer, but the texture might change slightly over extended periods.
Room Temperature
These bars are not meant to be stored at room temperature. They will melt very quickly due to the cream cheese and whipped topping components, making them unsuitable for leaving out.
Reheating
Reheating is not applicable for this frozen dessert. The goal is to keep them frozen and firm. If they’ve become too soft from thawing, simply return them to the freezer until firm again before serving.
Nutritional Values
- Calories: approximately 350-400 per serving
- Protein: 5-7g
- Carbohydrates: 40-45g
- Fat: 20-25g
- Fiber: 2-3g
Approximate values.
Frequently Asked Questions (FAQ)
Can I use a different type of cookie for the crust?
Yes, you can absolutely use a different cookie for the crust! Try vanilla wafers, shortbread, or even chocolate chip cookies. Just ensure you have about 1 ½ cups of crumbs and adjust the butter slightly if the cookie texture differs.
How do I know when my Drumstick frozen dessert bars are firm enough to cut?
The bars are firm enough when they are completely solid to the touch and don’t indent easily when gently pressed. You should be able to run a knife through them without extreme difficulty, although a slight resistance is expected from a frozen dessert.
My filling seems too soft. What went wrong?
If your filling is too soft, it likely means the cream cheese and Cool Whip weren’t fully chilled or incorporated properly, or the bars didn’t freeze long enough. Ensure all your chilled components are cold and allow ample freezing time, at least for the suggested 2-3 hours.
Can I make these Drumstick frozen dessert bars ahead of time?
Absolutely! These bars are designed to be made ahead. In fact, they need time to freeze and set, so preparing them a day or two in advance is perfectly ideal for parties or when you need a convenient dessert ready to go.
What are the best ways to customize or serve these bars?
To customize, add mini chocolate chips or chopped candy bars to the filling, or swirl in some caramel sauce. For serving, a dusting of cocoa powder or a dollop of whipped cream can elevate them further, alongside the classic chocolate drizzle and peanut topping.
CONCLUSION
These Drumstick frozen dessert bars are a delightful, no-bake treat that brings iconic flavors into an easy-to-share format. They are the perfect blend of creamy, crunchy, and sweet, making them an absolute crowd-pleaser for any occasion. Give them a try and experience the irresistible chocolatey, peanut-buttery goodness that makes this dessert a true standout.
Print
Drumstick Frozen Dessert Bars: A No-Bake Dream
- Prep Time: 15 minutes
- Cook Time: 0 minutes
- Total Time: 2 hours 15 minutes
- Yield: 12 servings 1x
- Category: Dessert
- Method: No Bake
- Cuisine: American
- Diet: Vegetarian
Description
This Drumstick Frozen Dessert is a crowd-pleasing no-bake treat with a graham peanut crust, creamy peanut butter filling, chocolate drizzle, peanuts, and crushed sugar cones.
Ingredients
- 1 1/2 cups graham cookie crumbs
- 1/2 cup peanuts, crushed
- 1/4 cup butter
- 8 ounces cream cheese
- 1/2 cup powdered sugar
- 1/2 cup peanut butter
- 2 teaspoons vanilla
- 8 ounces Cool Whip
- Chocolate sauce, for drizzle
- 3/4 cup peanuts, chopped
- 4 sugar cones, crushed
Instructions
1. Spray a 9×13-inch pan with cooking spray and set aside.
2. In a medium bowl, combine the graham cookie crumbs, crushed peanuts, and butter until the mixture resembles coarse crumbs.
3. Press the crust mixture evenly into the bottom of the prepared pan.
4. In a large bowl, beat the cream cheese, peanut butter, and powdered sugar until smooth.
5. Add the vanilla and mix well.
6. Using a spatula, gently fold the Cool Whip into the cream cheese mixture.
7. Spread the filling evenly over the crust.
8. Drizzle chocolate sauce over the top of the filling.
9. Sprinkle the chopped peanuts and crushed sugar cones across the top.
10. Cover with plastic wrap and freeze until firm, about 2 hours.
11. Remove from the freezer 5-10 minutes before serving.
12. Cut into squares and serve with additional chocolate sauce if desired.
13. Store covered in the freezer.
Notes
Serve with extra chocolate sauce for a true drumstick-style dessert.
Remove from the freezer a few minutes before slicing for cleaner cuts.
Store covered in the freezer.
Nutrition
- Serving Size: 1 square


