
No Bake Chocolate Mousse Cheesecake
No Bake Chocolate Mousse Cheesecake is the dessert dream we all need, especially on those warmer days when turning on the oven feels like a chore. It’s that perfect blend of smooth, rich chocolate mousse and a tangy, creamy cheesecake filling, all nestled on a crunchy, irresistible cookie crust. I remember the first time I attempted something like this; I was convinced it would be too complicated, but this recipe completely changed my mind. It’s surprisingly simple and delivers that ‘wow’ factor without any baking fuss.
This dessert is a true showstopper, proving that you don’t need fancy culinary school training to create something that tastes absolutely divine. Whether you’re a seasoned baker looking for a quick win or a beginner embarking on your dessert-making journey, this no bake chocolate mousse cheesecake is designed to bring joy and deliciousness to your table with minimal effort and maximum reward. It’s the kind of treat that makes everyone ask for the recipe, and you’ll be happy to share it!
What is No Bake Chocolate Mousse Cheesecake?
At its heart, a No Bake Chocolate Mousse Cheesecake is an elegant dessert that combines the best of two beloved treats: classic cheesecake and light, airy chocolate mousse. Unlike traditional cheesecakes that require baking, this version relies on the magic of refrigeration to set. The base is typically a crushed cookie crust, often made from Oreos for that extra chocolatey punch, providing a delightful crunch to contrast with the smooth filling.
The star of this dessert is the filling itself, which features a rich, decadent chocolate mousse layered over a creamy, subtly tangy cheesecake base. It’s a harmonious balance of deep chocolate flavor, a hint of cream cheese tang, and an unparalleled velvety texture that melts in your mouth. This no bake marvel is perfect for any occasion, from casual family dinners to more formal gatherings, offering a sophisticated dessert experience that’s incredibly approachable to make at home.
Reasons to Try No Bake Chocolate Mousse Cheesecake
One of the biggest draws of this No Bake Chocolate Mousse Cheesecake is its sheer simplicity, making it a fantastic choice for home cooks of all skill levels. It skips the often-intimidating baking process, eliminating worries about cracked cheesecakes or imperfect browning. This means less stress and more time to enjoy the process and anticipate the delicious outcome. It’s a truly forgiving recipe that consistently delivers a wonderfully rich and satisfying dessert.
Beyond its ease, this dessert is incredibly versatile and always a crowd-pleaser. The combination of chocolate and cheesecake is universally loved, and the no-bake aspect means it’s perfect for summer gatherings when you want to keep your kitchen cool. It’s an ideal make-ahead dessert, allowing you to prepare it a day in advance, freeing you up to enjoy your guests. For beginners, it’s a confidence-booster, and for busy individuals, it’s a lifesaver that provides a gourmet-tasting treat with minimal effort.
Ingredients Needed to Make No Bake Chocolate Mousse Cheesecake
To create this delightful No Bake Chocolate Mousse Cheesecake, you’ll need a few key ingredients that come together to make something truly special. Here’s what you’ll want to gather from your pantry and fridge:
- For the Crust:
- 23 Oreo cookies (ground into fine crumbs for that perfect base)
- 5 tablespoons unsalted butter (melted, to bind the crumbs together)
- For the Chocolate Mousse Filling:
- 8 ounces semi-sweet chocolate (chopped into small pieces for easy melting)
- 16 ounces cream cheese (two blocks, softened to room temperature – this is crucial for a smooth filling)
- 1 cup powdered sugar (for sweetness and a silky texture)
- 2 teaspoons vanilla bean paste (or vanilla extract for that warm, comforting flavor)
- 1½ cups heavy whipping cream (cold, for whipping into airy mousse)
- For Topping (Optional):
- Fresh whipped cream, fresh berries, chocolate shavings, or cocoa powder for dusting
Instructions to Make No Bake Chocolate Mousse Cheesecake – Step by Step
Let’s bring this amazing No Bake Chocolate Mousse Cheesecake to life, step by delicious step. Remember, the secret to a great no-bake dessert is patience during the chilling stages!
Step 1: Prepare the Cookie Crust
Begin by grinding your Oreo cookies into fine crumbs. You can use a food processor, a blender, or even place them in a sturdy zip-top bag and crush them with a rolling pin – it’s a great stress reliever! In a medium bowl, combine these fine crumbs with the 5 tablespoons of melted unsalted butter. Stir everything together until the crumbs are evenly moistened, resembling wet sand. This mixture will form the sturdy base of our cheesecake. Press this crumbly mixture firmly and evenly into the bottom and slightly up the sides of a 9-inch springform pan. If you want to ensure an easy release later, a little trick I love is to line the bottom of the pan with a circle of parchment paper before pressing the crust. Once pressed, pop the pan into the refrigerator to chill and firm up while you move on to the decadent filling. This chilling time is important for a crust that holds its shape.
Step 2: Melt the Chocolate for the Mousse
Now, let’s get that rich chocolate flavor ready. Take your 8 ounces of semi-sweet chocolate, chopped into small pieces, and place it in a medium microwave-safe bowl. Microwave it on medium power in 15-30 second intervals, stirring gently after each burst. It’s important to stir frequently to prevent the chocolate from burning and becoming grainy. Keep going until the chocolate is completely melted and smooth. If you prefer, you can also melt the chocolate using a double boiler over simmering water, stirring constantly until smooth. Once melted, set the bowl aside to cool slightly. We don’t want it too hot when we add it to the cream cheese mixture, or it could affect the texture.
Step 3: Create the Creamy Cheesecake Base
In a large mixing bowl, combine the 16 ounces of softened cream cheese. Ensure your cream cheese is truly at room temperature – this is key for a super smooth filling without any lumps. Add the 1 cup of powdered sugar and the 2 teaspoons of vanilla bean paste (or extract) to the cream cheese. Using an electric hand mixer, beat these ingredients together until the mixture is completely smooth and creamy, with absolutely no lumps remaining. Scrape down the sides of the bowl a couple of times to make sure everything is incorporated. Then, it’s time to add that beautifully melted and slightly cooled semi-sweet chocolate. Beat again until the chocolate is fully incorporated into the cream cheese mixture, creating a gorgeous, rich chocolate base for our mousse.
Step 4: Whip the Cream and Fold into the Mousse
In a separate, large, and clean bowl, pour in the 1½ cups of cold heavy whipping cream. Using your electric hand mixer, beat the cream on medium-high speed. Watch carefully! You’re looking for stiff peaks to form – this means when you lift the beaters, the cream should stand up straight without drooping. This whipped cream is what will give our chocolate mixture that light, airy mousse texture. Now, gently fold this whipped cream into the chocolate cream cheese mixture. You can do this in two additions: add about half the whipped cream and carefully fold it in with a spatula until just combined. Then, add the remaining whipped cream and fold again until there are no more streaks of cream visible. Be gentle to keep as much air in the mixture as possible; this is crucial for a light mousse!
Step 5: Assemble and Chill Your Cheesecake
Retrieve your chilled crust from the refrigerator. Carefully spread the luscious chocolate mousse filling evenly over the crust. Use your spatula to smooth the top, creating a beautiful, inviting surface. Once the filling is smooth and evenly distributed, cover the springform pan tightly with plastic wrap or aluminum foil. It’s essential to let this No Bake Chocolate Mousse Cheesecake chill thoroughly to set properly. Place it in the refrigerator for at least 4-5 hours, or for the best texture and firmness, let it chill overnight. This extended chilling period allows the flavors to meld and the mousse to achieve that perfect, sliceable consistency.
Step 6: Garnish and Serve Your Masterpiece
When you’re ready to serve your beautiful No Bake Chocolate Mousse Cheesecake, carefully unbuckle the sides of the springform pan. If you used parchment paper on the bottom, you can gently slide the cheesecake off after removing the ring. Now for the fun part – decorating! The possibilities are endless. You can top it with dollops of freshly whipped cream, a scattering of vibrant fresh berries like strawberries or raspberries, or even some elegant chocolate shavings. A light dusting of cocoa powder can also add a sophisticated touch. Slice your creation with a sharp knife (wiping it clean between slices helps for neat cuts) and serve immediately to your delighted guests. Enjoy the incredible creamy texture and rich chocolate flavor!
Chef’s Tips for a Perfect Result
- Use High-Quality Chocolate: Since chocolate is the star, using a good quality semi-sweet chocolate (around 50-60% cacao) will significantly impact the final flavor. Avoid candy melts, as they don’t melt or set as well.
- Room Temperature Cream Cheese is Key: Ensure your cream cheese is truly softened to room temperature before beating. This prevents lumps and creates a luxuriously smooth filling.
- Don’t Overbeat When Folding: Be gentle when folding the whipped cream into the chocolate mixture. Overmixing can deflate the air, resulting in a denser mousse.
- Chill Thoroughly: Patience is a virtue here. Allow the full chilling time (at least 4-5 hours, preferably overnight) for the cheesecake to set properly for clean slices.
- Prepare the Crust Well: Press the crust mixture firmly and evenly into the pan. A well-compacted crust provides a stable base for the creamy filling.
- Consider the Pan Size: While a 9-inch springform pan is standard, using a slightly smaller pan might result in a taller, more dramatic cheesecake, but ensure it has enough depth.
Variations and Substitutions
- For a Gluten-Free Alternative:
-
What to Change: Substitute the Oreo cookies with gluten-free chocolate sandwich cookies or use a gluten-free graham cracker crust.
How it Impacts: The flavor will be similar, but the texture of the crust might vary slightly depending on the cookie used. - For a Richer Chocolate Flavor:
-
What to Change: Use a mix of semi-sweet and dark chocolate (70% cacao), or even add a tablespoon of unsweetened cocoa powder to the cream cheese mixture.
How it Impacts: This will deepen and intensify the chocolate flavor, making it more suitable for serious chocolate lovers. - For a Mint Chocolate Twist:
-
What to Change: Add a few drops of peppermint extract to the chocolate filling along with the vanilla, or incorporate mint chocolate chips.
How it Impacts: This creates a refreshing and classic mint-chocolate combination. - Budget-Friendly Crust Swap:
-
What to Change: Instead of Oreos, use regular graham crackers or digestive biscuits for the crust. You might need to adjust the butter slightly.
How it Impacts: This changes the crust flavor from intensely chocolatey to a more classic graham cracker tang, which is still delicious. - Vegan No Bake Chocolate Mousse Cheesecake:
-
What to Change: Use vegan chocolate sandwich cookies for the crust and vegan butter. For the filling, replace cream cheese with vegan cream cheese, heavy cream with full-fat coconut cream (chilled overnight, only the thick cream part used), and ensure your chocolate is dairy-free.
How it Impacts: This allows for a dairy-free and vegan version, though the texture and richness might vary slightly based on the specific vegan products used.
How to Serve and Pair
This No Bake Chocolate Mousse Cheesecake is a treat that shines on its own, but a few thoughtful additions can elevate its presentation and taste even further. For a classic and utterly delightful pairing, halo it with freshly whipped cream – the light sweetness and airy texture are the perfect counterpoint to the rich chocolate. A handful of fresh berries, like bright red strawberries, raspberries, or even blueberries, adds a welcome burst of tartness and a beautiful pop of color that contrasts wonderfully with the deep chocolate hue. For an extra touch of chocolate indulgence, consider a sprinkle of chocolate shavings or curls over the top.
Presentation-wise, serving from a springform pan makes for a clean, impressive reveal. Once un-molded, you can serve individual slices directly onto dessert plates. This dessert is perfect for almost any occasion: it’s elegant enough for a dinner party, celebratory enough for birthdays or anniversaries, yet simple enough for a cozy weekend treat. It pairs beautifully with a glass of cold milk, a sweet dessert wine (if you enjoy them), or even a warm cup of coffee, which can enhance the chocolate notes. Consider serving it after a hearty meal as a decadent, yet surprisingly light, finish.
Storage and Reheating
Refrigerator
Leftover slices of your No Bake Chocolate Mousse Cheesecake will keep wonderfully in the refrigerator. Store them in an airtight container to prevent them from picking up any other odors. Properly stored, they should remain delicious for up to 3 to 4 days. The creamy texture holds up well, and it often tastes even better the next day as the flavors continue to meld together.
Freezer
While this cheesecake is best enjoyed fresh, it can be frozen for longer storage. It’s best to freeze individual slices tightly wrapped in plastic wrap, followed by a layer of aluminum foil or placed in a freezer-safe container. This helps to protect it from freezer burn. Frozen cheesecake can be stored for up to 1 to 2 months. Keep in mind that the texture might slightly change upon thawing, becoming a bit softer.
Room Temperature
Because this cheesecake contains dairy and is not baked, it’s not recommended to leave it at room temperature for extended periods. It should only be left out for about 1-2 hours while serving, to avoid spoilage and maintain its best texture. Once serving is complete, it should be promptly returned to the refrigerator.
Reheating
Reheating isn’t typically necessary for a no-bake dessert like this, as it’s designed to be served chilled. If you have frozen slices, the best method for thawing is to move them from the freezer to the refrigerator and let them thaw slowly overnight. This gentle thawing process helps to preserve the creamy texture best. Avoid thawing at room temperature or using a microwave, as this can make the cheesecake watery or alter its consistency significantly.
Nutritional Values
- Calories: Approximately 450-550 per slice (will vary based on exact ingredients and portion size)
- Protein: Around 5-7g
- Carbohydrates: Around 40-50g
- Fat: Around 30-40g
- Fiber: Around 2-4g
Approximate values.
Frequently Asked Questions (FAQ)
Can I substitute the type of chocolate used in the mousse filling?
Yes, you can substitute the semi-sweet chocolate with milk chocolate for a sweeter mousse or dark chocolate (70% or higher cacao) for a more intense, less sweet flavor. Using milk chocolate might require slightly less powdered sugar, while dark chocolate will yield a richer, bolder taste.
How do I know when the No Bake Chocolate Mousse Cheesecake is properly set?
The cheesecake is properly set when the center is firm to the touch and doesn’t jiggle excessively. When you insert a knife or spatula to slice it, it should come out clean with no creamy filling sticking to it, indicating it has reached its desired density.
My cheesecake filling is lumpy, what went wrong?
Lumps usually occur when the cream cheese is not fully softened to room temperature or if the chocolate was added while too hot. Ensure the cream cheese is very soft and allow the melted chocolate to cool slightly before incorporating it into the cream cheese mixture.
Can I make this No Bake Chocolate Mousse Cheesecake completely ahead of time?
Absolutely! This cheesecake is ideal for making ahead. It needs at least 4-5 hours to chill and set, but preparing it the day before you plan to serve it is highly recommended, as it allows the flavors to deepen and the texture to firm up perfectly.
What are the best ways to customize or serve this chocolate mousse cheesecake?
You can customize it by adding a swirl of raspberry or caramel sauce into the filling before chilling, or by layering different types of cookie crumbs. For serving, consider a dusting of cocoa powder, a dollop of whipped cream, or a medley of fresh berries for added color and flavor.
CONCLUSION
This No Bake Chocolate Mousse Cheesecake is a delightful testament to creating incredible desserts without the oven. It’s incredibly creamy, rich, and surprisingly simple to assemble, making it a perfect treat for any home cook. Gather your ingredients, follow these easy steps, and prepare to enjoy a truly irresistible, decadent chocolate experience that will leave everyone asking for seconds!
Print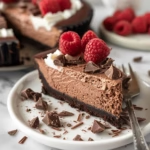
No Bake Chocolate Mousse Cheesecake
- Prep Time: 15
- Total Time: 60
- Yield: 12 1x
- Category: desserts
- Method: No Bake
- Cuisine: American
- Diet: Vegetarian
Description
A sublime, no-bake dessert that layers rich chocolate mousse over a creamy cheesecake filling and a chocolatey cookie crust. Perfect for warm days or effortless entertaining, this indulgent treat sets in the fridge and requires no special skills to create. A crowd-pleaser with a velvety texture and vibrant flavor.
Ingredients
1 1/2 cups crushed Oreos (or halal chocolate cookies)
1/4 cup melted butter
1 cup heavy cream
1 cup semi-sweet chocolate chips
1/4 cup powdered sugar (sugar-free option available)
16 oz cream cheese, softened
1/2 cup granulated sugar
1 tsp vanilla extract
1/4 cup milk
1 tbsp gelatin powder (halal-certified, optional)
Instructions
Mix crushed Oreos with melted butter to form the crust. Press into the bottom of a springform pan.
In a bowl, whisk heavy cream until stiff peaks form. Set aside.
Melt chocolate chips with powdered sugar, then mix with 1/4 cup milk. Fold in 1/3 of the whipped cream to loosen.
Beat cream cheese, granulated sugar, and vanilla until smooth. Gently fold in the remaining whipped cream.
Spoon the chocolate mousse over the crust, then add the cream cheese layer. Chill for 4-6 hours to set.
Top with fresh berries and halal-certified chocolate sauce before serving.
Notes
Substitute gelatin with tapioca starch or agar agar for a halal, alcohol-free alternative.
Crush cookies in a food processor or with a rolling pin for a finer crust.
Chill for at least 4 hours, but overnight results in best texture.
Wrap tightly in plastic if refrigerating for 24+ hours.
Nutrition
- Serving Size: 1 slice
- Calories: 680
- Sugar: 50g
- Sodium: 340mg
- Fat: 47g
- Saturated Fat: 35g
- Carbohydrates: 45g
- Fiber: 2g
- Protein: 35g
- Cholesterol: 180mg


