Banana icebox cake is one of those comforting desserts that just feels like a hug in a dish. It’s the kind of treat that brings back sweet memories, maybe of childhood summers or quiet afternoons spent in the kitchen. This particular recipe is a favorite because it’s so wonderfully simple to throw together, yet it delivers a rich, creamy, and satisfying banana flavor that everyone adores. It’s a testament to how a few humble ingredients can transform into something truly special without needing a fancy technique or fuss.
What I love most about this banana icebox cake is its fuss-free nature. You don’t need to turn on the oven, worry about intricate steps, or spend hours slaving away. It’s perfect for those moments when you crave a homemade dessert but time or energy are in short supply. It truly is a no-bake wonder that tastes like it came from a beloved bakery, proving that simple can often be the most delicious.
What is Banana Icebox Cake?
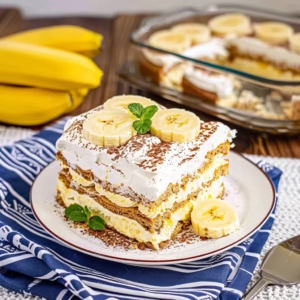
At its heart, banana icebox cake is a layered dessert that relies on the magic of refrigeration to set and meld its flavors. It typically involves layers of cookies or crackers, a creamy pudding or custard-like filling, and often fresh fruit. Think of it as a no-bake cheesecake meets banana cream pie, all stacked up to create a delightful experience with every spoonful. This version brings together the delightful flavors of banana cream pudding, airy whipped topping, and the classic crunch of graham crackers.
The beauty of this banana icebox cake lies in its accessibility. You don’t need to be a seasoned baker to achieve a stunning result. The simplicity of the ingredients – readily available at most grocery stores – means you can whip this up on a whim. It’s a dessert designed for enjoyment, for sharing, and for making everyday moments feel a little sweeter, just like those spontaneous gatherings with friends where someone always asks, “What’s for dessert?”
Reasons to Try Banana Icebox Cake
There are so many wonderful reasons why this banana icebox cake deserves a spot in your recipe repertoire. Chief among them is the sheer ease of preparation. If you can whisk and layer, you can make this cake. It’s a lifesaver for busy weeknights, last-minute gatherings, or when that sweet craving hits unexpectedly. Plus, it requires no baking, which means your kitchen stays cool and inviting, no matter the weather outside.
Beyond its effortless nature, the taste and texture are simply sublime. The creamy banana filling is luscious and smooth, beautifully complemented by the tender graham cracker layers that soften just enough in the fridge without becoming mushy. It appeals to a wide audience, from kids who adore anything banana-flavored to adults who appreciate a nostalgic, comforting dessert. It’s a guaranteed crowd-pleaser that always gets rave reviews without the stress.
Ingredients Needed to Make Banana Icebox Cake
-
2 (3.4 ounce) boxes instant banana cream pudding mix
-
3 cups cold milk
-
2 (8 ounce) containers whipped topping, thawed
-
1 (14.4 ounce) box graham crackers
-
Fresh banana slices, for garnish (optional)
Instructions to Make Banana Icebox Cake – Step by Step
Step 1: Prepare the Pudding Base
Begin by gathering a large mixing bowl. Into this bowl, add the contents of both boxes of instant banana cream pudding mix. Pour in the 3 cups of cold milk. Now, grab a whisk and get started! Whisk the pudding mix and milk together until they are thoroughly combined. Keep whisking for about a minute or so until the mixture begins to noticeably thicken. You’re looking for a consistency that’s starting to set, much like a soft-serve ice cream. This forms the delicious, creamy heart of our icebox cake.
Step 2: Incorporate the Whipped Topping
Once your pudding base has reached that lovely thickened state, it’s time to add the lightness. Take one of the 8-ounce containers of thawed whipped topping and gently fold it into the pudding mixture. Use a spatula or a large spoon for this, carefully incorporating the whipped topping until it’s just blended. You want to maintain as much of that airy volume as possible, so avoid overmixing. This step makes the filling wonderfully smooth and luscious, setting the stage for that signature icebox cake texture. Set this mixture aside for now; it’s going to blanket our layers perfectly.
Step 3: Start Layering the Crackers
Now, let’s get to the assembly! Take your 9×13 inch baking dish. Begin by arranging about one-fourth of your graham crackers across the bottom of the dish. It’s perfectly fine if you need to break some of the crackers to fill in gaps and ensure a nice, even base. Don’t worry about making it absolutely perfect; a few small gaps are easily handled in the next steps. This forms the foundational layer that will soften beautifully as the cake chills, creating a delightful contrast.
Step 4: Add the First Pudding Layer and Repeat
With your cracker base in place, it’s time for the creamy filling. Spoon about one-third of your prepared banana pudding mixture over the graham crackers. Gently spread it out with your spatula to create an even layer, making sure to reach the edges of the dish. Now, repeat the process: place another layer of graham crackers on top of the pudding, followed by another third of the pudding mixture. Do this one more time, so you have three layers of pudding and graham crackers. This is where the magic happens, building up those delicious strata of flavor and texture.
Step 5: The Final Topping and Chill Time
For the very top layer, take the remaining 8-ounce container of whipped topping. Carefully spread this over the final layer of graham crackers, ensuring it covers them completely. You want to create a smooth, unbroken surface – this helps the cake set evenly and looks so inviting. Once that’s done, cover the dish tightly with plastic wrap. Now comes the hardest part: waiting! Place the covered cake in the refrigerator for at least 6 hours, or for the best results, let it chill overnight. This crucial chilling time allows the flavors to meld and the creaminess to set perfectly.
Step 6: Garnish and Serve
Once your banana icebox cake is fully chilled and set, it’s time for the grand finale! Just before you’re ready to serve, remove the plastic wrap. You can use any leftover graham cracker crumbs you might have saved, or lightly crush a few more, and sprinkle them over the top. Neatly arranged fresh banana slices add a lovely visual appeal and an extra burst of banana flavor. Slice into generous portions and enjoy the wonderful symphony of creamy and crunchy textures.
Chef’s Tips for a Perfect Result
-
Always use cold milk when preparing the instant pudding to ensure it thickens properly and quickly.
-
Gently fold in the whipped topping to preserve its airy texture, which is key for a light and creamy filling.
-
Don’t be afraid to break graham crackers to fit; an even base ensures every bite is delicious.
-
Allow ample chilling time, ideally overnight, for the flavors to meld and the cake to set thoroughly.
-
For an even richer banana flavor, consider adding a teaspoon of mashed ripe banana to the pudding mixture, but be sure to keep the chill time consistent.
-
Ensure the whipped topping completely covers the top layer of graham crackers to prevent them from drying out during refrigeration.
Variations and Substitutions
-
Gluten-Free Alternative: Swap out the graham crackers for your favorite gluten-free cookies, such as shortbread or vanilla wafers, ensuring they are sturdy enough to layer. The texture might be slightly different but still delicious.
-
Dairy-Free Option: Use plant-based milk (like almond or soy) and dairy-free whipped topping. For the pudding, ensure you select an instant pudding mix that is dairy-free or use a dairy-free vanilla or banana flavored pudding prepared according to package directions with plant-based milk.
-
Add Some Crunch: For a delightful textural contrast, sprinkle a layer of chopped toasted pecans or walnuts between the pudding layers or on top.
-
Enhanced Banana Flavor: For those who adore an intense banana taste, you can mash one ripe banana very smoothly and fold it into the pudding mixture along with the whipped topping.
How to Serve and Pair
This banana icebox cake is a showstopper on its own, but a few thoughtful touches can elevate the experience. Serve each slice slightly chilled, allowing the creamy texture to be at its best. Garnishing with fresh, thinly sliced bananas right before serving adds a beautiful visual appeal and a pop of freshness. A dusting of crushed graham cracker crumbs also provides a rustic, homemade look.
For pairing, this dessert shines with a simple glass of cold milk, a rich coffee, or warm herbal tea. It’s fantastic on its own for a casual family dessert, but it also makes an impressive yet easy finale for a potluck, a backyard barbecue, or a relaxed holiday gathering. Imagine serving this after a comforting meal; it’s the perfect sweet ending that doesn’t overwhelm the palate. It’s especially wonderful for celebrations where you want a show-stopping dessert without the oven stress, like a summer birthday party.
Storage and Reheating
Refrigerator
Store the banana icebox cake covered tightly with plastic wrap in the refrigerator. It will keep well for up to 4 days. The texture remains wonderfully creamy, and the flavors continue to meld beautifully. Ensure it’s well-covered to prevent it from absorbing any other odors in the fridge.
Freezer
This icebox cake freezes remarkably well! Wrap it securely in plastic wrap, and then add a layer of aluminum foil to prevent freezer burn. It can be stored in the freezer for up to 3 months. It’s delicious served slightly frozen, offering a refreshing, almost ice cream-like consistency.
Room Temperature
It’s best to keep this cake refrigerated if it contains dairy or whipped topping, as it is designed to be served chilled. Leaving it out at room temperature for extended periods (more than 2 hours) is not recommended due to food safety concerns and potential changes in texture.
Reheating
There’s no need to reheat banana icebox cake; it’s meant to be enjoyed cold. If it’s been frozen, allow it to thaw in the refrigerator for several hours or overnight before serving. If you prefer it slightly softer than fully frozen, you can let it sit at room temperature for about 15-20 minutes before slicing.
Nutritional Values
-
Calories: 268kcal
-
Protein: 3g
-
Carbohydrates: 45g
-
Fat: 8g
-
Fiber: 1g
Approximate values.
Frequently Asked Questions (FAQ)
Can I use a different type of cookie instead of graham crackers?
Yes, you can certainly substitute graham crackers with other cookies like vanilla wafers, shortbread, or even gingersnaps for a spicier kick. The key is to choose a cookie that is sturdy enough to layer and will soften nicely within the refrigerator.
How do I know when the banana icebox cake is ready to serve?
The cake is ready when it has chilled for at least 6 hours, or ideally overnight. You’ll know it’s properly set when the pudding layers are firm and the edges are no longer visibly soft. It should feel solid but yield gently when pressed.
My pudding didn’t thicken properly, what went wrong?
Instant pudding typically requires cold liquid to thicken. If your pudding didn’t set, it’s likely because the milk wasn’t cold enough. Ensure everything is well-chilled and whisk for the full minute or until it begins to thicken before adding other ingredients.
Can I make this banana icebox cake a day in advance?
Absolutely! This banana icebox cake is perfect for making ahead. In fact, chilling it overnight is highly recommended to allow the flavors to meld and the biscuit layers to soften. It will be even better the next day.
What are some creative ways to customize this icebox cake?
Get creative by adding a layer of sliced fresh bananas between the cracker and pudding layers for extra banana flavor. You could also swirl in some caramel sauce or add a pinch of cinnamon to the pudding mixture for a warm, spiced note.
CONCLUSION
This banana icebox cake is the epitome of simple, no-bake perfection. It’s a wonderfully comforting dessert that’s incredibly easy to make, perfect for any home cook. The signature creamy banana flavor, balanced with the tender graham cracker layers, makes it an absolutely irresistible treat that you’ll want to make again and again.
Print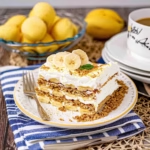
Easy Banana Icebox Cake: A No-Bake Dessert Dream
- Prep Time: 15
- Total Time: 15
- Yield: 6 servings 1x
- Category: desserts
- Method: No-Bake
- Cuisine: American
- Diet: Vegetarian
Description
This creamy, no-bake banana icebox cake layers graham crackers, banana cream pudding, and whipped topping for a nostalgic, comforting dessert. Perfect for busy days or spontaneous gatherings, it’s a fuss-free treat that tastes like a bakery classic.
Ingredients
1 ½ cups crushed graham crackers
2 cups prepared banana cream pudding
1 cup whipped topping
2 ripe bananas, sliced
Pinch of ground cinnamon (optional)
Instructions
1. Crush 1 ½ cups graham crackers into a food processor or using a rolling pin
2. Lightly grease an 8×8-inch loaf pan with nonstick spray
3. Layer ½ of the crushed graham crackers into the pan as a base
4. Spread 1 cup of banana pudding over the graham cracker layer
5. Top with ½ cup of whipped topping
6. Repeat layers with remaining graham crackers, pudding, and whipped topping
7. Place in refrigerator, covered, for at least 4 hours or overnight
8. Before serving, garnish with banana slices and a dash of cinnamon
Notes
Use dairy-free whipped topping for vegan adaptation
For a homemade touch, prepare pudding mixture with banana puree and custard base
Chill cake for best texture and flavor melding
Nutrition
- Serving Size: 1 serving
- Calories: 225
- Sugar: 9g
- Sodium: 68mg
- Fat: 6g
- Saturated Fat: 3g
- Carbohydrates: 18g
- Fiber: 1g
- Protein: 2g
- Cholesterol: 20mg