
The BEST Oreo Dessert is a heavenly no-bake marvel that turns humble ingredients into a layered masterpiece. Imagine a crisp Oreo base, silky chocolate pudding, and clouds of whipped cream layered together, crowned with crunchy cookie crumbs. It’s a dessert that whispers sweet simplicity but sings with bold flavor. Whether you’re a first-time baker or a seasoned pro, this recipe invites you to savor the magic of creating something rich and comforting from just a few pantry staples. With its effortless preparation and crowd-pleasing charm, it’s the kind of treat you’ll find yourself making for holidays, family dinners, or even a spontaneous Friday night reward. Let’s dive into how this Oreo wonder became my kitchen’s new star.
Every Oreo lover knows the thrill of that cookie’s classic chocolate-crisp-cream contrast. But this dessert elevates the humble Oreo to new heights by combining it with velvety textures and sweet warmth. The BEST Oreo Dessert isn’t just a treat—it’s a tribute to the joy of no-knead, no-fuss baking. It’s a dessert born from countless kitchen experiments, where curiosity led to the perfect harmony of buttery crust, decadent pudding, and whipped cream. What makes it stand out? The layers work together like a symphony: each bite delivers a medley of crunch, cream, and chocolatey richness that feels like an Oreo dream come true. It’s not just a dessert; it’s a celebration of how even the simplest combinations can become unforgettable.
What is The BEST Oreo Dessert?
The BEST Oreo Dessert is a layered no-bake treat that combines the beloved crispy-chocolate cookie with creamy textures. At its core, it starts with a crushed Oreo base mixed with melted butter, forming a golden, biscuit-like crust. Over that sits a silken chocolate pudding layer, which adds a cool, custardy contrast to the crunch. A topping of whipped cream and Cool Whip gives it a fluffy finish, while a final sprinkle of crumbly Oreo pieces brings textural balance. This dessert is a nod to classic American no-bake creations, where convenience didn’t mean compromising flavor. Its genius lies in using accessible ingredients—Oreos, dairy, and pantry staples—to create something that feels indulgent and luxurious. It’s a dish that’s as much about the experience of making it as it is about devouring it piece by piece.
Reasons to Try The BEST Oreo Dessert
For those juggling a busy schedule or seeking baking simplicity, this dessert is pure serendipity. Its no-bake nature means no preheating, no oven monitoring, and no stressed-out last-minute scrambling. You can whip up the layers in under 30 minutes and let them chill while you relax or prep other dishes. Beginners will find it particularly rewarding, as it requires no advanced techniques—just simple mixing, layering, and patience for the chilling process. Yet the results? Absolutely stunning. It’s a dessert that looks impressive enough for dinner parties but remains approachable for casual family gatherings. Parents will love how quickly it comes together for a kid’s birthday, while dessert enthusiasts will appreciate how each layer plays off the other without overwhelming the senses. It’s a recipe that proves great food doesn’t have to be complicated.
Ingredients Needed to Make The BEST Oreo Dessert
1 package Double Stuf Oreos (regular or family size)
½ cup melted butter (unsalted preferred for balanced flavor)
2 – 3.9 oz. packages of instant chocolate pudding mix
3 ¼ cups milk (whole or 2% for optimal richness)
2 – 8 oz. containers Cool Whip, thawed to room temperature
8 oz. cream cheese, softened (room temperature for smooth texture)
¾ cup powdered sugar
Optional garnish: mini chocolate chips, crushed Oreo topping
Instructions to Make The BEST Oreo Dessert – Step by Step
Step 1: Begin by crushing your Oreos to form the base. Place two rows of Double Stuf Oreos in a large Ziploc bag and seal it tightly. Using the palm of your hand or the back of a rolling pin, gently press down until the cookies break into small, crumb-like pieces. The goal is a coarse but not powdery texture—like a rocky trail mix. If you prefer, a food processor works too, but be careful not to over-process. Transfer the crumbs to a 9 x 13-inch baking pan.
Step 2: While the Oreos are being crushed, melt the butter in the microwave or a small saucepan. When ready, drizzle the melted butter over the crushed Oreo base in the pan. Use a spoon to mix it in thoroughly, ensuring every crumb is coated. Press the mixture evenly into the pan and smooth the surface. Cover it and refrigerate to set for 20 minutes. This step isn’t optional—the butter needs time to firm up and bind the crumbs into a cohesive crust.
Step 3: Now the magic of the pudding. In a large mixing bowl, combine the milk with two pouches of instant chocolate pudding mix. Using a whisk attachment on your stand mixer or a hand mixer, start on low speed to avoid splattering. Once the dry powder is fully wetted down, increase the speed to medium-high and whip until the mixture thickens and becomes glossy, much like a custard. The texture should be smooth enough to drizzle and hold its shape when spooned. Set the pudding in the refrigerator to chill for 10–15 minutes so it firms up slightly.
Step 4: Lightly wash your mixing bowl and whip the softened cream cheese on medium speed until it becomes light and fluffy. It should have a soft peak texture, almost like a cloud on the spatula. Gradually add the powdered sugar, mixing on low to avoid clumps. Once fully incorporated, increase the speed to medium and whip until the mixture is thick and smooth. With a gentle hand, fold in one container of thawed Cool Whip. The key here is slow and steady motion to preserve the lightness of the whipped cream. Set this cream cheese Cool Whip mixture aside in a separate bowl.
Step 5: Now for the layering. Start with the chilled Oreo crust in the pan. Spoon a third of the cream cheese mixture over the crust, using a spatula to spread it into an even layer. Top with half of the chilled chocolate pudding, smoothing the surface as you go. Next, add the second container of Cool Whip in an even layer, then gently sprinkle a thin layer of crushed Oreo crumbs (save a small handful for the final topping). Return the dessert to the refrigerator for at least 2 hours to let the layers bind together. The chilling time is crucial—it allows the textures to firm up and the flavors to meld. Resist the urge to eat it right away (trust me, it’s worth the wait).
Chef’s Tips for a Perfect Result
- Cold butter, warm butter: Melt the butter just until it flows freely; overheating can make it greasy and prevent it from binding the Oreos properly.
- Thaw Cool Whip ahead: Allow the Cool Whip to sit at room temperature for 20–30 minutes before mixing—it whips more voluminous and smooth.
- Layer carefully: Once you spread each layer, smooth it before moving to the next. Air pockets or uneven layers can lead to messy slices.
- Chill aggressively: The dessert needs at least 2 hours of chill time, but 4 hours is ideal for optimal texture.
- Warm knife trick: For clean slices, lightly dip a sharp knife in hot water, wipe with a towel, then cut through the dessert. Repeat for each slice.
- Don’t skip the crust: The buttered Oreo base is the foundation of the dessert—skipping it will make each bite feel unstructured.
Variations and Substitutions
Vegan Option: Replace cream cheese with cashew-based vegan cheese and use non-dairy Cool Whip. Substitute butter with coconut oil for a rich, plant-based crust.
Gluten-Free Alternative: Use gluten-free Oreos and ensure all other ingredients (like Cool Whip and pudding mix) are gluten-free certified.
Low-Carb Version: Swap sugar in the cream cheese for a sugar-free substitute and use unsweetened almond milk in the pudding mixture. Oreo crumbs can be omitted or reduced.
How to Serve and Pair
This dessert pairs beautifully with a strong cup of dark roast coffee or a bold mocha. Serve it in neat squares with a sprinkle of extra Oreo crumbs or chocolate shavings for a decorative touch. For a decadent upgrade, drizzle each slice with chocolate sauce or caramel. It’s perfect for holidays, potlucks, or cozy family dinners. Leftovers freeze incredibly well, making it a go-to dessert for weeks ahead. The BEST Oreo Dessert feels like a party in a pan—bright, bold, and guaranteed to bring smiles.
Storage and Reheating
Refrigerator: Store leftovers in an airtight container for up to 3 days. The layers may soften slightly over time, but the flavors stay vibrant.
Freezer: Wrap the cake tightly in plastic wrap and freeze for up to 2 months. Thaw completely in the refrigerator before slicing to prevent messy texture.
Room Temperature: Left at room temperature, the dessert will firm up within 5–10 minutes. Avoid leaving it out for more than 2 hours.
Reheating: This dessert is best served chilled. If warming, microwave individual slices for 3–5 seconds to soften the texture slightly. Avoid oven reheating, as it can dry out the layers.
Frequently Asked Questions
Can I substitute non-vegan cream cheese?
Yes, replace with store-bought vegan cream-style cheese or a cashew-based alternative. Ensure the texture is firm and spreadable before mixing with powdered sugar.
How do I know the dessert is done after chilling?
The dessert is ready when the layers are firm to the touch and the Oreo crust holds together when lifted with a spatula. It should slice cleanly without slumping.
Why is my Oreo crust too dry or crumbly?
Ensure the butter is fully melted and evenly distributed in the Oreo crumbs. If the crust feels too dry, drizzle a teaspoon of additional melted butter over it before layering.
Can I make this dessert ahead of time?
Absolutely! Prepare and chill the dessert up to 24 hours in advance. Cover it tightly and keep it refrigerated until serving.
What’s the best way to customize the flavor?
Add a teaspoon of vanilla extract to the cream cheese layer or swap the chocolate pudding with vanilla for a classic twist. Sprinkle rainbow sprinkles on top for a festive version.
Conclusion
The BEST Oreo Dessert is a harmonious blend of crunch, cream, and chocolatey delight waiting to be discovered. With its layers of buttery crust, thick pudding, and whipped clouds, it’s a dessert that feels indulgent yet approachable. Every bite is a reminder that extraordinary flavors can emerge from simple ingredients and a little patience. Whether you’re craving a quick treat for the weeknight or planning a showstopping dessert, this recipe proves that sometimes, the best desserts are the ones with zero stress and maximum joy.
Print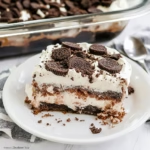
The BEST Oreo Dessert
- Prep Time: 20
- Total Time: 20
- Yield: 24 servings 1x
- Category: desserts
- Method: No-bake
- Cuisine: American
- Diet: Vegetarian
Description
A no-bake layered Oreo masterpiece with a buttery crust, creamy chocolate pudding, and whipped cream topping. Combines crisp, creamy, and dreamy textures for a sweet treat that’s easy to make and perfect for any occasion.
Ingredients
500g Oreo cookies
1/2 cup melted butter
1 cup semisweet chocolate pudding mix
2 1/4 cups cold milk
1 1/2 cups heavy whipping cream
2 tablespoons powdered sugar
1 teaspoon pure vanilla extract
8 oz Cool Whip
24 Oreo cookie halves (for garnish)
Instructions
Crush 48 Oreo cookies using a food processor or ziplock bag and rolling pin
Mix with melted butter until a crumbly mixture holds together
Press evenly into the bottom of a 9×13-inch pan and refrigerate for 15 minutes
Prepare pudding mix by whisking it with cold milk until thickened (about 2-3 minutes)
Pour cooled pudding layer over the crust
Fold whipped cream (made from heavy cream, powdered sugar, and vanilla) into Cool Whip and spoon over the pudding
Chill the dessert for 2 hours before slicing
Sprinkle remaining Oreo halves on top just before serving
Notes
For a halal version, use vegan chocolate pudding mix and non-dairy whipping cream
Double the crumb layer for extra texture
Store in the refrigerator for up to 3 days
Springform pan works well for clean slices
Oreos can be replaced with store-bought chocolate sandwich cookies for variation
Nutrition
- Serving Size: 1 serving
- Calories: 220
- Sugar: 28g
- Sodium: 200mg
- Fat: 10g
- Saturated Fat: 6g
- Carbohydrates: 30g
- Fiber: 1g
- Protein: 3g
- Cholesterol: 30mg


