
The Best Blueberry Cheesecake Recipe
Blueberry cheesecake is one of those desserts that just feels like a special occasion, doesn’t it? It brings back memories of simpler times, maybe a birthday party or a holiday gathering where this showstopper always disappeared first. It’s the kind of dessert that makes people ooh and aah before they even take a bite, and I totally get it. The creamy, tangy filling against that sweet graham cracker crust, with bursts of bright blueberry… it’s an absolute dream.
Over the years, I’ve made my fair share of cheesecakes, and while perfection can feel a little intimidating, this recipe simplifies things beautifully. It’s a testament to how sometimes, simple, quality ingredients and a little bit of patience can create something truly magical. This easy blueberry cheesecake is a recipe that I’ve refined, tweaking until it felt just right – a balance of rich and light, sweet and tart, all coming together in that perfect bite.
What is Blueberry Cheesecake?
Blueberry cheesecake is a classic American dessert that takes the beloved richness of a traditional cheesecake and infuses it with the vibrant, slightly tart flavor of blueberries. It typically features a buttery graham cracker crust forming the base, a dense yet incredibly creamy cheesecake filling, and a delightful swirl of blueberry sauce or fresh berries throughout. Sometimes, the top is adorned with even more of that luscious blueberry goodness, making it as beautiful as it is delicious.
While its exact origins are a bit hazy, cheesecake, in various forms, has been enjoyed for centuries, with the modern New York-style cheesecake gaining popularity in the early 20th century. The addition of fruit, like blueberries, is a natural evolution, adding a burst of freshness and color that contrasts beautifully with the creamy, dairy-forward profile. This particular recipe pulls together those key elements for a truly satisfying experience that’s perfect for any gathering.
Reasons to Try My Blueberry Cheesecake
There are so many reasons why I absolutely adore this blueberry cheesecake, and why I think you will too! First off, it’s incredibly approachable, even if you’ve never made a cheesecake before. I remember my early days in the kitchen, feeling a bit daunted by anything that required a water bath, but this method is built for success, ensuring a smooth, crack-free top that looks as good as it tastes. It’s a wonderfully rewarding bake that brings a smile to everyone’s face.
Beyond its beginner-friendliness, the flavors are just out of this world. The sweetness of the graham cracker crust, the luxurious creaminess of the cheesecake, and the bright, slightly tart notes from the blueberries create a harmonious balance that’s simply irresistible. It’s a dessert that feels both comforting and celebratory, perfect for family dinners, potlucks, or simply when you crave a truly special treat. It’s also wonderfully versatile, making it a go-to for any season or occasion you want to elevate.
Ingredients Needed to Make Blueberry Cheesecake
To bring this delightful blueberry cheesecake to life, you’ll need a few simple ingredients that come together to create pure magic. Here’s what you’ll gather:
- 1 1/2 cups graham cracker crumbs (about 12-13 full graham cracker sheets, crushed)
- 6 tablespoons unsalted butter, melted
- 1/4 cup granulated white sugar
- 2 cups fresh blueberries
- 3 tablespoons granulated white sugar (for the blueberry sauce)
- 1 teaspoon lemon juice
- 1 tablespoon cornstarch
- 1 tablespoon warm water
- 24 ounces cream cheese, softened to room temperature
- 1 cup granulated white sugar (for the filling)
- 1 cup sour cream, at room temperature
- 1/2 tablespoon vanilla extract
- 3 large eggs, at room temperature
Instructions to Make Blueberry Cheesecake – Step by Step
Let’s get baking! This step-by-step guide will walk you through creating this dreamy blueberry cheesecake. Don’t worry if you’ve never made one before; we’ll take it easy, just like we’re chatting in the kitchen.
Step 1: Prepare the Graham Cracker Crust
First things first, let’s get that delightful crust ready. Preheat your oven to 350 degrees Fahrenheit (175 degrees Celsius). Take your graham crackers and crush them into fine crumbs – a food processor or a trusty blender works wonderfully for this, or you can pop them into a sealed bag and give them a good bash with a rolling pin, which is always a satisfying kitchen task! In a medium bowl, combine these fine crumbs with the melted butter and the 1/4 cup of granulated sugar. Stir it all together until the crumbs are evenly moistened, resembling wet sand. Pour this mixture into a 9-inch springform pan that you’ve lightly sprayed with cooking spray. Gently press the crumbs evenly into the bottom and slightly up the sides of the pan to form your crust. To help keep everything neat and prevent leaks, wrap the outside of the springform pan with a couple of layers of heavy-duty aluminum foil, ensuring it covers the bottom and goes up the sides. Bake this crust for about 8 to 10 minutes, just until it’s lightly golden and smells wonderful. Once it’s done, take it out of the oven and let it cool completely on a wire rack while you move on to the blueberry sauce and the creamy filling.
Step 2: Craft the Blueberry Sauce
Now for that gorgeous blueberry swirl! In a small saucepan, combine the fresh blueberries with 3 tablespoons of granulated sugar. Place the saucepan over medium heat and let it cook, stirring occasionally, until the blueberries start to soften and release their juices, and the sugar dissolves. While the berries are cooking, in a separate small bowl, whisk together the lemon juice, cornstarch, and warm water until you have a smooth slurry with no lumps. Once the blueberry mixture is bubbling and starting to thicken slightly, add this cornstarch slurry to the saucepan. Stir it all together, gently mashing some of the berries with your spoon to help thicken the sauce further. Continue to cook and stir for another minute or two until the sauce has reached a lovely, thickened consistency. Remove the saucepan from the heat. For the smoothest swirl, press this blueberry mixture through a fine-mesh sieve set over a bowl. This will separate the concentrated blueberry juice from the skins and pulp, giving you a smooth sauce to swirl. Save this beautiful blueberry juice for your cheesecake! The leftover berries you mashed through can be mixed back in and saved separately, perhaps to top your finished cheesecake.
Step 3: Make the Creamy Cheesecake Filling
This is where the magic happens for that signature creamy texture! Make sure your cream cheese is truly softened – this is key for a smooth batter. In the bowl of a stand mixer fitted with the paddle attachment (or using a sturdy hand mixer and a large bowl), beat the softened cream cheese on medium speed until it’s completely smooth and creamy, with absolutely no lumps. This usually takes a minute or two. Gradually add the 1 cup of granulated sugar to the cream cheese and continue beating for another 2 to 3 minutes until the mixture is light and fluffy. Next, add in the sour cream and the vanilla extract. Mix on low speed until just combined, scraping down the sides of the bowl as needed. Now, it’s time for the eggs, and this is important: add them one at a time, beating on low speed after each addition just until the yolk is incorporated. Overmixing after adding the eggs can incorporate too much air, which can lead to cracks. So, gentle and brief is the name of the game here!
Step 4: Assemble and Bake Your Cheesecake
With your crust cooled and your filling ready, it’s time to bring it all together. Carefully pour the smooth cheesecake filling over the cooled graham cracker crust in your prepared springform pan. Now, for that beautiful blueberry swirl: take about 1/4 cup of the reserved blueberry sauce (the smooth liquid you strained earlier) and drop spoonfuls of it randomly over the surface of the cheesecake batter. Grab a knife or a skewer and gently swirl the blueberry sauce through the batter. Don’t overdo it; you want a pretty marbled effect, not a fully mixed purple batter. When you’re ready to bake, this next step is crucial for a moist cheesecake: place your foil-wrapped springform pan into a larger roasting pan or a deep cookie sheet. Carefully pour about 1/2 to 1 inch of hot water into the larger pan, creating a water bath around the cheesecake. This water bath helps the cheesecake bake evenly and gently, preventing cracks and ensuring that incredibly smooth texture. Bake in the preheated 350°F (175°C) oven for 55 to 65 minutes. You’ll know it’s almost done when the edges are set, but the very center (about a 2-inch circle) still looks a little wobbly or jiggly, almost like pudding. This is exactly what you want!
Step 5: The Cool-Down Process
This part is just as important as the baking itself for achieving that perfect cheesecake texture and appearance. Once the baking time is up and the cheesecake is almost set in the center, turn the oven OFF completely. Prop the oven door open slightly (you can use a wooden spoon or a heatproof spatula for this). Leave the cheesecake inside the oven for a full hour. This gradual cooling process allows the cheesecake to slowly adjust to the room temperature, preventing that dreaded sudden temperature change that causes cracks. After that hour, carefully remove the cheesecake from the water bath and from the roasting pan. Let it cool completely on a wire rack on the countertop until it reaches room temperature. This can take a couple of hours. Once it’s at room temperature, gently cover the cheesecake with plastic wrap (being careful not to touch the surface) and transfer it to the refrigerator to chill overnight, or for at least 6-8 hours. This chilling time is essential for the cheesecake to fully set and for its flavors to meld together beautifully.
Step 6: Serve and Enjoy!
The moment of truth! Once your cheesecake has chilled overnight and is beautifully set, it’s time to release it from the springform pan. Carefully run a thin knife around the inside edge of the pan to loosen the cheesecake, then unlatch and remove the sides of the springform pan. Be gentle – it’s delicate! You can then slide the cheesecake onto a serving plate. Slice it using a sharp knife that you’ve dipped in hot water and wiped dry between each cut for the cleanest slices. You can serve it as is, or go a step further and top each slice with a dollop of whipped cream and a spoonful of the reserved blueberry mixture (the one with the skins and pulp) for an extra fruity punch. Seeing that beautiful swirl and enjoying that first creamy, tangy bite is always such a rewarding feeling.
Chef’s Tips for a Perfect Result
- Ensure your cream cheese and eggs are truly at room temperature; this is non-negotiable for a smooth, lump-free batter and even baking.
- Don’t overmix the batter once the eggs are added. Mix on low speed and only until just combined to prevent incorporating too much air, which causes cracks.
- A water bath is your best friend for cheesecake. It ensures gentle, even cooking, which results in a creamy texture and prevents the top from cracking.
- Resist the urge to open the oven door frequently while baking. This causes temperature fluctuations that can lead to a cracked or unevenly cooked cheesecake.
- The gradual cooling process in the oven (and then at room temperature) is critical. Don’t skip the hour-long cool-down with the oven door ajar.
- Chilling overnight is essential. This allows the cheesecake to fully set and develop its rich, creamy texture and deep flavor. Patience truly pays off here!
Variations and Substitutions
While this blueberry cheesecake is wonderful as is, there are always ways to make it your own! Here are a few ideas to spark your creativity:
- Lemon Zest Boost: For an extra bright flavor, add the zest of one lemon to the cheesecake filling along with the sour cream. This complements the blueberries beautifully and adds a lovely zing.
- Different Crust Options: If graham crackers aren’t your favorite, you can easily swap them for crushed vanilla wafers, digestive biscuits, or even an almond flour-based crust for a gluten-free option. Just adjust the butter and sugar as needed to bind.
- Mixed Berry Swirl: Don’t have enough blueberries? Combine them with raspberries, blackberries, or strawberries for a mixed berry swirl. This adds a wonderfully complex fruit flavor.
- Toasted Pecan Crust: Add a handful of chopped, toasted pecans to your graham cracker crust for a nutty crunch and depth of flavor that pairs surprisingly well with blueberry.
How to Serve and Pair
Serving this blueberry cheesecake is a joy! Present it as is, showcasing that beautiful swirl, perhaps with a few fresh blueberries scattered on top. For an extra touch of indulgence, a dollop of softly sweetened whipped cream or a scoop of vanilla bean ice cream makes a perfect accompaniment. It’s a showstopper for any celebration, from birthdays and anniversaries to holiday gatherings or a special Sunday dessert. For pairing, a light, crisp white wine or a Moscato can cut through the richness, or simply serve it with a cup of freshly brewed coffee or a delicate herbal tea.
Storage and Reheating
Once your glorious blueberry cheesecake is made, storing it properly will ensure it stays delicious for your next indulgence.
Refrigerator
Your cheesecake is best stored covered tightly with plastic wrap or foil in the refrigerator. It will keep well for up to 4-5 days. Make sure it’s completely cooled before covering and refrigerating to prevent condensation.
Freezer
If you need to store it for longer, cheesecake freezes beautifully! It’s best to freeze the entire cheesecake or individual slices. Wrap them very tightly in a layer of plastic wrap, followed by a layer of aluminum foil or place them in an airtight freezer-safe container. It can be stored in the freezer for up to 2-3 months. Thaw overnight in the refrigerator before serving.
Room Temperature
Cheesecake is best kept chilled. It should not be left at room temperature for more than 2 hours due to the dairy and egg content. Enjoying it within that timeframe means it won’t require any reheating if served shortly after coming out of the fridge.
Reheating
Reheating isn’t typically necessary for cheesecake, as it’s best served chilled or at room temperature. However, if you prefer a slightly warmer slice, you can gently warm individual slices in a low oven (around 250°F or 120°C) for about 5-10 minutes, or microwave on very low power in short intervals. Be careful not to overheat, as it can make the texture undesirable.
Nutritional Values
- Calories: 456 kcal
- Protein: 6g
- Carbohydrates: 40g
- Fat: 31g
- Fiber: 1g
- Sugar: 31g
Approximate values.
Frequently Asked Questions (FAQ)
Can I use frozen blueberries instead of fresh for the swirl?
Yes, you can use frozen blueberries, but you may need to adjust the cooking time for the sauce to thicken properly. Frozen berries release more liquid, so you might need a bit more cornstarch or a longer simmer. Ensure the sauce is sufficiently thickened before proceeding.
How do I know when my blueberry cheesecake is done baking?
The cheesecake is done when the edges are set and slightly puffed, but the center still has a slight wobble, like pudding. It should not be liquid, but it shouldn’t be completely firm either. The residual heat will finish setting it as it cools.
Why did my cheesecake crack?
Cracks typically happen from overmixing the batter (introducing too much air), overbaking, or a sudden temperature change. Using a water bath, mixing gently, and the slow cooling process in the oven are key to preventing cracks.
Can I make this blueberry cheesecake a day ahead?
Absolutely! In fact, making it a day ahead is highly recommended. Chilling overnight allows the cheesecake to fully set and its flavors to meld, resulting in a much better texture and taste.
What’s the best way to customize my blueberry cheesecake?
You can customize it by adding a hint of lemon zest to the filling, using a different crust like crushed shortbread or gingersnaps, or even topping it with a blueberry compote instead of the swirl. A drizzle of white chocolate ganache is also a delicious, decadent addition.
CONCLUSION
This blueberry cheesecake is a true testament to simple elegance, offering a creamy, dreamy texture with delightful bursts of fruity tang. It’s a recipe that’s both approachable for beginners and satisfying for experienced bakers looking for that classic, comforting dessert. Give this recipe a try, and you’ll discover precisely why that signature blueberry swirl makes this cheesecake so incredibly irresistible.
Print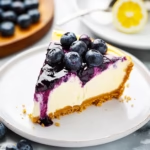
The Best Blueberry Cheesecake Recipe
- Prep Time: 25 minutes
- Cook Time: 1 hour 10 minutes
- Total Time: 1 hour 35 minutes
- Yield: 12 servings 1x
- Category: Dessert
- Method: Baking
- Cuisine: American
- Diet: Vegetarian
Description
This Blueberry Cheesecake features a buttery graham cracker crust, rich and creamy cheesecake filling, and a tangy blueberry swirl for a stunning dessert.
Ingredients
For the Crust:
- 1 1/2 cups graham cracker crumbs
- 6 tablespoons melted butter
- 1/4 cup granulated white sugar
For the Blueberry Sauce:
- 2 cups fresh blueberries
- 3 tablespoons granulated white sugar
- 1 teaspoon lemon juice
- 1 tablespoon cornstarch
- 1 tablespoon warm water
For the Cheesecake Filling:
- 24 oz cream cheese, softened
- 1 cup granulated white sugar
- 1 cup sour cream
- 1/2 tablespoon vanilla extract
- 3 large eggs, room temperature
Instructions
1. Preheat the oven to 350°F. Spray a 9-inch springform pan with cooking spray.
2. Crush the graham crackers into fine crumbs using a blender or food processor.
3. Mix the graham cracker crumbs, melted butter, and sugar together until combined.
4. Press the crust mixture into the bottom and slightly up the sides of the prepared springform pan.
5. Wrap foil around the bottom and sides of the pan. Bake the crust for 8-10 minutes, then allow it to cool.
6. In a small saucepan over medium heat, combine the blueberries and sugar for the blueberry sauce.
7. In a small bowl, whisk together the lemon juice, cornstarch, and warm water.
8. Add the cornstarch mixture to the blueberries and cook, stirring and lightly mashing some berries, until thickened.
9. Strain the mixture through a fine mesh sieve, separating the sauce from the cooked berries. Reserve both.
10. In a stand mixer, beat the cream cheese until smooth.
11. Add the sugar and beat for 2-3 minutes until creamy.
12. Mix in the sour cream and vanilla extract until combined.
13. Add the eggs one at a time, mixing after each addition until just blended.
14. Pour the cheesecake filling into the cooled crust.
15. Drop about 1/4 cup of the blueberry sauce over the top and swirl gently with a knife to create a marbled effect.
16. Place the springform pan into a large roasting pan filled with 1/2 to 1 inch of hot water.
17. Bake for 55-65 minutes until the center is nearly set with a slight jiggle in the middle.
18. Turn off the oven, crack the oven door slightly, and leave the cheesecake inside for 1 hour.
19. Remove the cheesecake and cool to room temperature.
20. Cover and refrigerate overnight before removing from the pan, slicing, and serving.
21. Top with the reserved blueberry mixture and whipped cream if desired.
Notes
Prep time does not include cooling or overnight chilling time.
Using a water bath helps prevent cracks and creates a creamier texture.
Do not overmix the batter after adding the eggs to avoid excess air bubbles.
Allow the cheesecake to cool gradually in the oven to minimize cracking.
Store leftovers covered in the refrigerator for up to 5 days.
Nutrition
- Serving Size: 1 slice
- Calories: 456
- Sugar: 31g
- Sodium: 338mg
- Fat: 31g
- Saturated Fat: 17g
- Unsaturated Fat: 12g
- Trans Fat: 0g
- Carbohydrates: 40g
- Fiber: 1g
- Protein: 6g
- Cholesterol: 129mg


