Cherry Pie Bars – the very thought conjures up visions of warmth, comfort, and that signature sweet-tart flavor we all adore. I remember the first time I attempted a classic cherry pie from scratch; it felt like scaling a mountain! The delicate pastry, the endless slicing of butter, the fear of a soggy bottom… it was a lot for a beginner. But what if I told you there’s a way to capture all that wonderful cherry pie goodness in a much more forgiving, completely delightful bar form? That’s where these Cherry Pie Bars come in. They’re a little bit of rustic charm and a whole lot of pure joy, perfect for any occasion, or just because.
These aren’t just any dessert bars; they are a culinary hug. They bring together that beloved flaky, buttery shortbread base and crumbly topping with a luscious, vibrant cherry filling that sings with every bite. They’re simpler than a traditional pie, meaning less stress and more smiles, whether you’re a seasoned baker or just starting your journey in the kitchen. I developed this recipe after many years of trying to simplify beloved classics, and these Cherry Pie Bars have become a staple in my recipe repertoire, always disappearing faster than I can bake them!
What is Cherry Pie Bars?
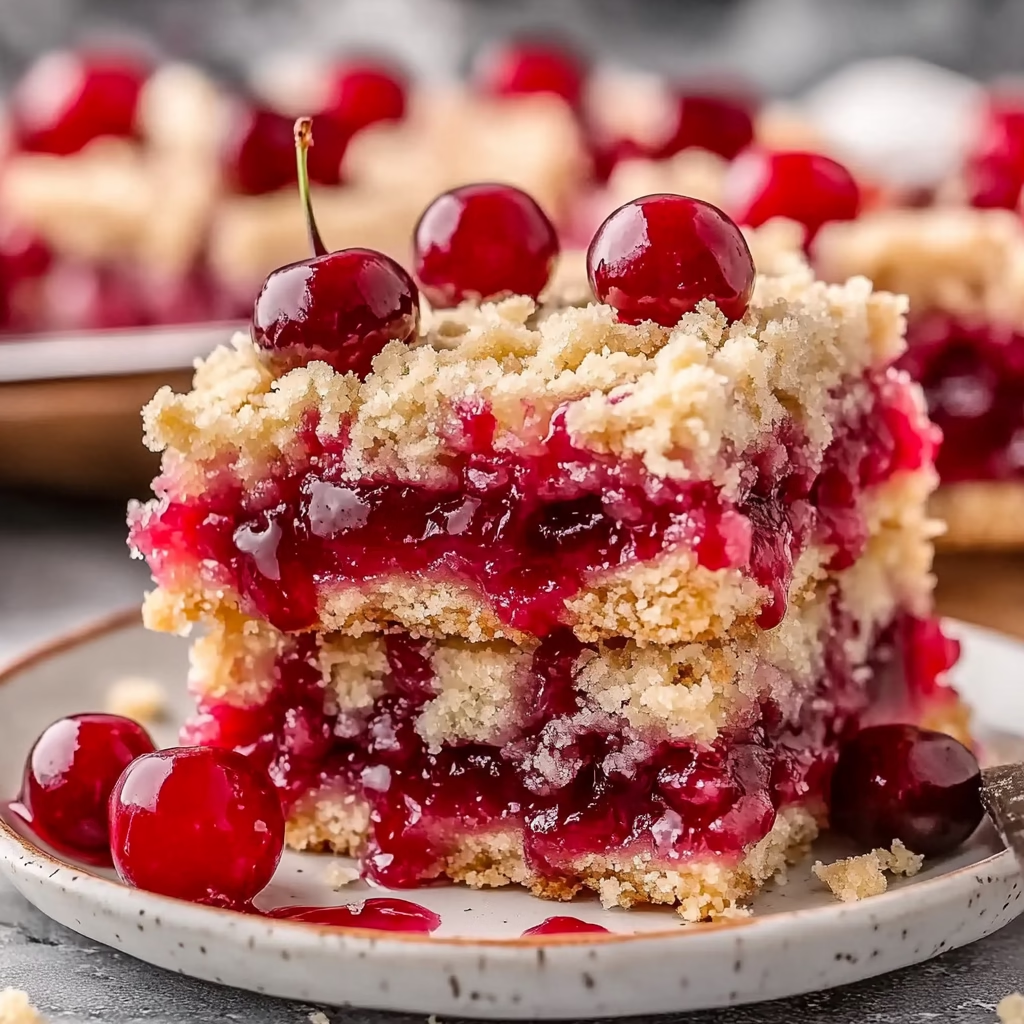
Cherry Pie Bars are essentially a deconstructed, easier-to-handle version of the iconic American cherry pie. Instead of a double crust, they feature a shortbread-like dough that forms both the base and a crumbly, delicious topping. Nestled between these buttery layers is a generous helping of sweet and tart cherry filling. They capture the soul of cherry pie – the tender fruit, the rich buttery notes – but in a format that’s incredibly simple to assemble and serve. Think of them as a bar cookie that’s been elevated with the beloved flavors of a summer fruit pie.
The magic truly lies in their simplicity and versatility. They’re the perfect bake sale treat, potluck contribution, or simply a way to satisfy a craving for that classic cherry dessert without the fuss of a traditional pie. The texture is wonderful: a tender, slightly crumbly bottom crust gives way to the gooey, bright cherry filling, all crowned with a delightful crumbles. It’s a delightful contrast that makes each bite an experience. This recipe takes inspiration from classic American baking, focusing on comforting, familiar flavors presented in an approachable way.
Reasons to Try Cherry Pie Bars
If you’re looking for a dessert that delivers maximum flavor with minimum fuss, these Cherry Pie Bars are your answer. They are incredibly forgiving, making them a fantastic choice for beginner bakers or anyone who’s had the occasional baking mishap (we’ve all been there!). The shortbread base and topping mixture is simple to throw together, and using canned cherry pie filling takes away the step of preparing fresh fruit, saving you precious time. Plus, they hold their shape beautifully when sliced, making them ideal for parties, picnics, or just a tidy afternoon treat.
Beyond their ease, the taste is simply irresistible. The balance of sweet, slightly tart cherries against the buttery, crumbly shortbread is just divine. They offer all the comforting flavors of a classic cherry pie but in a format that is far more portable and easier to serve. Busy parents, students new to baking, or anyone who appreciates a delicious homemade treat that doesn’t demand hours in the kitchen will find these bars a lifesaver. They’re a guaranteed crowd-pleaser that brings a touch of homemade goodness to any table.
Ingredients Needed to Make Cherry Pie Bars
- 1 cup (2 sticks) unsalted butter, barely softened (about 60-65°F)
- ¾ cup granulated sugar
- 1 teaspoon vanilla extract
- ½ teaspoon almond extract (enhances the cherry flavor beautifully!)
- 2 cups all-purpose flour
- ½ teaspoon baking powder
- ¾ teaspoon fine sea salt (or regular table salt)
- 21 ounces canned cherry pie filling (usually one standard can)
- ½ cup powdered sugar (for the glaze)
- ¼ teaspoon almond extract or vanilla extract (for the glaze)
- 1 Tablespoon milk or cream (for the glaze, adjust for desired consistency)
Instructions to Make Cherry Pie Bars – Step by Step
Step 1: Prepare Your Baking Station. First things first, let’s get everything ready so we can move smoothly through the process. Preheat your oven to 350°F (175°C). This gentle heat is perfect for baking these bars through without over-browning the topping. Next, take a 9×9 inch baking pan and line it with parchment paper. I like to leave a little overhang on the sides – these make it so much easier to lift the baked bars right out of the pan later on. It’s those little tips that make a world of difference, right?
Step 2: Craft the Buttery Dough. In a large bowl, we’re going to make the magic happen for our dough. Cream together the barely softened butter and granulated sugar. You can use an electric mixer for this if you have one, but a sturdy whisk and a bit of elbow grease work too! Beat them until the mixture looks light in color and nice and fluffy. This is important for creating that tender, crumbly texture. Once that’s looking good, stir in the vanilla and almond extracts. That almond extract really jazzes up the cherry flavor, giving it a lovely depth.
Step 3: Combine the Dry Ingredients. Now it’s time to add the dry elements to our buttery mixture. Gently add the all-purpose flour, baking powder, and salt to the bowl. Mix everything together until it’s just combined into a soft dough. Be careful not to overmix at this stage; we want it to be tender, not tough. You might need to scrape down the sides of the bowl a couple of times to make sure all the flour is incorporated.
Step 4: Assemble the Base and Filling. Take about two-thirds of this lovely dough mixture. Press it evenly into the bottom of your prepared baking pan. I find it easiest to use my hands or the bottom of a measuring cup for this. Then, spread the entire can of cherry pie filling right over this dough layer. Try to get it as even as possible, but don’t worry about perfection; a slightly rustic look is part of their charm.
Step 5: Add the Crumbly Topping. Now for the fun part – the topping! Take the remaining one-third of the dough. You can drop this over the cherry filling in small spoonfuls or dollops. Don’t try to cover the filling completely; leaving some gaps allows the vibrant cherry filling to peek through once baked. This not only looks pretty but also gives you a wonderful burst of fruit when you bite into a bar.
Step 6: Bake to Golden Perfection. Carefully place the pan into your preheated oven. Bake for about 20 to 30 minutes. You’re looking for the topping to turn a lovely light golden brown and for the cherry filling to be gently bubbling around the edges. That bubbling is a sign that everything is cooked through and deliciously caramelized.
Step 7: Cool Completely. Once they’re baked to golden perfection, carefully remove the pan from the oven. Place it on a wire rack to cool completely. This is a crucial step, perhaps the hardest one for impatient bakers (myself included!), but it’s essential for the bars to set properly before slicing. If you try to cut them while they’re warm, you’ll end up with a gooey mess, and nobody wants that.
Step 8: Whip Up the Simple Glaze. While your bars are cooling, let’s make a quick and easy glaze. In a small bowl, whisk together the powdered sugar, that extra splash of almond or vanilla extract, and the milk or cream. Usually, one tablespoon of liquid is enough, but you might need a tiny bit more or less depending on the humidity and powdered sugar. Keep whisking until you have a smooth, drizzle-able consistency. If it’s too thick, add a bit more milk; if it’s too thin, add more powdered sugar.
Step 9: Glaze and Set. Once the bars have cooled completely, it’s time for the finishing touch. Drizzle the prepared glaze evenly over the top of the cooled bars. You can use a spoon or a small squeeze bottle for this. Finally, pop the pan into the refrigerator for about 10 minutes. This short chill helps the glaze set firm, making for clean slices.
Step 10: Slice and Serve! Now for the moment of truth! Lift the bars out of the pan using the parchment paper overhang. Place them on a cutting board and slice them into 16 neat portions. These are best served chilled or at room temperature, offering that perfect blend of textures and flavors.
Chef’s Tips for a Perfect Result
- Line your baking pan with parchment paper, leaving an overhang on the sides for easy removal. This avoids sticking and makes clean-up a breeze.
- If your dough mixture feels too sticky to handle when pressing into the pan, place a piece of parchment paper on top of the dough and press down with your hands or a flat-bottomed glass.
- Ensure the cherry pie filling isn’t completely covered by the topping. Allowing some filling to peek through provides visual appeal and a more intense burst of cherry flavor with each bite.
- For an extra-crispy bottom crust, you can pre-bake the base dough for 5-10 minutes before adding the cherry filling. This helps create a firmer foundation.
- Cooling completely before slicing is non-negotiable for clean cuts. Patience here ensures you get beautiful, well-defined bars, not a gooey pile.
- Adjust glaze consistency with more milk (to thin) or powdered sugar (to thicken) as needed. Aim for a consistency that will drizzle nicely without running off the bars too much.
Variations and Substitutions
Vegan Option:
- What to change: The butter and any dairy in the glaze.
- Suggested substitute: Use vegan butter sticks for the dough and a plant-based milk (like almond or oat milk) for the glaze. Ensure your powdered sugar is also vegan, as some brands process theirs with bone char.
- How it impacts flavor or texture: The texture might be slightly softer, but the buttery flavor remains quite similar.
Gluten-Free Alternative:
- What to change: All-purpose flour.
- Suggested substitute: Use a good quality 1:1 gluten-free baking flour blend.
- How it impacts flavor or texture: The texture might be a bit more tender or slightly denser depending on the blend used. Always look for blends that contain xanthan gum.
Other Fruit Fillings:
- What to change: Cherry pie filling.
- Suggested substitute: Use canned blueberry, raspberry, or even apple pie filling.
- How it impacts flavor or texture: Each fruit will offer a slightly different flavor profile, from the tartness of raspberry to the sweetness of apple. Blueberry is often a delightful swap.
Spice it Up:
- What to change: Add spices to the dough.
- Suggested substitute: Mix ½ teaspoon of cinnamon and ¼ teaspoon of nutmeg into the flour mixture before combining with the wet ingredients.
- How it impacts flavor or texture: This adds a warm, cozy undertone that pairs beautifully with the cherries, making it taste even more like a classic pie.
How to Serve and Pair
These Cherry Pie Bars are wonderfully versatile and can be served in so many delightful ways. For a classic pairing, a scoop of creamy vanilla bean ice cream alongside a warm or room-temperature bar is pure bliss. A dollop of freshly whipped cream also adds a lovely richness and lightens the texture. For a more sophisticated touch, a drizzle of chocolate sauce or a sprinkle of toasted slivered almonds over the glaze can elevate them further. They are perfect for casual gatherings, family dessert nights, or as a sweet ending to a backyard barbecue. You could even serve them at a bake sale or a potluck, where their easy-to-handle format is always appreciated.
Storage and Reheating
Refrigerator
- Store leftover cherry pie bars in an airtight container in the refrigerator for up to 4 days. The glaze will set firmer, and the bars will maintain their best texture when chilled.
Freezer
- These bars freeze surprisingly well! Wrap them individually or stack them in an airtight, freezer-safe container. They can be frozen for up to 2 months. For best results, freeze them before glazing, or ensure the glaze is fully set before wrapping.
Room Temperature
- If you plan to eat them within 1-2 days and they are not glazed, they can be stored at room temperature in an airtight container. However, due to the fruit filling, refrigeration is generally recommended for optimal freshness and safety.
Reheating
- These bars are delicious served cold or at room temperature. If you prefer them slightly warm, you can gently reheat them. Place a bar on a microwave-safe plate and heat for 10-20 seconds in the microwave. Alternatively, you can warm them in a 300°F (150°C) oven for about 5-8 minutes. Be careful not to overheat, as this can make them dry or cause the filling to become too runny.
Nutritional Values
- Calories: Approximately 350-400 per bar
- Protein: Around 2-3g per bar
- Carbohydrates: Approximately 45-55g per bar
- Fat: Around 18-22g per bar
- Fiber: About 1-2g per bar
Approximate values.
Frequently Asked Questions (FAQ)
Can I use fresh cherries instead of canned pie filling?
While canned filling is convenient, you can use fresh or frozen cherries. You’ll need to pit about 3-4 cups of fresh cherries and cook them down with sugar, cornstarch (to thicken), and lemon juice until jam-like. Frozen cherries can be used directly but may require a little extra cooking time to thicken.
How do I know when my Cherry Pie Bars are done baking?
Your cherry pie bars are ready when the topping is a lovely golden brown and the cherry filling is visibly bubbling around the edges. This indicates that the bars are baked through and the filling has reached an optimal consistency.
My topping is too crumbly/soggy. What went wrong?
If the topping is too crumbly, it might be from overmixing the dough or using butter that was too cold. If it’s soggy, ensure the bars are fully cooled before slicing, as cutting them warm can transfer moisture from the filling to the base. Pre-baking the base slightly can also help prevent a soggy bottom.
Can I make these Cherry Pie Bars ahead of time?
Absolutely! These bars are perfect for making a day or two in advance. Store them in an airtight container at room temperature if unglazed, or in the refrigerator if glazed, to keep them fresh. They also freeze beautifully for longer storage.
What’s the best way to serve these bars and can I add anything?
Serve them chilled or at room temperature. They are wonderful on their own, but a scoop of vanilla ice cream, a dollop of whipped cream, or a drizzle of chocolate sauce makes them even more decadent. For added texture, a sprinkle of toasted nuts like almonds or pecans works wonderfully!
Conclusion
These Cherry Pie Bars are an absolute triumph of flavor and simplicity, embodying all the comforting joy of classic pie in an easy-to-manage format. They are a dessert that’s both charmingly rustic and utterly delightful, perfect for sharing with loved ones or enjoying as a sweet personal treat. The irresistible combination of buttery shortbread and vibrant cherry filling makes them a truly unforgettable indulgence.


