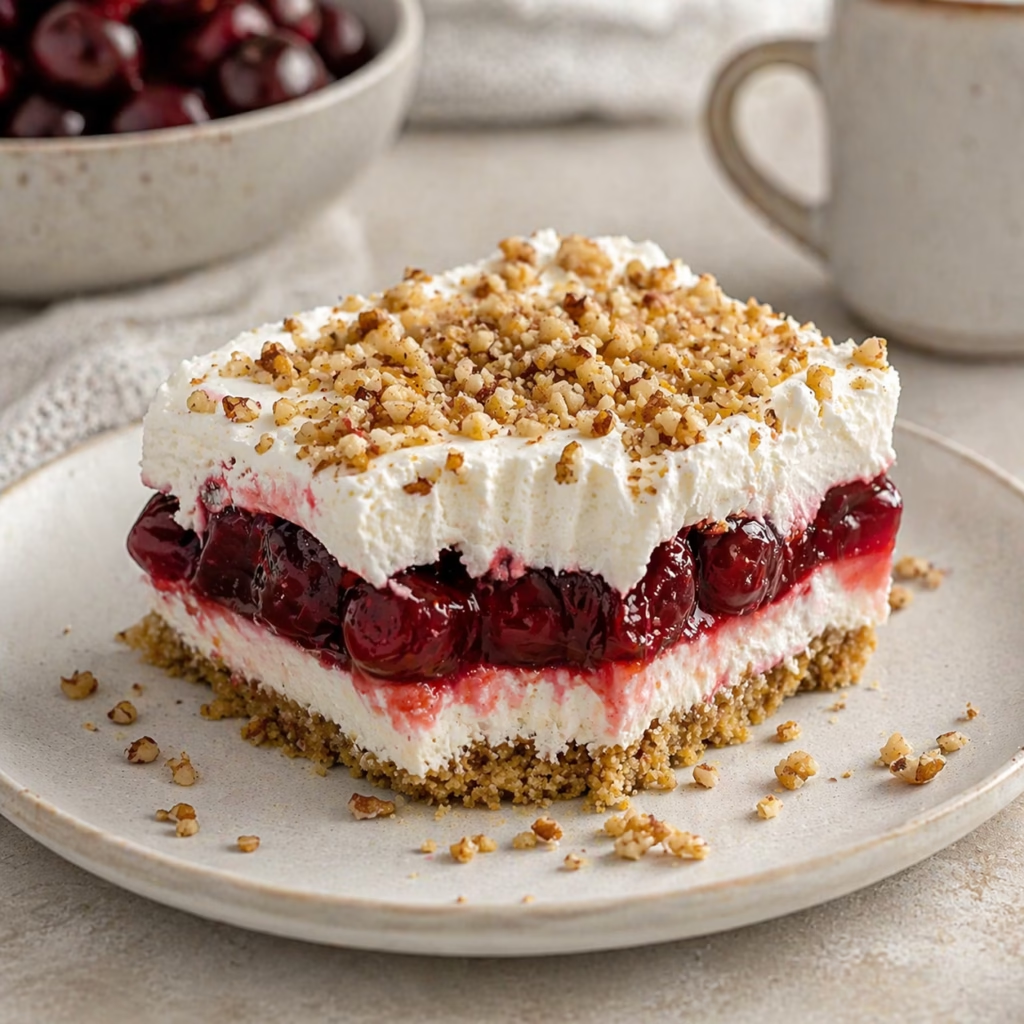
Cherry Yum Yum is a delightful, no-bake dessert that combines the tangy sweetness of cherries with the richness of a graham cracker crust and creamy cream cheese filling. Perfect for gatherings or a cozy family dinner, this dessert brings a burst of flavor and texture that lingers on your palate. Every bite is a harmonious blend of soft, crunchy, and tangy elements, making it a crowd-pleaser for any occasion.
What makes Cherry Yum Yum truly special is its simplicity. With just a handful of everyday ingredients, you can create a dessert that feels indulgent yet is surprisingly easy to make. The layers of graham cracker crust, velvety cream cheese, and luscious cherry pie filling come together to form a treat that’s both comforting and gourmet. Whether you’re a seasoned baker or a kitchen novice, this recipe invites you to savor the joy of cooking without the stress.
In this guide, we’ll walk you through every step of bringing Cherry Yum Yum to life. Just like the first time I made it, you’ll learn to trust your instincts, embrace the sensory moments, and let the layers unfold naturally. Ready to dive in? Let’s begin.
What is Cherry Yum Yum?
Cherry Yum Yum is a layer dessert that marries the best of American pantry staples with a touch of Southern charm. It evolved from classic no-bake desserts like cherry pie and cheesecake, blending the structure of a graham cracker crust with the smoothness of cream cheese and the brightness of cherries. The name is a playful nod to the explosion of flavor each bite delivers—yum yum indeed!
This dessert has humble beginnings, often shared at potlucks and family gatherings where simplicity meets heartiness. The base is a buttery graham cracker crust studded with pecans, which I inherited from my grandmother’s favorite cookie bar recipe. A layer of tangy cream cheese filling follows, gently sweetened and stabilized with whipped topping. Finally, sweet cherries from the can (or fresh when in season) and a final crust of whipped topping and pecans top it off. The result is a dessert that’s tender on the inside and toasted on the edges, perfect for warm weather or cooling off on a summer day.
What sets Cherry Yum Yum apart is its balance of textures and flavors. The graham crust provides a subtle bitterness to counteract the sweetness, while the whipped topping adds softness. Pecans in the crust and garnish give a satisfying crunch to every layer. It’s a dessert that requires both precision in layering and a generous spirit of sharing.
Reasons to Try Cherry Yum Yum
Cherry Yum Yum isn’t just dessert—it’s an experience. Contrast its bold flavors with the simplicity of preparation: you’ll have a showstopper on the table in hours with minimal effort. The creamy filling and bright cherries work beautifully for a make-ahead option, perfect for holidays, potlucks, or summer birthdays. I love making it in the fall when cherries are at their peak, but it also shines in other seasons when preserved pie fillings can be used.
This recipe is ideal for beginners because it avoids complicated techniques. The graham cracker crust is as easy as mixing and pressing, while the cream cheese layer is a straightforward blend. Even better, it’s endlessly customizable. Substitute maraschino cherries for a sweeter bite, or toss the pecans with cinnamon for a spiced twist. It’s also family-friendly—no one needs to be a whiz in the kitchen to contribute. Hand one guest the rolling pin to crush graham crackers, and another the spoon to spread the layers.
Cherry Yum Yum works beautifully for gatherings large and small. For a party, cut it into smaller squares for easy serving, or pair slices with a scoop of vanilla for a decadent dessert dish. For a quiet evenin…
Ingredients Needed to Make Cherry Yum Yum
2 cups graham cracker crumbs (14 full-size crackers, roughly 2 12-ounce packages)
1/2 cup finely chopped pecans (about 1/3 cup whole pecans, roughly chopped)
1/4 cup granulated sugar
1/2 cup salted sweet cream butter, melted and cooled (about 4 tablespoons, which is 1/4 pound or 1 stick)
8 ounces cream cheese, softened (2 regular bars, thawed to room temperature)
16 ounces whipped topping, thawed (two 8-ounce containers, soft but not melted; brands like Reddi-Wip or Nestlé).
1 1/4 cups powdered sugar (opt for finest grind for smooth mixing)
1/2 teaspoon pure vanilla extract (not imitation, for that perfect floral depth)
42 ounces cherry pie filling (two 21-ounce cans, such as McVitie’s or Bird Brand)
3 tablespoons finely chopped pecans, for garnishing (save cosmetic ones for top layer)
Instructions to Make Cherry Yum Yum Step by Step
Step 1: Prepare the graham cracker crust base. In a medium mixing bowl, combine the graham cracker crumbs, 1/2 cup chopped pecans, and granulated sugar. Add the melted sweet cream butter (at room temperature or slightly warm) and stir until the mixture is evenly coated. The ideal texture resembles coarse, wet sand—you still want some visible grains of graham cracker but not dry. If you have a family helper, let them press the dough mixture into a 9×13-inch pan using an offset spatula. Press firmly to the edges, especially corners, to create a uniform base.
Step 2: Bake the crust. Place the prepared pan on the center rack of a preheated oven at 350°F. Bake for exactly 8 minutes, or until the edges lightly brown. Bake a test slice beforehand to calibrate oven temps, as I learned from over-browning during my first batch. Allow the crust to cool completely at room temperature on a wire rack. This chilling is crucial: a warm base will soften the cream cheese layer. Trust the timing—the crust will harden further as it cools.
Step 3: Make the cream cheese filling. In a stand mixer or large bowl, beat the softened cream cheese on medium-high speed for 1–1 1/2 minutes. The texture should be smooth and quite light—no visible streaks. Add one 8-ounce container of thawed whipped topping, 1 1/4 cups powdered sugar, and 1/2 teaspoon vanilla extract. Continue mixing for 1 1/2 to 2 minutes. Its final consistency should be a uniform, glossy swirl of white. Stop the mixer a few times to scrape down the sides and ensure full blending. Spread this layer evenly over the cooled crust using the offset spatula.
Step 4: Prepare the cherry cake layers. Spread the two cans of cherry pie filling over the cream cheese base in a single, even layer. Favor freshly thawed pie fillings, which have a slightly prettier red color than canned. Use a spoon to gently press the cherries into the surface, ensuring good contact with the cream cheese. Save a few cherries for garnishing individual slices if possible.
Step 5: Top with whipped topping and final pecan garnish. Spread the remaining 8-ounce container of thawed whipped topping over the cherry layer. Using the back of a spoon, lightly swirl the surface to create a rustic look. Sprinkle the remaining 3 tablespoons finely chopped pecans over the top layer. Cover the pan with plastic wrap and refrigerate for 4 hours. This chilling time is non-negotiable—the layers need time to set and integrate. For best slicing, cut squares cold using a sharp knife, then let each square sit at room temperature for 30 seconds before serving.
Chefs Tips for a Perfect Result
- Always soften cream cheese to 70°F (not 90°F or 50°F), or it will resist mixing into the whipped topping. Place a bar on your skin to test softness—the texture should be yielding but not gooey.
- Use a high-sided mixing bowl when adding whipped topping to cream cheese to prevent splashing. The mixture will bubble slightly, so plan for a few spills.
- For a crunchier crust, let the butter harden slightly before mixing it into the graham cracker base. This creates smaller crumbs and less oil pooling.
- If using canned pie filling, gently rinse cherries under very hot water and pat dry. This removes excess syrup and gives a crisper texture in the final dessert.
- Don’t skip the room-temperature test for the crust: it hardens as it cools, and you’ll be too late to fix issues after chilling the other layers.
- For a seasonal twist, add a dash of almond extract to the filling when you add the vanilla. It enhances the cream flavor beautifully.
Variations and Substitutions
Gluten-Free Alternative: Substitute a gluten-free graham cracker crumb (I prefer Schnucks or Food Club brand) or crush gluten-free graham cels at home. Brush the crust with coconut oil for a more delicate bite.
Vegan Option: Replace the cream cheese with vegan cream cheese (Tofutti or Kite Hill work well). Use vegan butter alternatives in the crust and a dairy-free whipped topping. Cherry pie filling in a 100% fruit version will keep it 100% vegan.
Low-Carb Version: Swap graham cracker crumbs for almond flour (2 cups) and use xylitol instead of granulated sugar. For the cream cheese, use a full-fat block with minimal sweetener. Adjust balances carefully.
Budget Swap: Open Costco’s cherry pie filling cans and drain each using a colander to reduce syrup content. It saves calories and creates a more vibrant texture for the filling.
Chocolate Twist: Drizzle melted dark chocolate over the top layer before chilling. Add a pinprick to each square when serving to allow the chocolate to seep through. Works wonders as a dinner-dessert hybrid.
Coconut Crunch Variation: Soak the graham cracker crumbs in coconut milk for 10 minutes before baking. The result is a coconut-flavored crust that plays well with both cherries and whipped toppings.
How to Serve and Pair
Serve Cherry Yum Yum cold, directly from the refrigerator. For a dinner pairing, slice it into small squares (1.5in x 3in) and place on a platter alongside a few mixed nuts and candied orange slices. For a spring dessert, complement it with a light and herbal mojito, or serve chilled with a scoop of coffee-flavored gelato for a coffee-cherry combination.
For a rustic presentation, cut the squares with a pizza wheel and use parchment paper to line the platter. Add a fresh maraschino cherry to the top of each square for an extra pop. To up the glamour for a dinner party, arrange the squares on a slate tray with tiny paper straws for serving, especially if drizzled with chocolate or butter.
This dessert pairs particularly well with brunch spreads. Serve wedges beside a classic Eggs Benedict and a slice of lemon pound cake for a balanced meal. During summer, it’s at its best with a bowl of fresh strawberries and a few basil-infused cocktails.
Storage and Reheating
Refrigerator: Store tightly wrapped (plastic wrap then aluminum foil) for up to 3 days. The layers will firm up over time, so slice after chilling if possible. The crust remains crisp for the first 48 hours—after that, it absorbs excess moisture from the filling and becomes chewy.
Freezer: Freezing is not ideal because the moisture content of the filling and whipped topping will likely cause weeping and drooping. If you must freeze, use a sealed airtight container and consume within 1 month. Thaw in the refrigerator and brush with a thin syrup of maple and water before serving to rescue the texture.
Room Temperature: The dessert will soften noticeable once cut. Leave uncut in a cool room (around 75°F) for up to 8 hours. Under hot weather, the cream cheese layer can begin to weep at the edges, leading to a slouched texture.
Reheating: This dessert is best served cold. If you absolutely must warm it up, use the oven—place the cut pieces on an oven-safe tray and heat at 275°F for 3-4 minutes per side. Check frequently to avoid melting the cream cheese. Do not use a microwave.
Nutritional Values
Serving per slice (based on 15 pieces)…
Calories: 268
Protein: 4g
Carbohydrates: 33g
Fat: 13g
Fiber: 1g
Approximate values.
Frequently Asked Questions
Can I use maraschino cherries instead of pie filling?
Yes, maraschino cherries in syrup (not brandied) work well, but drain them well before layering to avoid saturating the other layers. Their clearer color can also prettier contrast against the cream cheese layer.
How do I know when the cream cheese is evenly mixed with the whipped topping?
The final mixture should look uniform with no streaks of cream cheese. It should also hold in a ribbon when lifted with a spatula and poorly back into the bowl within 5 seconds—a good blend marker.
My crust is too crumbly after baking. What should I do?
If the crust is crumbly, it may not have enough butter or sugar was skipped. The sugar acts as a second binder. Next time, add a small splash of water or maple syrup to the mix to create enough moisture for cohesion.
Can I prepare the layers in advance?
Yes! You can make the graham cracker crust a day in advance and the cream cheese layer can be chilled overnight. The cherry filling and whipped topping should be kept separately until use for optimal texture.
What’s the best way to serve it as a dinner dessert?
The best serving is to deglaze each square in wine pairing (like a Pinot Gris or Savennières) just before serving. Alternatively, melt dark chocolate over the top as a decadent finish. This decorates and pairs the sweetness.
Conclusion
Cherry Yum Yum is a testament to how simple ingredients can create something extraordinary when layered with care. Its burst of cherry flavor and peanut crunch is a joy to share, making it perfect for any gathering. Whether you’ll serve it at a backyard barbecue or a midweek family night, this dessert invites you to savor not just the flavors but the connection it brings. Give it a try, and you’ll discover why its sweetness lingers for more than just the taste.
Print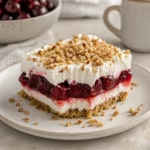
Cherry Yum Yum
- Prep Time: 20
- Total Time: 20
- Yield: 8 servings 1x
- Category: desserts
- Method: No-Bake
- Cuisine: American
- Diet: Vegetarian
Description
A no-bake dessert with a graham cracker crust, creamy cream cheese filling, and tangy cherry topping. Sweet, crunchy, and easy to make, perfect for gatherings or a cozy treat.
Ingredients
1 1/2 cups graham cracker crumbs
1/3 cup melted butter
1/4 cup chopped pecans (for crust)
8 oz cream cheese, softened
1/4 cup powdered sugar (plus extra for topping)
2 tbsp milk
1 1/2 tsp vanilla extract
1 cup cherry pie filling (canned or 2 cups fresh cherries, pitted and halved)
1 cup whipped topping
1/4 cup chopped pecans (for garnish)
1 tbsp sugar (for garnish)
Instructions
Mix graham cracker crumbs, melted butter, and 1/4 cup chopped pecans. Press into a 9-inch springform pan.
In a bowl, beat cream cheese, 1/4 cup powdered sugar, milk, and vanilla until smooth. Spread over crust.
Top with cherry pie filling, followed by a layer of whipped topping.
Sprinkle with 1/4 cup chopped pecans and 1 tbsp sugar. Chill for at least 2 hours before serving.
Notes
Cherry pie filling can be substituted with fresh cherries for a seasonal twist
Make ahead: Refrigerate for up to 24 hours to enhance flavor
No-bake recipe—no oven needed!
Nutrition
- Serving Size: 1 serving (1/8 of the dish)
- Calories: 350
- Sugar: 35g
- Sodium: 200mg
- Fat: 20g
- Saturated Fat: 9g
- Carbohydrates: 40g
- Fiber: 2g
- Protein: 6g
- Cholesterol: 60mg