Easy Strawberry Earthquake Cake
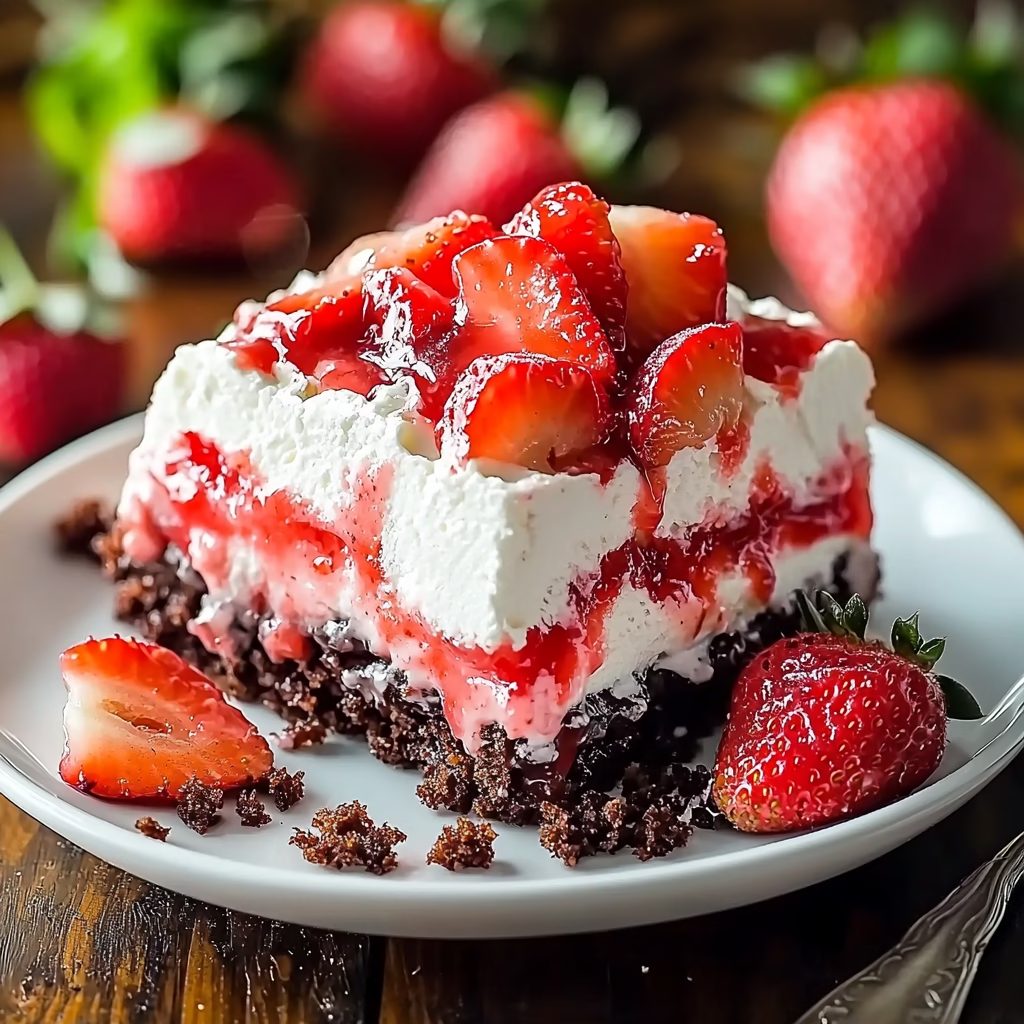
Easy Strawberry Earthquake Cake is a dessert that truly captures the imagination, bringing a bit of fun and a lot of deliciousness to any table. Imagine sinking your fork into layers of rich chocolate cake, interspersed with pockets of tangy strawberry cheesecake filling and studded with melty chocolate chips. It’s the kind of dessert that makes you do a double-take, not just because it looks so inviting, but because it tastes so incredibly good. This viral sensation isn’t just a pretty face; it’s fundamentally a delight to make and share.
The charm of this Easy Strawberry Earthquake Cake lies in its unique texture and flavor profile. The ‘earthquake’ effect comes from the way the different layers settle and swirl together during baking, creating irresistible gooey pockets and marbling. It’s a simple concept that results in a surprisingly complex and satisfying dessert. Perfect for potlucks, celebrations, or even just a cozy night in, it guarantees smiles all around. Get ready to create a dessert that’s as fun to look at as it is to eat.
What is Easy Strawberry Earthquake Cake?
An Easy Strawberry Earthquake Cake is a delightful improvisation on classic chocolate cake, designed to be visually striking and incredibly delicious. It earns its name from the signature cracked, textured top and the internal pockets that resemble the dramatic shifts of an earthquake. This dessert typically starts with a standard chocolate cake mix base, which is then layered with elements that create pockets and swirls. The unique construction results in a dessert that is both comforting and exciting, offering a playful twist on familiar flavors.
The magic happens through the layering process. A creamy cheesecake mixture, often infused with fresh fruit like strawberries, is dolloped onto the cake batter. As it bakes, the cake batter rises and cracks around the denser cheesecake filling, creating those characteristic fissures and gooey pockets. The addition of chocolate chips and sometimes nuts further enhances the texture and flavor, making each bite an adventure. It’s a dessert that appeals to everyone, from seasoned bakers looking for a fun project to beginners seeking a show-stopping treat without the fuss.
Reasons to Try Easy Strawberry Earthquake Cake
You absolutely should try making this Easy Strawberry Earthquake Cake because it’s incredibly forgiving and unbelievably rewarding. We’ve all had those baking moments where a recipe feels a little too precise, but this cake is designed for ease. The very nature of the ‘earthquake’ effect means that perfection isn’t the goal; delightful imperfection is. This makes it an ideal recipe for any home cook, whether you’re just starting out or have been baking for years. The visual appeal is undeniable, promising a dessert that’s a guaranteed conversation starter at any gathering.
Beyond its welcoming simplicity, the flavor combination is a guaranteed hit. Rich chocolate cake, tangy strawberry, creamy cheesecake, and melty chocolate chips create a symphony of tastes and textures that’s pure indulgence. It’s versatile enough to be served warm or at room temperature, making it perfect for parties where you need a dessert that can hold up. Plus, the ‘viral’ nature of this cake means you’re joining in on a fun culinary trend that’s bringing joy to kitchens everywhere. It’s a taste of happiness, baked right in.
Ingredients Needed to Make Easy Strawberry Earthquake Cake
Gather these simple ingredients to bring your Easy Strawberry Earthquake Cake to life:
- 1 box (15.25 oz) chocolate cake mix
- Ingredients required for cake mix (check package for eggs, oil, and water quantities)
- 8 oz cream cheese, softened to room temperature
- ½ cup powdered sugar
- 1 tsp vanilla extract
- 1½ cups fresh strawberries, chopped into small pieces
- 1 cup chocolate chips (milk, semi-sweet, or dark, your preference)
- ½ cup chopped pecans or walnuts (optional, for added crunch)
Instructions to Make Easy Strawberry Earthquake Cake – Step by Step
Follow these steps to create your sensational Easy Strawberry Earthquake Cake:
Step 1: Prepare Your Workspace and Oven
Begin by preheating your oven to a steady 350°F (175°C). Next, take a 9×13 inch baking pan and generously grease it. You can use butter, cooking spray, or a bit of oil to ensure nothing sticks. This simple preparation step is key to a clean release and an attractive final cake.
Step 2: Mix the Chocolate Cake Batter
Now, take your box of chocolate cake mix and prepare the batter according to the package instructions. This typically involves adding eggs, oil, and water. Mix until just combined and smooth, being careful not to overmix, as this can lead to a tougher cake. Set this delicious chocolate batter aside for a moment.
Step 3: Craft the Creamy Strawberry Filling
In a medium bowl, beat the softened cream cheese until it’s wonderfully smooth and free of lumps. Add the powdered sugar and vanilla extract to the cream cheese and continue beating until everything is very well combined and creamy. Gently fold in the chopped fresh strawberries. You want to fully incorporate the strawberries without overworking the mixture, preserving some of that fresh fruit texture.
Step 4: Begin Layering the Cake
Pour about half of the prepared chocolate cake batter into your greased 9×13 inch pan. Spread it out as evenly as you can with a spatula. This forms the base layer of our exciting earthquake cake.
Step 5: Add the Strawberry Cheesecake Surprise
Take the strawberry cream cheese mixture and dollop it evenly over the chocolate batter in the pan. Try to distribute it in about 8-10 spoonfuls across the surface. Don’t worry about making it perfectly smooth; the beauty of this cake is its natural, imperfect texture.
Step 6: Top with Remaining Batter
Carefully pour the rest of the chocolate cake batter over the dollops of strawberry cheesecake filling. Your goal here is to cover the cheesecake layer, but you shouldn’t aim for a completely smooth, flat surface. Let it naturally settle and create some bumps and dips, which will contribute to the ‘earthquake’ effect as it bakes.
Step 7: Add Extra Texture and Flavor
Now for the final touches before baking. Evenly sprinkle the chocolate chips over the top of the cake batter. If you’re using them, scatter the chopped pecans or walnuts across the surface as well. These additions will bake into the top, providing delightful pockets of melted chocolate and a satisfying crunch.
Step 8: Bake Until Gloriously Done
Place the pan into your preheated 350°F (175°C) oven. Bake for approximately 40–45 minutes. You’ll know it’s ready when the top looks crackly and set, and a toothpick inserted into the cake portion (avoiding the cheesecake pockets) comes out mostly clean. The center should be just set; it will firm up more as it cools.
Step 9: Cool and Enjoy the Anticipation
Once baked, carefully remove the Easy Strawberry Earthquake Cake from the oven. Let it cool in the pan on a wire rack for about 15–20 minutes before you even think about serving. This cooling period is crucial for the cake to set properly and for those gooey pockets to become perfectly luscious. Serving it warm creates an truly unforgettable experience.
Chef’s Tips for a Perfect Result
- Ensure your cream cheese is fully softened to room temperature; this is crucial for achieving a smooth, lump-free cheesecake layer.
- Don’t overmix the chocolate cake batter after adding the wet ingredients, as this can develop the gluten too much and result in a tougher cake.
- When dolloping the cheesecake mixture, vary the size of your dollops slightly to create more interesting pockets and textures.
- Resist the urge to smooth out the top layer of cake batter completely; embrace the bumps and dips for the signature ‘earthquake’ look.
- Use fresh, ripe strawberries for the best flavor and vibrant color in your cheesecake filling.
- For an even richer chocolate flavor, consider using a dark chocolate cake mix or adding a tablespoon of instant espresso powder to the batter.
Variations and Substitutions
While this Easy Strawberry Earthquake Cake is wonderful as is, you can absolutely make it your own with these fun variations:
- Berry Blast: Swap the strawberries for other fresh berries like raspberries or blueberries, or use a mix. This will alter the tartness and color slightly.
- White Chocolate Swirl: Add melted white chocolate chips into the cream cheese mixture for an extra layer of sweetness and creamy flavor.
- Chocolate Chip Choice: Experiment with different types of chocolate chips – milk, dark, semi-sweet, or even mini chocolate chips for a more distributed melt.
- Nutty Crunch: If you don’t have pecans or walnuts, sliced almonds or even a sprinkle of shredded coconut can add a delightful texture. Omit entirely if you have nut allergies.
- Gluten-Free Alternative: Use a gluten-free chocolate cake mix and ensure all other ingredients are certified gluten-free. The texture might be slightly different but still delicious.
How to Serve and Pair
This Easy Strawberry Earthquake Cake is a star on its own, but a few thoughtful touches can elevate the experience. Serve it warm, perhaps with a scoop of good quality vanilla bean ice cream melting into the gooey chocolate. A light dusting of powdered sugar or a dollop of freshly whipped cream also makes a wonderful presentation. This cake is perfect for casual family dinners, birthday parties, potlucks, or any occasion where you want to bring a smile to people’s faces. For a drink pairing, a cold glass of milk is classic and comforting, while a fruity iced tea or a sparkling cider would complement the strawberry notes beautifully.
Storage and Reheating
Refrigerator:
Leftover Easy Strawberry Earthquake Cake can be stored in an airtight container in the refrigerator for up to 3-4 days. The texture will firm up considerably when chilled, especially the cheesecake layer and chocolate chips.
Freezer:
You can freeze portions of the cake. Wrap individual slices tightly in plastic wrap, then in aluminum foil or place them in a freezer-safe container. It will keep well for up to 2 months, though the texture might change slightly upon thawing.
Room Temperature:
While it’s best stored in the fridge for longer shelf life, the cake can be left at room temperature for a few hours if it’s a casual gathering. Avoid leaving it out for extended periods, especially in warm weather, due to the cream cheese content.
Reheating:
To enjoy the gooey texture again, gently reheat individual slices. The microwave is quick: heat for 15-30 seconds until just warmed through. For a crispier top, reheating in a toaster oven or conventional oven at a low temperature (around 300°F or 150°C) for 5-10 minutes works well. Add a splash of milk or a bit of extra whipped cream if it seems dry after reheating.
Nutritional Values
Per serving (approximate):
- Calories: 350
- Protein: 4g
- Carbohydrates: 45g
- Fat: 18g
- Saturated Fat: 9g
- Fiber: 2g
Approximate values.
Frequently Asked Questions (FAQ)
What if I don’t have strawberries? Can I substitute them?
Yes, you can substitute fresh strawberries with other fruits like raspberries, blueberries, or even a jar of good quality strawberry preserves. If using preserves, you might want to reduce the amount of powdered sugar slightly to account for their sweetness.
How do I know when the Easy Strawberry Earthquake Cake is done baking?
The cake is done when the top appears crackly and set. A toothpick inserted into the cake portion (avoiding the gooey cheesecake pockets) should come out with moist crumbs, but no wet batter. The center should feel slightly firm and not jiggly.
My cake is too dry. What went wrong?
A dry earthquake cake can result from overbaking or using a cake mix that requires less liquid than usual. Always start checking for doneness a few minutes before the minimum baking time. You can also try adding a tablespoon of extra liquid to the cake batter or ensuring your cream cheese filling isn’t too dense.
Can I prepare parts of the Easy Strawberry Earthquake Cake ahead of time?
Absolutely. You can prepare the strawberry cheesecake mixture and store it in the refrigerator for up to 2 days. You can also chop your strawberries ahead of time. However, it’s best to mix the cake batter just before assembling and baking for optimal freshness.
What’s the best way to serve this cake to impress my guests?
Serve slices warm with a scoop of vanilla ice cream or a dollop of freshly whipped cream. A sprig of fresh mint or a light dusting of cocoa powder can add an elegant finishing touch. For an extra indulgence, drizzle with a little extra melted chocolate.
Conclusion
In conclusion, this Easy Strawberry Earthquake Cake is the perfect combination of rich chocolate flavor, creamy strawberry cheesecake goodness, and irresistibly gooey texture. Its cracked, swirled appearance gives it a homemade charm that makes every slice feel special, while the simple ingredients and easy preparation make it approachable for bakers of all skill levels. Whether you’re making it for a family gathering, holiday celebration, potluck, or simply to satisfy a sweet craving, this dessert is guaranteed to impress both visually and flavor-wise.
What truly makes this cake unforgettable is the balance of textures and flavors in every bite — moist chocolate cake, bursts of fresh strawberry, creamy cheesecake pockets, and melted chocolate chips all working together beautifully. Plus, with so many ways to customize it, you can easily make it your own and enjoy a different twist each time you bake it. Once you try this viral dessert, it’s sure to become a favorite recipe you’ll come back to again and again.
Print
Easy Strawberry Earthquake Cake
- Prep Time: 15
- Cook Time: 30
- Total Time: 45
- Yield: 12 slices 1x
- Category: desserts
- Method: Baking
- Cuisine: American
- Diet: Vegetarian
Description
A playful, gooey dessert with layers of chocolate cake, tangy strawberry cheesecake filling, and melty chocolate chips. The ‘earthquake’ effect creates cracked textures and surprising pockets of flavor, perfect for any occasion.
Ingredients
1 box chocolate cake mix
1/2 cup unsalted butter, softened
1 cup fresh strawberries, mashed
8 oz cream cheese, softened
2 eggs
1/4 cup sugar
1/2 tsp vanilla extract
2 cups dark chocolate chips
Instructions
Preheat oven to 350°F (180°C)
Mix cake mix with 1 tbsp butter as per package instructions until smooth
Pour half the batter into a greased 9×13″ baking pan
Spoon strawberry mixture, cream cheese, eggs, sugar, and vanilla into remaining batter to create the filling
Drop spoonfuls of the filling randomly onto the cake layer in the pan
Sprinkle chocolate chips over the dollops
Pour remaining cake batter over the top
Bake for 25-30 minutes until edges are golden and center is set
Let cool before slicing
Notes
Use room-temperature cream cheese for smooth mixing
Don’t overmix the cheesecake batter for a rustic look
Store in an airtight container at room temperature for up to 2 days
Nutrition
- Serving Size: 1 slice
- Calories: 420
- Sugar: 45g
- Sodium: 500mg
- Fat: 20g
- Saturated Fat: 10g
- Carbohydrates: 55g
- Fiber: 2g
- Protein: 6g
- Cholesterol: 60mg


