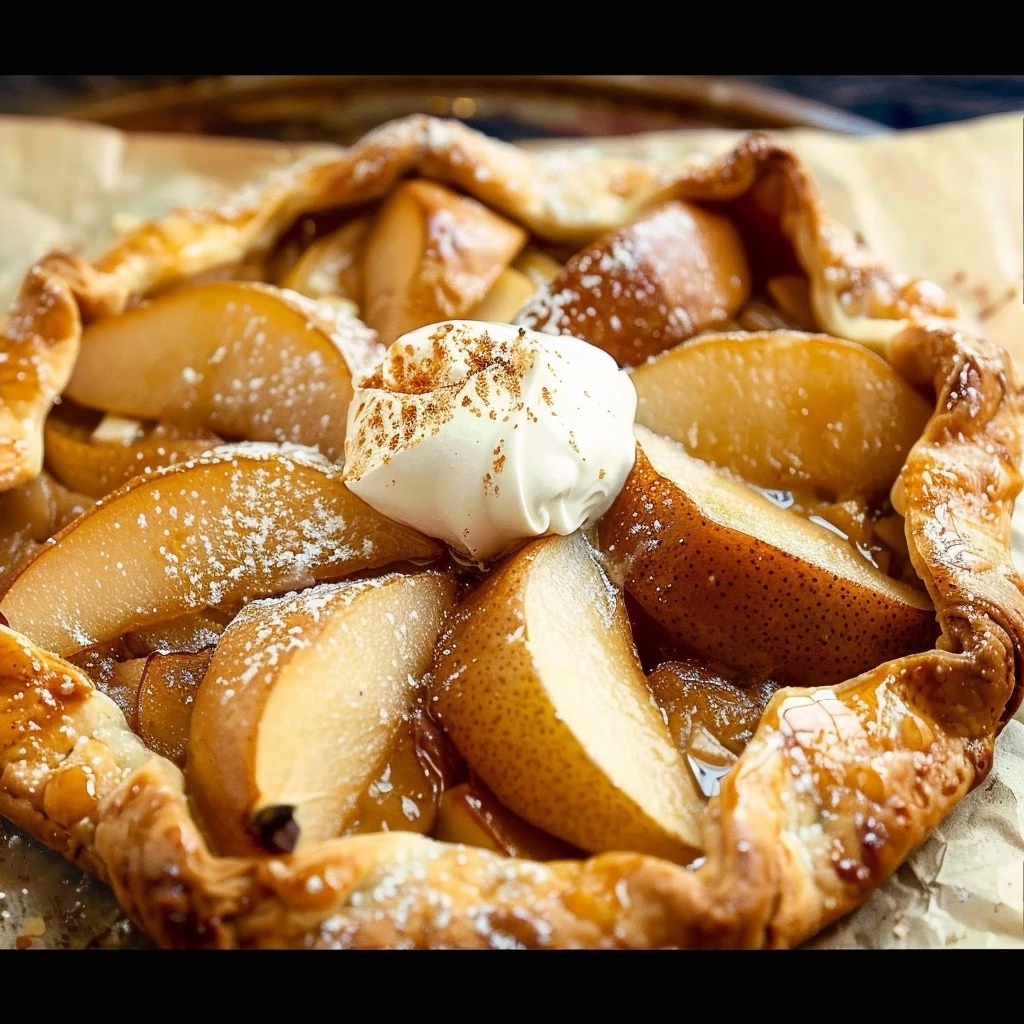
Gingered Pear Galette is truly one of those desserts that makes me feel like a professional pastry chef, even on my lazier kitchen days. It captures the essence of a traditional fruit pie but with much less fuss and a rustic, beautiful charm that always wows guests. The combination of tender, sweet pears and the warm spice of crystallized ginger creates a sophisticated flavor profile that is surprisingly simple to pull together in your own home kitchen.
Whenever I crave something sweet but don’t want to spend hours rolling out double-crust dough, I turn to this recipe. It is a forgiving, cozy bake that relies on the quality of your fruit and the perfect, buttery crunch of the pastry. Whether you are a beginner or a seasoned baker, this gingered pear galette is exactly the kind of recipe that builds confidence and creates lasting memories around the table.
What is a Gingered Pear Galette?
A galette is essentially a free-form, rustic French tart. Unlike traditional pies that require a specific pan and perfect crimped edges, a galette is intentionally imperfect. You simply roll out a circle of dough, heap your fruit in the center, and fold the edges over to create a stunning, messy-chic crust that holds all those delicious juices.
The gingered pear version adds a spicy, aromatic kick to a classic favorite. By incorporating crystallized ginger, you get little pops of chewy, spicy sweetness that cut through the buttery crust and mild, honeyed notes of the pears. It is a bridge between a refined dessert and a homey comfort food that feels special enough for a holiday gathering yet casual enough for an after-school treat.
Reasons to Try Gingered Pear Galette
If you find the idea of making pie crust intimidating, this recipe is for you. Because there is no need for precise crimping or fitting dough into a pan, you can focus on the texture and enjoyment of the process rather than the appearance. It is a low-stress way to achieve bakery-quality results without the anxiety of a formal fruit pie.
This dessert is also incredibly versatile. You can serve it warm with a scoop of melty vanilla ice cream, or enjoy it at room temperature with a dollop of fresh whipped cream. It is perfect for those busy days when you want a homemade, from-scratch dessert but have limited time, as the dough can be prepared ahead of time and kept in the fridge.
Ingredients Needed to Make Gingered Pear Galette
For the Crust:
- 1 and 1/2 cups all-purpose flour, spooned and leveled
- 2 Tablespoons granulated sugar
- 1/4 teaspoon salt
- 1/2 cup cold unsalted butter, cubed
- 1/4 cup ice-cold water, plus more as needed
- 1 large egg beaten with 1 Tablespoon milk (for egg wash)
- Coarse sugar (optional, for the crust edge)
For the Filling:
- 4–5 cups pear slices (peeled and sliced 1/4-inch thick)
- 1/4 cup granulated sugar
- 2 Tablespoons crystallized ginger, finely chopped
- 2 Tablespoons all-purpose flour
- 1 teaspoon lemon or orange juice
- 1/2 teaspoon ground cinnamon
- 1/4 teaspoon ground ginger
- Pinch of salt
Instructions to Make Gingered Pear Galette – Step by Step
Step 1: Start by whisking the flour, sugar, and salt together in a medium mixing bowl. Using a pastry cutter or two forks, work the cold, cubed butter into the flour mixture until it looks like coarse, pea-sized crumbs. Slowly add the ice-cold water, stirring as you go. If the dough still feels a bit dry, add another tablespoon of water until it just holds together when pressed.
Step 2: Turn the dough onto a lightly floured surface and gently form it into a disc. Wrap it tightly in parchment or plastic and pop it into the refrigerator for at least one hour. This chilling time is key to getting that signature flaky, buttery crust we all dream about.
Step 3: While the dough rests, prepare your filling. Gently toss the sliced pears, sugar, chopped crystallized ginger, flour, lemon juice, cinnamon, ground ginger, and salt in a bowl until the fruit is evenly coated. Keep this mixture refrigerated until you are ready to assemble, as the cold fruit helps the structure of the galette.
Step 4: Roll your chilled dough into a loose 12-inch circle on a lightly floured baking sheet or parchment paper. Don’t worry about getting perfect edges; the rustic, uneven border is exactly what makes a galette so charming.
Step 5: Spoon the pear mixture into the center of the dough, leaving about a 3-inch border of clear dough all the way around. Carefully fold the edges inward over the pears, overlapping pieces as you go. Give it a gentle press to ensure it stays sealed.
Step 6: Use your brush to apply the egg wash to the exposed dough. If you like a little extra crunch, sprinkle the crust with coarse sugar. Chill the prepared galette for at least 15–20 minutes before baking to ensure the butter stays cold, which is vital for a flaky crust.
Step 7: Bake at 400°F for 30–35 minutes until the pastry is a beautiful deep golden brown. Let the galette cool on the sheet for about 10 minutes before you slice into it. This waiting period allows the juices to settle and makes for much neater serving.
Chef’s Tips for a Perfect Result
- Use very cold butter, even chilling it in the freezer for a few minutes before you start.
- Do not overwork the dough, as handling it too much can lead to a tough crust instead of a flaky one.
- Keep the assembled galette cold before putting it into the preheated oven to ensure the best puff and shape.
- Use slightly firm pears to prevent the filling from becoming too mushy during the bake.
Variations and Substitutions
Vegan Option: Swap the butter for a high-quality vegan butter stick and use a plant-based milk for your egg wash alternative. Replace the egg with a simple brush of almond or soy milk for browning.
Gluten-Free Alternative: Substitute the all-purpose flour with a high-quality 1:1 gluten-free baking flour blend that contains xanthan gum. Ensure you keep your ingredients extra cold, as gluten-free dough handles a bit differently.
Budget Swap: If crystallized ginger is expensive or hard to find, use candied ginger or simply increase the amount of fresh ginger or ground ginger in the spice mix.
How to Serve and Pair
This galette is best served warm, ideally with a generous scoop of vanilla bean ice cream that begins to melt slightly against the warm crust. It also pairs wonderfully with a cup of spiced chai or a simple Earl Grey tea, which complements the notes of ginger. Serve it on a rustic wooden platter to really highlight its beautiful, free-form shape.
Storage and Reheating
Refrigerator: You can store leftovers in an airtight container for up to 4 days. The crust may lose some of its initial crispness, but the flavors actually deepen as it sits.
Freezer: For long-term storage, prepare the dough and freeze it for up to 3 months. When ready to bake, thaw it in the refrigerator overnight and proceed with the assembly.
Reheating: Avoid the microwave if you want to keep the crust crisp. Instead, place the galette on a baking sheet in a 350°F oven for about 10 minutes until warmed through and revived.
Nutritional Values
Values are approximate per serving (based on 8 servings):
- Calories: 285
- Protein: 3g
- Carbohydrates: 42g
- Fat: 12g
- Fiber: 3g
Approximate values.
Frequently Asked Questions (FAQ)
Can I use a different type of fruit if I do not have pears?
Yes, you can easily substitute the pears with sliced apples, peaches, or even stone fruit. Just stick to the same total volume of fruit and keep the sugar and spice levels consistent.
How do I know when the gingered pear galette is perfectly done?
The galette is finished when the crust is deeply golden brown and the fruit filling is bubbling gently. A dark, caramelized crust indicates that the crust is crisp throughout and the pears are tender.
My crust cracked while I was folding it, is that a problem?
It is perfectly fine if the crust cracks, as a galette is designed to be rustic and imperfect. Simply pinch the cracks back together with your fingers and continue with the process, as any leaks will just add to the jammy, caramelized flavor.
Can I make the dough for this galette in advance?
You can definitely prepare the dough up to 3 days in advance and keep it wrapped tightly in the refrigerator. This actually helps the gluten relax, resulting in an even better, more tender crust when you finally bake it.
What is the best way to customize this recipe?
You can customize the flavor by adding chopped walnuts or pecans to the fruit filling for extra crunch. Alternatively, drizzle a bit of honey or a balsamic reduction over the finished galette just before serving to add another dimension of sweetness.
Conclusion
The gingered pear galette is an accessible, rustic dessert that proves you do not need complex techniques to create a show-stopping finish to any meal. With its buttery, flaky crust and spicy, jammy fruit filling, it celebrates the beauty of seasonal baking in the simplest way possible. I encourage you to gather your ingredients, fire up the oven, and savor the warm, aromatic experience of this delightful treat. It is truly the perfect union of simple techniques and bold, warming flavors that never fails to impress.
Print
Gingered Pear Galette
- Prep Time: 20
- Cook Time: 40
- Total Time: 60
- Yield: 8 servings 1x
- Category: desserts
- Method: Baking
- Cuisine: French-inspired
- Diet: Vegetarian
Description
This rustic, free-form French tart features tender, sweet pear slices nestled in a buttery, flaky crust. Infused with aromatic, chewy crystallized ginger, it offers a sophisticated balance of warm spice and mellow fruit. The galette is intentionally imperfect, making it an approachable, low-stress dessert that looks professional yet feels like homey, comforting perfection. Serve it warm with a scoop of vanilla ice cream for an ideal dessert experience.
Ingredients
1 1/2 cups all-purpose flour
2 Tablespoons granulated sugar
1/4 teaspoon salt
1/2 cup cold unsalted butter, cubed
1/4 cup ice-cold water
4–5 cups pear slices (peeled and 1/4-inch thick)
1/4 cup granulated sugar
1 Tablespoon cornstarch
2 Tablespoons finely chopped crystallized ginger
1 teaspoon lemon juice
1 large egg beaten with 1 Tablespoon milk (for egg wash)
Coarse sugar for sprinkling
Instructions
In a food processor or bowl, mix flour, sugar, and salt.
Add cold butter and pulse or use a pastry cutter until the mixture resembles coarse meal.
Gradually add ice-cold water until the dough just holds together; form into a disk, wrap, and chill for at least 30 minutes.
Preheat oven to 400°F (200°C).
In a bowl, toss pear slices with sugar, cornstarch, chopped ginger, and lemon juice.
Roll out the dough into a 12-inch rustic circle on parchment paper.
Arrange pear slices in the center, leaving a 2-inch border.
Fold the edges of the dough over the pears, overlapping as needed.
Brush the crust with egg wash and sprinkle with coarse sugar.
Bake for 35 to 40 minutes until the crust is golden brown and the pears are tender.
Notes
Keep the butter very cold to ensure a flaky crust. If the dough gets too soft while rolling, pop it back into the fridge for 10 minutes. Serve warm with vanilla ice cream or a dollop of fresh whipped cream. Store at room temperature for one day or refrigerate for up to three days.
Nutrition
- Serving Size: 1 slice
- Calories: 280
- Sugar: 18g
- Sodium: 95mg
- Fat: 12g
- Saturated Fat: 7g
- Carbohydrates: 42g
- Fiber: 3g
- Protein: 3g
- Cholesterol: 45mg