
Homemade Strawberry Shortcake Bars are the perfect summer dessert—fluffy, fruity, and bursting with flavor in every bite. Whether you’re craving a nostalgic slice of Americana or a refreshing twist on classic shortcake, these bars deliver the buttery, brioche-like base we love, layered with juicy strawberries and crowned with a dollop of whipped cream. What sets these apart? They’re easy to make, no special equipment needed, and they’re adaptable for any occasion from family picnics to backyard barbecues. With just a few ingredients and simple steps, you’ll have a showstopping dessert that feels extra special without the effort.
There’s something comforting about the sight of fresh strawberries glistening beneath a golden crust, isn’t there? I remember my first attempt at these bars in my tiny college apartment, when I realized you could recreate the elegance of a bakery cake with basic tools. The crust had a few cracks, but the taste? Pure magic. These bars have become a staple in my repertoire because they let you showcase seasonal fruits while feeding a crowd. Let’s dive into why they work so well.
Besides the obvious joy of eating them, these bars are practical. The base bakes quickly, the strawberries add moisture and natural sweetness, and the optional topping means you can customize it for your audience. Kids love it plain, adults adore it with a drizzle. Want to make it fancier? Top with fruit compote or a sprinkle of crushed nuts. Perfect as a make-ahead dessert or a same-day treat, it’s the kind of recipe that becomes a keepsake in your kitchen.
What Are Homemade Strawberry Shortcake Bars?
At their core, these bars are a simplified version of classic strawberry shortcake, reimagined as a layered dessert bar instead of a sliced cake. The standard shortcake recipe usually involves layers of brioche-like cake, whipped cream, and strawberries. Our bar format makes it easier to portion, store, and share. They originated as a practical solution—turning the classic dish into a format that’s easier to manage for potlucks, picnics, and catering. The buttery base is similar to a coffee cake or pound cake, while the strawberry layer is enhanced with cornstarch to thicken juices into a syrupy glaze. The result is tender, chewy, and utterly addictive.
Key to their charm are the three distinct layers. First, the base: a buttery, almost sponge-like texture that holds up to the juicy strawberries. Next, the strawberry layer: fresh, seasonal fruits tossed in cornstarch and sugar to create a thick, jam-like coating. Lastly, the optional topping (whipped cream or a drizzle) for cooling the sweetness. The simplicity of the ingredients—just flour, butter, sugar, eggs, and fruit—makes this recipe accessible while retaining gourmet appeal.
What truly makes them special is the balance. The base is dense but not dry, the strawberries are sweet but not cloying, and the optional whipped topping adds freshness without overpowering. This balance has kept these bars in my kitchen rotation for over a decade, especially during summer when strawberries are at their peak.
Reasons to Try Homemade Strawberry Shortcake Bars
These bars deserve a permanent spot in your dessert repertoire for three main reasons. First, they’re incredibly easy to prepare. The entire process—mixing, layering, and baking—takes about an hour. There’s no need for special equipment like a stand mixer; a large bowl and spatula work perfectly. Second, they’re versatile. Want to make them gluten-free? Swap the flour. Need a vegan version? Use plant-based butter and egg substitutes. Serving a crowd? Scale up the recipe easily. Third, they’re timeless. Once tried, this combination of soft crust, tangy strawberries, and fluffy topping becomes a non-negotiable for any summer gathering, potluck, or after-dinner treat.
Let’s talk about the audience: this recipe is beginner-friendly but satisfying for experienced bakers as well. The steps are straightforward enough for someone making their first fruit-based dessert bar without relying on trial-and-error. For families, the bars are a crowd-pleaser that satisfies both kids and adults. Busy home bakers will appreciate the make-ahead potential—bake the base and freeze it, then finish later with fresh strawberries when you’re ready to serve.
What makes them truly special is the flexibility. You can keep it traditional with whipped cream, or get creative with toppings like crumbled shortbread, a swirl of marshmallow fluff, or even a sprinkle of crushed candy. The recipe acts as a blank canvas, letting you tailor it to your pantry or dietary needs. That level of adaptability is why this single recipe has brought joy to so many kitchens—mine included.
Ingredients Needed to Make Homemade Strawberry Shortcake Bars
1 cup (226g) unsalted butter, softened (at room temperature for easier mixing)
1 cup (200g) granulated sugar (adjust to taste, or use half-and-half with coconut sugar for a milder flavor)
2 large eggs (room temperature for best emulsification with the butter)
1 tsp vanilla extract (or ½ tsp almond extract for a twist)
2 cups (250g) all-purpose flour (see notes for gluten-free substitution)
1 tsp baking powder (fresh for optimal rise)
¼ tsp salt (keeps the sweetness balanced)
2 cups chopped fresh strawberries (ripe and unblemished, under dry conditions)
1 tbsp granulated sugar (optional, for sweetening the strawberries—adjust based on strawberry sweetness)
1 tbsp cornstarch (creates a syrupy glaze for the berries)
Whipped cream or stabilized whipped topping (add chilled to prevent melting)
White chocolate drizzle or powdered sugar (optional for decoration)
Instructions to Make Homemade Strawberry Shortcake Bars – Step by Step
Step 1: Prepare Your Pan Like a Pro. Start with an 8×8-inch or 9×9-inch baking pan (steel, not glass, for even heat distribution). Line it with parchment paper, extending it over the edges for easier removal. Lightly grease the paper to prevent dough from sticking—even if your recipe includes butter, some parchment papers can be tricky. Place the pan in the oven while it preheats at 350°F (175°C). This helps expand the parchment slightly, creating a perfect mold.
Step 2: Create the Buttery Base. In a large mixing bowl, beat the softened butter and sugar together until light and fluffy. Use a hand mixer or spatula—and for circles, use a figure-eight motion to distribute the air bubbles evenly. Add the eggs one at a time, incorporating each fully. Mix in the vanilla extract. Then slowly add the dry ingredients (flour, baking powder, and salt) in thirds, using a sifter if possible to remove lumps. Stop mixing as soon as the flour is combined—the dough will be thick, like cornbread batter, and that’s perfect.
Step 3: Master Temperature Timing. Divide the batter into two unequal parts: spread about two-thirds into the prepared pan as the base. The top layer of batter benefits from a bit of structure, so use a spoon to drop mounds of the remaining dough over the strawberry layer. Don’t worry about full coverage—this creates a rustic, “half-baked” look that’s visually appealing. Place the pan in the preheated oven on the middle rack for 30–35 minutes. The top should be golden brown, and a toothpick inserted into the center should emerge clean. Avoid over-baking—too much heat dries out the strawberries and firms the base too much.
Step 4: Cool, Set, and Serve with Style. After baking, let the pan sit at room temperature while cooling. This allows the layers to set and firm up. If you cut too early, the bars will be messy. Once cooled (about 30 minutes), use the parchment paper to lift the bars out onto a cutting board. Top with whipped cream if you like, or dust with powdered sugar for a classic finish. Use a sharp knife to cut into even squares (12–16 depending on size). For advanced presentation, place a small candle in the center of the pan while cooling—it creates a centered warm spot, ensuring even cooling.
Chef’s Tips for a Perfect Result
- Use room-temperature eggs: They emulsify better with butter, creating a smoother batter and tender base.
- Freeze the dough: Portion the base batter into a zip-top bag, freeze for up to 3 months, and thaw before using as-is for a time-saving shortcut.
- Thin the strawberries first: Core them and slice into ¼-inch pieces to enhance sweetness and maintain texture during baking.
- Avoid overmixing the batter: The cook time compensates for minimal gluten development—the longer you mix, the tougher the final texture.
- Test doneness with a toothpick: Insert it into the center but not the strawberry layer—the base should be firm, not gooey.
Variations and Substitutions
Vegan Option: Swap butter with vegan margarine (ensure it’s firm for baking) and use flax eggs (1 tbsp ground flaxseed + 3 tbsp water per egg). The crust will be denser, but still delicious.
Gluten-Free Alternative: Substitute all-purpose flour with a 1:1 gluten-free flour blend (like Bob’s Red Mill or King Arthur). Add ½ tsp xanthan gum to help bind the structure.
Low-Carb Version: Use almond flour and coconut sugar (or monk fruit sweetener). Reduce the strawberries for lower carb content and add a teaspoon of pureed strawberries to the batter for moisture.
Budget Swap: Substitute strawberries with affordable fruits like peaches or blueberries. Adjust the cornstarch to thicken different fruits: peaches need less, blueberries a bit more.
Low-Sugar Twist: Replace granulated sugar with 75% volume of coconut sugar or maple syrup (adjust liquid amounts slightly). The berries will provide natural sweetness.
How to Serve and Pair
These bars are best served at room temperature or slightly chilled. For a rustic look, rest them on a slate board with a rustic centerpiece like a pom-pom or a small ceramic bowl. Pair them with lemonade, iced tea, or a simple milk for a classic afternoon snack. Create a dessert spread by adding a mini fruit tart platter nearby for visual balance. At events, stack the bars on a spectrum from simple to fancy: plain bars, ones with whipped cream, and ones with white chocolate drizzle.
For presentation, consider pairing them with a lavender honey drizzle or a caramel ribbon for extra flair. During summer barbecues, serve them directly in the parchment-lined pan for a no-fuss platter. To complement the sweetness, pair with sharp cheddar cheese or English muffins for a savory-sweet contrast. The magical thing about these bars is how they adapt to different seasons—fruit compote can replace strawberries in fall or winter.
Storage and Reheating
Refrigerator: Store in an airtight container for up to 3 days. The lid prevents the whipped cream from weeping, but if you added it, cover the bars directly. Cold bars are still tender, so no heating required.
Freezer: Wrap individual bars in plastic wrap and place in a zip-top bag. Freeze for up to 1 month. Thaw on a plate for 45 minutes before topping with whipped cream (which doesn’t freeze well). The texture remains intact, and the sweetness stays balanced even after thawing.
Room Temperature: Keep in a cool, dry place (below 70°F) in an open container for up to 1 day. The moisture in the strawberries limits the shelf life here—the longer they sit, the softer the base becomes.
Reheating: If you prefer a warm, gooey texture (less common for this recipe), loosely cover the pan and reheat in the oven at 250°F (120°C) for 5–8 minutes. Avoid microwaving, which dries out the base and heats the strawberries unevenly. To revive the whipped topping, add a quick spritz from a canister of chilled whipped cream before serving.
Nutritional Values
Per serving (12–16 bars):
Calories: 260 kcal
Protein: 3g
Carbohydrates: 28g
Fat: 14g
Fiber: 1g
Approximate values.
Frequently Asked Questions
Q1: Can I substitute strawberries with another fruit?
Absolutely. Peaches, blueberries, and blackberries work well—adjust the cornstarch to accommodate their moisture levels. For example, peaches need ½ tbsp less cornstarch to avoid gelling.
Q2: How do I know when the bars are done baking?
Check the center with a toothpick. It should insert cleanly and the edges should be golden brown. Avoid overbaking, which can dry out the base and strawberries.
Q3: Why did my dough turn out too wet or too dry?
Wet: You likely mixed too long. Dry: The dough sat out too long. Adjust by refrigerating the dough if it’s too soft, or adding a tbsp of flour for dense texture.
Q4: Can I make these ahead of time?
Yes! Bake the base, cool, and freeze for up to a month. Thaw in the fridge overnight, then add fresh strawberries and top before serving for a last-minute touch.
Q5: What’s the best way to customize these for a party?
Top with themed decorations—like edible flowers for weddings or edible glitter for birthdays. Swap the whipped cream with yogurt swirls or condensed milk drizzle for a Mexican-inspired twist.
Learn More About Breads
Whether you’re making these bars today or planning your next creation, understanding the fundamentals of baking is key. Learn about mastering layering crusts or how to handle soft pastries. These techniques will elevate not just this recipe, but your entire dessert repertoire. I learned them early in my home kitchen journey, and they’ve become essential for consistency and quality in every batch.
Conclusion
Homemade Strawberry Shortcake Bars are a celebration of summer, simplicity, and the joy of home-baked treats. With their buttery base, fresh strawberries, and endless customization options, they’re the kind of dessert that brings people together—literally and metaphorically. So grab your favorite pan, line it with parchment, and let the magic happen. The signature combination of fruit and cream will make every bite a nostalgic favorite, whether you’re sharing in a backyard or enjoying one alone with a sunset drink by the window.
Print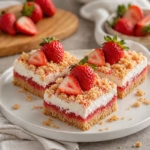
Homemade Strawberry Shortcake Bars
- Prep Time: 20
- Cook Time: 40
- Total Time: 60
- Yield: 24 bars 1x
- Category: desserts
- Method: Baking
- Cuisine: American
- Diet: Vegetarian
Description
A comforting American dessert combining a buttery brioche-like base, sweet strawberry filling with a syrupy glaze, and an optional dollop of whipped cream. Easy to make, perfect for gatherings, and customizable for any audience.
Ingredients
2 cups all-purpose flour
3/4 cup granulated sugar
1/2 teaspoon baking powder
1/4 teaspoon salt
1 cup (2 sticks) unsalted butter, softened
2 large eggs
2 teaspoons vanilla extract
4 cups fresh strawberries, hulled and sliced
2 tablespoons cornstarch
1/3 cup granulated sugar
1/4 teaspoon ground cinnamon (optional)
1 cup heavy whipping cream, chilled
2 tablespoons powdered sugar
Instructions
Preheat oven to 350°F (175°C)
Line a 9×13-inch baking dish with parchment paper
In a bowl, whisk flour, 3/4 cup sugar, baking powder, salt, and cornstarch
Add softened butter and mix until crumbly
In a separate bowl, whisk eggs, vanilla extract, and 2 tablespoons melted butter
Gradually fold egg mixture into flour blend until dough forms
Transfer dough to prepared dish, press evenly, and bake 25 minutes
Toss strawberries with 1/3 cup sugar and ground cinnamon
Spread strawberry mixture over warm base and return to oven
Bake uncovered 15-20 minutes until berries bubble and glaze forms
Chill cream and powdered sugar, whip to stiff peaks if desired
Refrigerate bars at least 1 hour before slicing
Notes
Use overripe strawberries for maximum sweetness
Add a crumb topping (flour, butter, sugar) for crunch if preferred
Store in an airtight container in fridge up to 3 days
Freeze unbaked dough for easier portioning
Nutrition
- Serving Size: 1 bar
- Calories: 165
- Sugar: 18g
- Sodium: 150mg
- Fat: 8g
- Saturated Fat: 5g
- Carbohydrates: 23g
- Fiber: 1.2g
- Protein: 2.5g
- Cholesterol: 35mg


