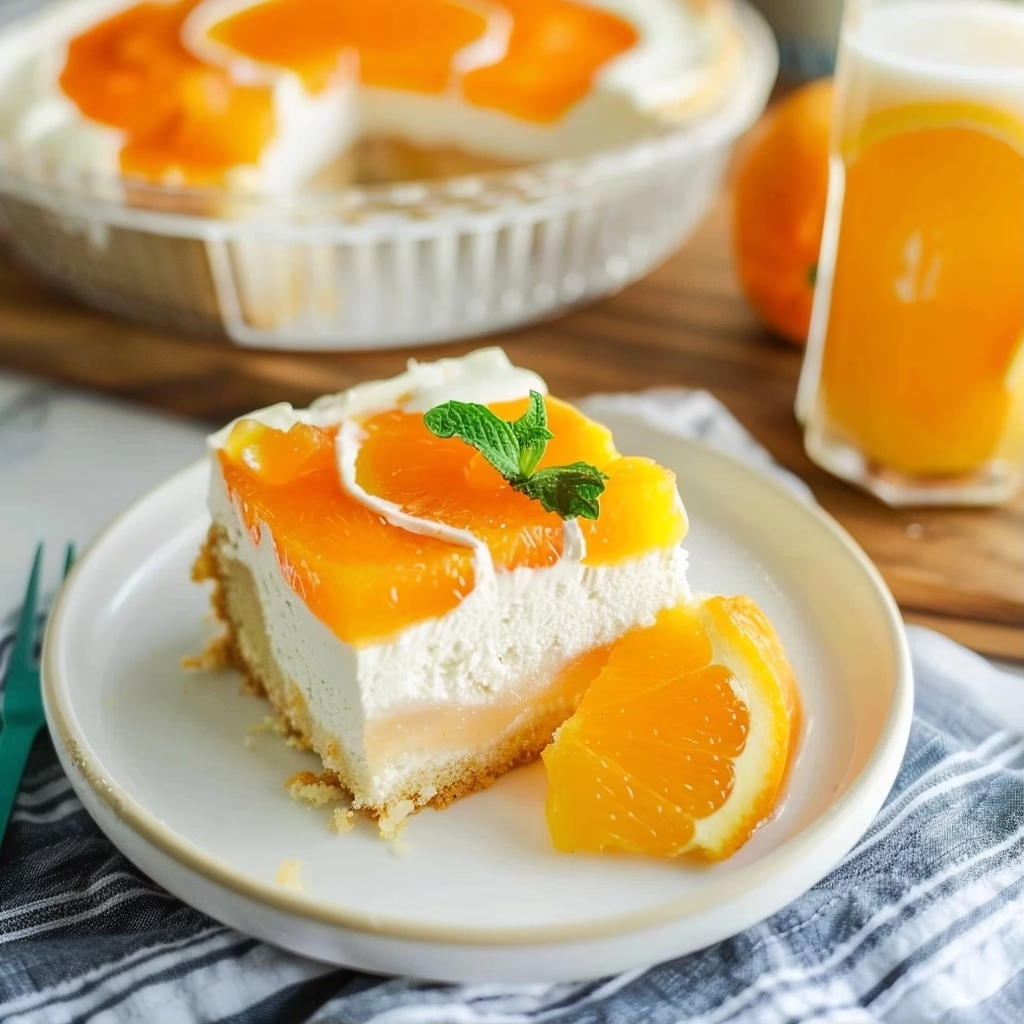
No Bake Creamsicle Lush Cake is your favorite ice cream truck treat made into a spectacular dessert perfect for the warmer months. No need to turn the oven on to create this layered dessert with layers of flavors. Vanilla pudding, orange jello, and a cream cheese layer sit on top of a vanilla cookie crust. This one is a showstopper for sure!
There’s something so wonderfully nostalgic about a Creamsicle, isn’t there? That perfect blend of creamy vanilla and bright, zesty orange instantly transports me back to childhood summers, chasing down the ice cream truck. When I discovered how to capture that magic in a no-bake cake, I knew I had to share it. This No Bake Creamsicle Lush Cake is exactly that – a delightful journey back to simpler times, all without even turning on the oven. It’s a dessert that looks as impressive as it tastes, and honestly, it’s surprisingly easy to put together, even for a novice baker.
This layered wonder combines a buttery cookie crust, a tangy cream cheese filling, a smooth vanilla pudding layer, and a vibrant orange gelatin topping, all finished with a cloud of whipped cream. It’s the kind of dessert that makes people ooh and aah when you bring it to the table, and the best part is, it tastes just like your favorite frozen treat. It’s perfect for potlucks, family gatherings, or just a special weekend indulgence when you want something sweet and refreshing. I’ve made this many times, and it always disappears in a flash, leaving everyone asking for the recipe!
What is No Bake Creamsicle Lush Cake?
At its heart, a No Bake Creamsicle Lush Cake is a celebration of classic dessert flavors in a totally fuss-free format. Imagine the iconic orange and vanilla swirl of a Creamsicle, but transformed into a decadent, layered dessert. It starts with a simple, crumbly crust made from crushed vanilla cookies and butter, providing a lovely foundation. Then comes a delightful layer of sweetened cream cheese, offering a rich, tangy counterpoint to the sweetness.
The magic truly unfolds with the pudding and gelatin layers. We combine creamy vanilla instant pudding with a zesty orange gelatin mixture, creating a jiggly, flavorful stratum that’s both refreshing and utterly delicious. This is then topped with a generous dollop of fluffy whipped topping, creating a beautiful, inviting finish. It’s the combination of textures and the unmistakable Creamsicle flavor profile – that bright orange citrus mingling with sweet vanilla – that makes this dessert so special and beloved.
Reasons to Try No Bake Creamsicle Lush Cake
Honestly, the biggest reason to make this No Bake Creamsicle Lush Cake is pure, unadulterated joy. It’s like sunshine in dessert form! The bright orange flavor paired with the cool, creamy vanilla is incredibly refreshing, especially on a warm day. Plus, the fact that it’s “no bake” is a huge win. This means no preheating the oven, no worrying about over-baking, and it keeps your kitchen cooler, which is always a bonus. It’s also a wonderfully versatile dessert that appeals to almost everyone, from kids who love anything brightly colored to adults who crave a taste of nostalgia.
This recipe is also fantastic for anyone feeling a little intimidated by baking or who simply wants a straightforward dessert that delivers big on flavor and presentation. It’s perfect for busy home cooks who need a make-ahead option, as it requires several hours of chilling time, allowing you to prepare it the day before a party. The steps are clear and simple, and the result is always a showstopper. Picture serving this stunner at your next family gathering or potluck – it’s guaranteed to be a hit and is a wonderful way to bring smiles to faces.
Ingredients Needed to Make No Bake Creamsicle Lush Cake
- 36 vanilla cookies (like vanilla Oreos or shortbread), crushed into crumbs
- 6 tablespoons unsalted butter, melted
- 2 boxes (3 ounce each) orange gelatin powder
- ⅓ cup boiling water
- 2 boxes (3.4 ounce each) vanilla instant pudding & pie filling mix
- 2 ½ cups cold milk
- 1 package (8 ounce) cream cheese, softened to room temperature
- 1 cup powdered sugar (confectioners’ sugar), sifted
- 2 (8 ounce) tubs whipped topping (like Cool Whip), thawed
- Mandarin orange segments and fresh mint leaves, for optional garnish
Instructions to Make No Bake Creamsicle Lush Cake – Step by Step
Step 1: To begin crafting our delightful crust, gather your vanilla cookies. You can place them in a sturdy zip-top bag and crush them with a rolling pin, or for a super fine crumb, pulse them in a food processor until they resemble coarse sand. Once crushed, transfer these crumbs into a medium mixing bowl and pour over the melted butter. Stir everything together with a fork until all the cookie crumbs are evenly moistened, like damp sand. This ensures a crust that holds together beautifully. Press this mixture firmly and evenly into the bottom of a 9×13 inch glass baking dish. Using the flat bottom of a glass or measuring cup helps get it nice and compact. This is our foundation, so a sturdy crust makes all the difference!
Step 2: Now, let’s get started on those vibrant, creamy layers. First, in a small bowl, combine the orange gelatin powder. Carefully pour the boiling water over the powder and whisk vigorously for about a minute or two, until the gelatin is almost completely dissolved. There might be a few tiny bits left, and that’s perfectly fine. Set this aside to cool slightly. In a separate medium bowl, whisk together the dry vanilla instant pudding mix with the cold milk. Whisk continuously until the pudding begins to thicken; this usually takes about 2 minutes. You want it smooth and creamy.
Step 3: We’re going to meld those pudding and gelatin flavors now to create our luscious orange-vanilla layer. Once the bloomed orange gelatin has cooled slightly (you don’t want it piping hot, or it could affect the pudding), gradually whisk it into the thickened vanilla pudding. Keep whisking until the mixture is completely uniform in color and texture. It should be a beautiful, translucent orange-vanilla swirl. This combined mixture will be our bright, jiggly middle layer, bringing that signature Creamsicle essence to our cake.
Step 4: Time for the tangy cream cheese layer, which adds a wonderful richness. In a large mixing bowl, combine the softened cream cheese and the sifted powdered sugar. Using an electric mixer on medium speed, beat these together until the mixture is incredibly smooth and completely free of lumps. This is key for a silky texture. Once smooth, gently fold in 1 cup of the thawed whipped topping using a rubber spatula. Be careful not to overmix; we want to keep it light and airy. This creates a luscious, slightly tangy, and airy layer that’s a perfect contrast to the cookie crust.
Step 5: Assembling the dream! Carefully spread the cream cheese mixture evenly over the prepared cookie crust. Use your spatula to create a smooth, neat layer across the entire dish. Next, gently pour or spoon the orange gelatin and vanilla pudding mixture over the cream cheese layer. Try to spread it as evenly as possible without disturbing the cream cheese layer too much. We’re building these beautiful strata, and evenness contributes to that stunning, layered look when sliced.
Step 6: For the crowning glory, we add the final fluffy layer. Take the remaining thawed whipped topping and spread it gently over the orange gelatin layer. Again, aim for an even coating that covers the entire surface. This fluffy white topping provides a beautiful contrast to the orange layer beneath and adds a final touch of cloud-like lightness. If you desire, gently arrange mandarin orange segments on top and tuck in a few fresh mint leaves for a pop of color and freshness.
Step 7: The most important step for a no-bake dessert: chilling! Cover the dish tightly with plastic wrap (try to prevent it from sticking to the topping if you can) and refrigerate for at least 4 hours. This allows all the layers to set up firmly, ensuring clean slices and that wonderful creamy texture. Some folks even prefer to chill it overnight for the best possible set. I often get mine ready the night before a party; it’s such a relief knowing dessert is all sorted!
Step 8: When you’re ready to serve, simply remove the plastic wrap. Admire those beautiful layers! Slice the No Bake Creamsicle Lush Cake into squares using a sharp knife, wiping the knife clean between slices for the neatest presentation. Serve immediately and enjoy the cascade of Creamsicle flavors! It’s truly a delightful treat for any occasion.
Chef’s Tips for a Perfect Result
- Ensure your cream cheese is truly softened to room temperature. This is crucial for achieving a smooth, lump-free texture when mixed with powdered sugar; cold cream cheese will result in a gritty layer.
- When dissolving the gelatin, use exactly ⅓ cup of boiling water and whisk until almost fully dissolved. Too much or too little water can affect how the gelatin sets.
- Allow the bloomed gelatin to cool slightly before whisking it into the pudding. If it’s too hot, it can cause the instant pudding to become overly thick or break down.
- Use thawed, but not melted, whipped topping. Gently folding it into the cream cheese mixture and spreading it over the gelatin layer will help maintain its airy texture.
- Press the cookie crust down very firmly into the baking dish. A compact crust prevents it from crumbling away when you slice and serve the cake.
- Chill the cake for the full recommended time, at least 4 hours. This allows all the layers to firm up properly, making it easy to slice and enjoy with clean layers.
Variations and Substitutions
While this recipe is wonderful as is, it’s also a fantastic canvas for creativity!
-
Orange Layer Swap
Don’t have orange gelatin? You can use lemon or even strawberry gelatin for a different fruit twist. For a more intense orange flavor, try using a small amount of orange extract mixed into the vanilla pudding, or even fold in some orange zest into the cream cheese layer.
-
Crust Options
Switch up the cookie base! Consider using graham crackers, shortbread cookies, or even lemon sandwich cookies for a different flavor profile. For a gluten-free version, simply use your favorite gluten-free vanilla sandwich cookies.
-
Creamy Texture Boost
Want an even richer cream cheese layer? Try using half softened cream cheese and half softened mascarpone cheese. It adds a lovely, velvety texture.
-
Vegan Dream
For a dairy-free, vegan version, use vegan vanilla sandwich cookies for the crust, vegan butter, dairy-free cream cheese alternatives, and a good quality vegan whipped topping. Ensure your gelatin is plant-based (agar-agar based) if you wish to make the gelatin layer vegan as well, though many opt to skip the gelatin layer in vegan versions and focus on a creamy pudding/whipped topping finish.
-
Add-ins
Fold some finely chopped candied orange peel or even some fresh orange segments (drained well!) into the orange layer before pouring, or sprinkle them on top for an extra burst of citrus and texture.
How to Serve and Pair
This No Bake Creamsicle Lush Cake is a star all on its own, but presentation can elevate it even further. I love serving it in a clear glass 9×13 dish so everyone can admire the beautiful distinct layers. For an extra touch, just before serving, arrange fresh mandarin orange segments prettily over the top. A few sprigs of fresh mint add a lovely pop of green and a hint of extra freshness. It looks so inviting!
This dessert is perfect for a summer barbecue, a potluck, or any gathering where you want something refreshing and fun. It pairs wonderfully with a glass of cold milk, or for the adults, a crisp, non-alcoholic sparkling cider or a light herbal iced tea. It’s a celebration dessert that’s right at home on a picnic table or as the grand finale to a family dinner. It’s especially delightful after a lighter meal, offering a sweet, bright finish without being too heavy.
Storage and Reheating
Refrigerator
Leftover No Bake Creamsicle Lush Cake will keep beautifully in the refrigerator for up to 4 days. Make sure it’s covered tightly with plastic wrap or aluminum foil to prevent it from drying out or absorbing other odors from the fridge. The chilling process actually helps the layers set even further, so it’s often even better on the second or third day!
Freezer
You can absolutely freeze this cake for longer storage, up to about 1-2 months. It’s a great make-ahead strategy. To freeze, ensure the cake is well-covered with plastic wrap and then a layer of aluminum foil. Freezing can sometimes make slicing cleaner; some people even find it easier to slice when it’s partially frozen. Thaw it in the refrigerator overnight before serving.
Room Temperature
It’s best to keep this cake chilled. Due to the cream cheese and whipped topping, it should not be left at room temperature for more than 2 hours to maintain its quality and food safety. For best texture, always serve it cold.
Reheating
This cake is designed to be served cold and does not require reheating. If it has been frozen, simply transfer it to the refrigerator to thaw completely. Avoid microwaving it, as this will melt the layers and ruin the intended texture.
Nutritional Values
- Calories: ~350-450 per serving (approximate, depending on exact ingredients and portion size)
- Protein: ~3-5g
- Carbohydrates: ~40-50g
- Fat: ~20-25g
- Fiber: ~1-2g
Approximate values.
Frequently Asked Questions (FAQ)
Can I use a different flavor of gelatin in this recipe?
Yes, you can absolutely substitute the orange gelatin with other flavors like lemon, strawberry, or lime for a fun twist. Just be mindful that it will change the iconic Creamsicle flavor profile.
How do I know when my No Bake Creamsicle Lush Cake is ready to slice and serve?
The cake is ready when all the layers are firm and set. After at least 4 hours of chilling in the refrigerator, the gelatin layer should be jiggly but hold its shape, and the cream cheese layer should feel solid to the touch.
My cream cheese layer is lumpy, what did I do wrong?
Lumpiness typically occurs if the cream cheese wasn’t softened enough or if it was mixed too quickly with the powdered sugar. Ensure your cream cheese is at room temperature and beat it with the powdered sugar until completely smooth before folding in the whipped topping.
Can I make this entire No Bake Creamsicle Lush Cake the day before?
Absolutely! This is a fantastic make-ahead dessert. In fact, chilling it overnight often improves the texture and helps the layers set even more firmly, making it perfect for preparing in advance for parties.
What are the best ways to customize my No Bake Creamsicle Lush Cake?
You can customize it by adding orange zest to the cream cheese layer, using a different cookie crust like graham crackers, or topping it with fresh fruit like raspberries or blueberries alongside the mandarin oranges for extra color and flavor.
CONCLUSION
This No Bake Creamsicle Lush Cake is a delightfully easy and incredibly rewarding dessert. It captures the beloved taste of childhood summers in a stunning, layered treat that requires no oven time at all. Give this recipe a try for a guaranteed smile and a refreshing taste of nostalgia that will leave everyone craving more of its signature orange and vanilla bliss.
Print
No Bake Creamsicle Lush Cake
- Prep Time: 30
- Total Time: 30
- Yield: 8 servings 1x
- Category: desserts
- Method: No-Bake
- Cuisine: American
- Diet: Vegetarian
Description
A nostalgic, no-bake dessert combining vanilla pudding, tangy cream cheese, and zesty orange jello over a buttery cookie crust. Perfect for warm-weather gatherings and refreshing sweetness.
Ingredients
2 cups vanilla cookies, crushed
1/2 cup melted butter
4 oz cream cheese, softened
1/4 cup granulated sugar
1 tsp vanilla extract
1 cup whole milk
1 (3.4 oz) box instant vanilla pudding mix
1 (3 oz) box orange gelatin (non-alcoholic)
2 cups cold water, divided
1 cup whipped topping (non-alcoholic)
Instructions
Mix crushed cookies and melted butter for the crust. Press into a 9-inch round or square pan.
Beat cream cheese, 2 tbsp sugar, and 1 tsp vanilla until smooth. Chill.
In large bowl, whisk 2 cups cold water with orange gelatin until dissolved. Refrigerate 10-15 minutes to slightly thicken.
In another bowl, combine milk, pudding mix, and remaining 2 tbsp sugar. Stir until smooth.
Assemble layers: Spread cream cheese layer evenly over crust. Pour pudding mixture over it. Top with orange jello mixture.
Refrigerate 4 hours or until set. Before serving, spread whipped topping on top.
Optional: Dip serving edges into a shallow dish with orange jello mixture to create a ‘swirl’ effect before setting.
Notes
Ensure all layers are fully cold before assembling. For stronger orange flavor, add 1 tsp orange zest to the jello mixture. Store covered in fridge for up to 48 hours.
Nutrition
- Serving Size: 1 serving
- Calories: 350
- Sugar: 28g
- Sodium: 200mg
- Fat: 18g
- Saturated Fat: 10g
- Carbohydrates: 45g
- Fiber: 0g
- Protein: 6g
- Cholesterol: 60mg