
No-Bake Flag Cheesecake Bars are a delightful way to celebrate holidays and summer gatherings with minimal fuss. This recipe transforms simple ingredients into a visually stunning and incredibly satisfying dessert that always brings smiles. Whether you’re a seasoned baker or just starting out, these bars offer that perfect combination of creamy texture and sweet, fruity flavor, all without turning on the oven. It’s become a go-to for me when I want something special that doesn’t take all day to make.
Imagine a crisp graham cracker crust, a luscious, smooth cream cheese filling, and a vibrant topping of fresh berries artfully arranged to mimic the American flag. That’s the magic of No-Bake Flag Cheesecake Bars. They’re a true crowd-pleaser, perfect for picnics, barbecues, or simply enjoying on a warm afternoon. I love how they capture the spirit of celebration in every bite, making any occasion feel a little brighter and sweeter.
What is No-Bake Flag Cheesecake Bars?
No-Bake Flag Cheesecake Bars are a charming and simple dessert designed to look like a miniature American flag. They consist of a buttery graham cracker crust, a rich and creamy no-bake cheesecake filling, and a colorful topping made from fresh blueberries and strawberries. The key is the arrangement of these fruits, with blueberries forming the blue field and sliced strawberries creating the red stripes. It’s a creative way to present a classic dessert.
Originating from the desire for an easy, festive dessert, this concept plays on the visual appeal of national symbols, making it particularly popular during patriotic holidays like the Fourth of July or Memorial Day in the United States. The ‘no-bake’ aspect means it’s accessible to everyone, even those without conventional baking experience or appliances. It’s a testament to how simple ingredients and a little creativity can result in something truly special and memorable.
Reasons to Try No-Bake Flag Cheesecake Bars
One of the biggest draws of these bars is their incredible ease. You can whip up the crust and filling in under 30 minutes, leaving ample time for decoration and chilling. This makes them perfect for last-minute dessert needs or for days when you simply don’t want to spend hours in a hot kitchen. The delightful combination of textures and flavors—crumbly crust, smooth cheesecake, and fresh fruit—makes them a winner every time.
These bars are fantastic for beginners because the no-bake method removes a common point of failure: overbaking or underbaking. They are also wonderful for families to make together, as arranging the fruit can be a fun activity for kids. Plus, their portability makes them ideal for potlucks and outdoor events. If you’re looking for a dessert that’s both beautiful and delicious, without the stress, these No-Bake Flag Cheesecake Bars are an absolute must-try.
Ingredients Needed to Make No-Bake Flag Cheesecake Bars
- 2 cups graham cracker crumbs (about 14-16 full graham crackers)
- 1/2 cup unsalted butter, melted
- 1/4 cup granulated sugar
- 16 oz cream cheese, softened to room temperature
- 1 cup powdered sugar (also known as confectioners’ sugar or icing sugar)
- 1 teaspoon vanilla extract
- 1 cup heavy whipping cream (cold)
- 1 cup fresh blueberries
- 1 cup fresh strawberries, hulled and sliced
Instructions to Make No-Bake Flag Cheesecake Bars – Step by Step
Step 1: Prepare the Crust
Start by getting your crust ready. In a medium bowl, combine the graham cracker crumbs, melted unsalted butter, and granulated sugar. Stir everything together until the crumbs are evenly moistened, resembling wet sand. This mixture will form the delicious foundation for your cheesecake bars. I like to press this mixture firmly into the bottom of a 9×13 inch baking pan lined with parchment paper for easy removal later. Use the bottom of a glass or measuring cup to ensure a nice, even layer. This creates a sturdy base that holds everything together beautifully.
Step 2: Make the Cream Cheese Filling
Now, let’s create that luscious cheesecake filling. In a large mixing bowl, beat the softened cream cheese until it’s completely smooth and free of lumps. This is crucial for a silky texture. Then, add the powdered sugar and vanilla extract to the cream cheese. Continue to beat until the mixture is light, fluffy, and well combined. Make sure to scrape down the sides of the bowl periodically to incorporate all the ingredients evenly. It should look wonderfully creamy and inviting at this stage.
Step 3: Whip the Cream and Fold It In
In a separate, clean bowl, whip the cold heavy cream using an electric mixer until stiff peaks form. This means when you lift the beaters, the cream holds its shape and doesn’t droop. Gently fold this whipped cream into the cream cheese mixture. Be careful not to overmix; you want to maintain that airy lightness. Folding preserves the airiness, making the cheesecake filling light and mousse-like rather than dense.
Step 4: Spread the Filling
Carefully spread the smooth cheesecake mixture evenly over the prepared graham cracker crust in the pan. Use an offset spatula or the back of a spoon to get a level surface. This even layer will be the canvas for your masterpiece flag decoration. Take your time here to ensure it’s smooth and reaches all the edges. This creates a beautiful, uniform base for the rest of the design.
Step 5: Decorate with Blueberries
Now for the artistic part! In the top left corner of the cheesecake filling, arrange the fresh blueberries to create the blue field of the flag. Place them close together to form a neat rectangle. This is where you can start to see your flag design come to life. Imagine the deep blue color contrasting with the creamy white filling – it’s already looking festive!
Step 6: Add the Strawberry Stripes
Next, arrange the sliced strawberries in horizontal rows across the remaining portion of the cheesecake topping. Start from the top, just below the blueberry field, and work your way down, creating alternating red stripes. Gently press the strawberries into the cheesecake filling so they stay in place. The vibrant red of the strawberries against the white filling will complete the iconic flag pattern.
Step 7: Chill Until Set
Once your beautiful flag design is complete, cover the pan securely with plastic wrap or foil. Refrigerate the cheesecake bars for at least 4 hours, or preferably overnight. This crucial chilling time allows the cheesecake filling to set firm, making it easy to cut and enjoy. Don’t rush this step; patience ensures the best texture and allows the flavors to meld together perfectly.
Step 8: Cut and Serve
When the cheesecake bars are fully chilled and set, it’s time to serve. If you lined your pan with parchment paper, you can lift the entire block out for easier cutting. Use a sharp knife (wiping it clean between cuts helps create neat slices) to cut the cheesecake into 12 bars. Serve them chilled, and enjoy the delightful combination of crisp crust, creamy filling, and fresh, fruity topping. They’re a perfect, no-fuss treat for any patriotic occasion or summer get-together.
Chef’s Tips for a Perfect Result
- Ensure your cream cheese is truly softened to room temperature for a perfectly smooth filling without any lumps.
- Use cold heavy cream; it whips up best and creates a lighter, fluffier filling.
- For cleaner cuts, run a sharp knife under hot water, wipe it dry, and then slice. Repeat this between each cut.
- If you prefer a firmer crust, add an extra tablespoon or two of melted butter to the graham cracker mixture.
- Lining your pan with parchment paper that overhangs the sides makes lifting the set cheesecake out of the pan much easier for cutting.
- For a more vibrant red stripe, you can briefly macerate the strawberries in a tablespoon of sugar for about 5-10 minutes before slicing.
Variations and Substitutions
- Gluten-Free Alternative: Use certified gluten-free graham crackers or crushed gluten-free cookies like almond or shortbread for the crust. The texture might be slightly different, but the flavor will still be delicious.
- Berry Swap: If strawberries and blueberries aren’t available or you prefer other fruits, raspberries can stand in for strawberries, and blackberries can replace blueberries. Different fruits will subtly change the overall sweetness and tartness.
- Lime or Lemon Zest: For a brighter flavor profile, add a teaspoon of finely grated lime or lemon zest to the cream cheese mixture. This adds a wonderful citrusy zing that cuts through the richness.
- Crushed Cookie Crust: Instead of graham crackers, try using crushed vanilla wafers, shortbread cookies, or even gingersnap cookies for a unique crust flavor.
- Sweetened Condensed Milk Version: For an even richer and sweeter filling, you can substitute some of the powdered sugar and cream cheese with a can of sweetened condensed milk, though this will alter the classic cheesecake flavor.
How to Serve and Pair
These No-Bake Flag Cheesecake Bars are a treat all on their own, but they pair wonderfully with a glass of cold milk or a light, refreshing beverage like lemonade or iced tea, especially on a warm day. For an extra touch of sweetness, a dollop of whipped cream on the side can be delightful. They are perfect for any patriotic celebration, summer picnic, barbecue, or even as a fun weekend dessert that brings a festive spirit to any table. Their bite-sized format makes them ideal for parties where guests can easily pick one up while mingling.
Storage and Recharging
Refrigerator
Store leftover No-Bake Flag Cheesecake Bars in an airtight container in the refrigerator for up to 3-4 days. Ensure they are well covered to prevent them from drying out or absorbing other odors. The chilling keeps them firm and refreshing.
Freezer
These bars freeze surprisingly well! You can freeze them whole or pre-cut. Wrap them tightly in plastic wrap, then in aluminum foil or place them in a freezer-safe container. They will keep their best quality in the freezer for up to 1 month. Thaw them in the refrigerator for several hours or overnight before serving.
Room Temperature
Due to the cream cheese and dairy content, it’s best to keep these cheesecake bars refrigerated. Leaving them at room temperature for extended periods (more than 2-3 hours) can affect their texture and safety.
Reheating
These bars are designed to be served cold and do not require reheating. Reheating would compromise the texture of the no-bake filling and the freshness of the berries.
Nutritional Values
- Calories: approximately 250 per bar
- Protein: 3g
- Carbohydrates: 22g
- Fat: 18g
- Saturated Fat: 10g
- Fiber: 1g
- Sugar: 15g
- Sodium: 150mg
Approximate values.
Frequently Asked Questions (FAQ)
Can I substitute the cream cheese for a lighter version?
While you can use light cream cheese, it may result in a slightly softer filling. For the best creamy texture, full-fat cream cheese is recommended.
How do I know when my No-Bake Flag Cheesecake Bars are properly set?
The bars are set when the cheesecake filling is firm to the touch and no longer jiggles when the pan is gently shaken. Proper chilling time is key to achieving this firmness.
My cheesecake filling is lumpy, what did I do wrong?
Lumpy filling usually happens when the cream cheese isn’t softened enough before mixing. Ensure it’s at room temperature and beat it until very smooth *before* adding other ingredients.
Can I make these cheesecake bars a day in advance?
Absolutely! These bars are ideal for making ahead. Chilling them overnight allows them to set perfectly and makes decorating and slicing much easier.
What are the best ways to customize the flag design on these cheesecake bars?
You can add a few dollops of whipped cream to represent stars on the blueberry field, or use different berry combinations for a unique flag look. Feel free to add a sprinkle of edible glitter for extra sparkle.
CONCLUSION
These No-Bake Flag Cheesecake Bars are a simple, stunning, and utterly delicious dessert that’s perfect for any celebration. They offer a delightful creamy texture and a burst of fresh berry flavor that is truly irresistible. Gather your friends and family, whip up a batch, and enjoy a taste of festive fun!
Print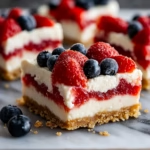
No-Bake Flag Cheesecake Bars: A Deliciously Easy Patriotic Treat
- Prep Time: 20 minutes
- Cook Time: 0 minutes
- Total Time: 4 hours 20 minutes
- Yield: 12 bars 1x
- Category: Dessert
- Method: No-Bake
- Cuisine: American
- Diet: Vegetarian
Description
No-Bake Flag Cheesecake Bars are a festive summer dessert with a buttery graham cracker crust, creamy cheesecake filling, and fresh berries arranged like the American flag.
Ingredients
- 2 cups graham cracker crumbs
- ½ cup unsalted butter, melted
- ¼ cup granulated sugar
- 16 oz cream cheese, softened
- 1 cup powdered sugar
- 1 teaspoon vanilla extract
- 1 cup heavy whipping cream
- 1 cup blueberries
- 1 cup strawberries, sliced
Instructions
1. In a bowl, combine graham cracker crumbs, melted butter, and granulated sugar. Press the mixture into the bottom of a 9×13-inch pan to form the crust.
2. In a large mixing bowl, beat softened cream cheese, powdered sugar, and vanilla extract until smooth and creamy.
3. In a separate bowl, whip heavy cream until stiff peaks form, then gently fold it into the cream cheese mixture.
4. Spread the cheesecake mixture evenly over the crust.
5. Arrange blueberries in the top left corner to create the blue field of the flag.
6. Place sliced strawberries in rows to form the red stripes of the flag.
7. Refrigerate for at least 4 hours, or until set.
8. Cut into bars and serve chilled.
Notes
For a gluten-free version, use gluten-free graham crackers.
Make sure the cream cheese is at room temperature for easier mixing.
Use other fresh berries for decoration if desired.
Nutrition
- Serving Size: 1 bar
- Calories: 250
- Sugar: 15 g
- Sodium: 150 mg
- Fat: 18 g
- Saturated Fat: 10 g
- Unsaturated Fat: 8 g
- Trans Fat: 0 g
- Carbohydrates: 22 g
- Fiber: 1 g
- Protein: 3 g
- Cholesterol: 50 mg


