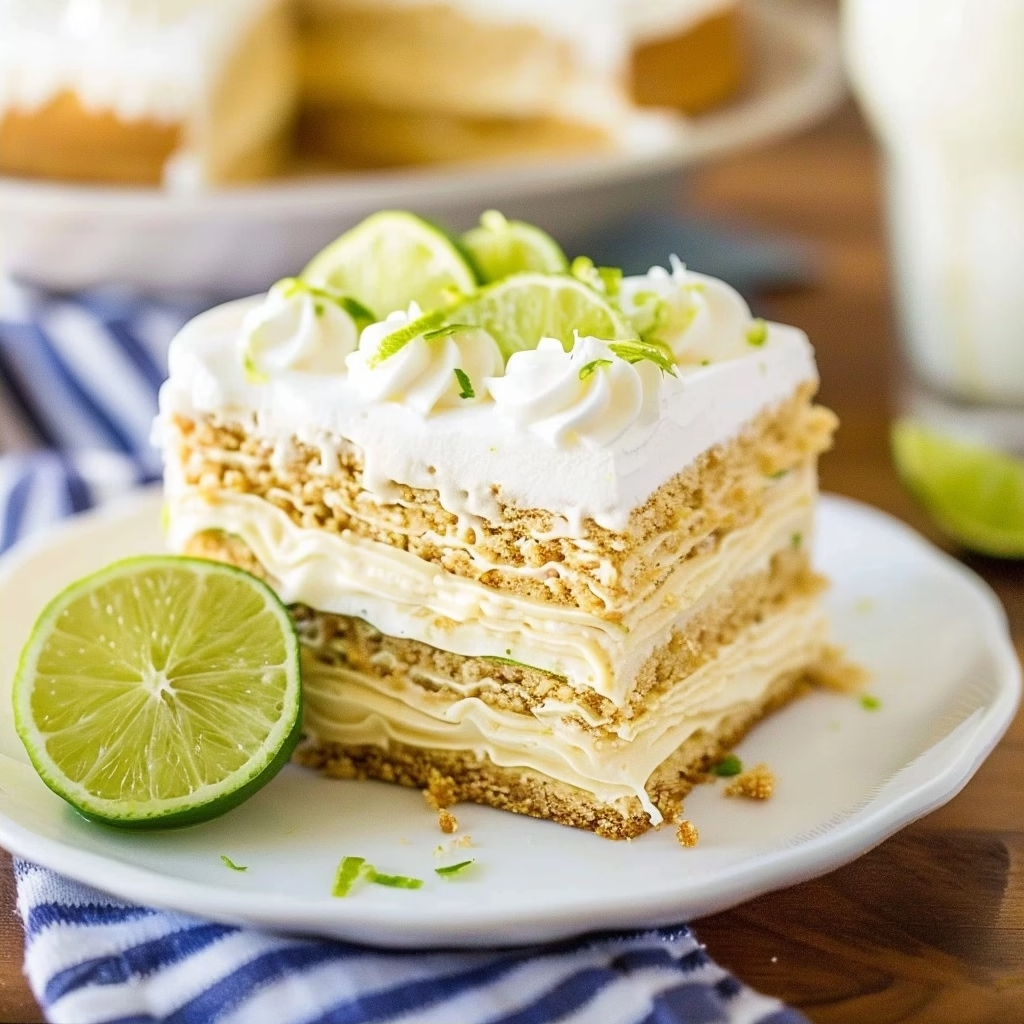
No-bake Key Lime Icebox Cake is a dessert that whispers of summer days and effortless entertaining. It’s the perfect cool-down treat when the weather heats up, or honestly, anytime you crave a burst of bright, tangy flavor. This isn’t just another cake; it’s a creamy, dreamy concoction that comes together with surprisingly little fuss, yet looks and tastes like it took hours of dedicated effort. Imagine layers of sweet graham crackers softened by a luscious, zesty key lime custard, all topped with billowy whipped cream. It’s a true crowd-pleaser that makes you look like a baking superstar, even if you’re just starting out.
There’s something truly magical about desserts that don’t require an oven, especially when they deliver such a satisfying punch of flavor. This No-bake Key Lime Icebox Cake takes that magic and amplifies it with the distinct, irresistible tang of key limes. It’s the kind of dessert that brings people together, sparking conversations and creating those cozy kitchen memories I cherish so much. I remember the first time I made something like this, a little nervous that it wouldn’t set right, but the sheer delight on my friends’ faces when they took their first bite was all the encouragement I needed. It’s proof that sometimes, the simplest recipes are the most rewarding.
What is No-Bake Key Lime Icebox Cake?
A no-bake Key Lime Icebox Cake is a delightful layered dessert that relies on chilling to set, rather than baking. Think of it as a no-fuss, frozen cheesecake hybrid, but with a distinctly tropical and tangy profile. The “icebox” in its name refers to the old-fashioned ice boxes that were used to keep food cool before modern refrigerators, highlighting the dessert’s chilled nature. It typically features a base and layers made from crushed cookies or graham crackers, interspersed with a rich, creamy filling. For this particular version, that luscious filling is infused with the unmistakable zing of key lime juice and zest, creating a wonderfully refreshing taste experience.
The beauty of this dessert lies in its simplicity and the harmonious blend of sweet and tart. The graham crackers act as both the structure and a textural contrast, softening beautifully as they absorb moisture from the creamy filling over time. The key lime custard is the star, providing that characteristic pucker-me-up flavor that’s so invigorating. It’s a dessert that feels both elegant and incredibly comforting, reminiscent of summer picnics, beach days, or just a quiet afternoon treat. Its appeal comes from its straightforward preparation and the irresistible combination of textures and tastes that make it a beloved classic for so many.
Reasons to Try No-Bake Key Lime Icebox Cake
There are so many wonderful reasons to whip up this No-bake Key Lime Icebox Cake, beginning with how incredibly easy it is. For anyone who finds themselves a little intimidated by baking, or even just short on time, this recipe is a dream come true. You can have it assembled in under an hour, and then it’s just a matter of patience while it chills in the refrigerator or freezer. It’s perfect for busy weeknights, impromptu gatherings, or when you want a show-stopping dessert without turning on the oven, especially in warmer months. The minimal effort involved belies the sophisticated flavor and elegant presentation, making it a go-to for hosts and home cooks alike.
Beyond its ease, the flavor profile is simply irresistible. The bright, citrusy tang of key lime cuts through the creamy sweetness of the custard and whipped topping, creating a perfectly balanced taste that’s both refreshing and indulgent. It’s the kind of dessert that makes everyone ask for the recipe. Plus, it’s wonderfully versatile! You can easily adjust the tartness, the sweetness, and even the type of cracker base to suit your preferences. It’s a fantastic option for potlucks or parties because it travels well and can be made ahead, freeing you up to enjoy your guests. It genuinely feels like a special occasion dessert, yet it’s achievable for cooks of all skill levels.
Ingredients Needed to Make No-Bake Key Lime Icebox Cake
Here’s what you’ll need to gather for this delightful no-bake treat:
- 3/4 cup granulated sugar
- 1/4 cup cornstarch
- 4 large egg yolks (save the whites for another recipe, like meringues!)
- 2 cups half-and-half (a mix of whole milk and cream gives the best richness)
- 3 tablespoons unsalted butter
- 2 tablespoons key lime zest (from about 4-6 key limes)
- 1/2 cup key lime juice (freshly squeezed is best for that authentic flavor!)
- About 15-18 graham crackers (enough to form two layers in your pan)
- 1 cup heavy whipping cream
- 1/4 cup powdered sugar (for sweetening the whipped cream)
- Optional Garnishes: extra lime zest, thin lime slices
Instructions to Make No-Bake Key Lime Icebox Cake – Step by Step
Let’s get this no-bake wonder assembled! It’s a straightforward process that’s truly enjoyable, almost like building a delicious edible puzzle.
Step 1: Begin by preparing the base for your creamy key lime filling. In a medium-sized saucepan, whisk together the 3/4 cup of granulated sugar and the 1/4 cup of cornstarch until they are thoroughly combined and there are no visible lumps of cornstarch. This step is important to prevent lumps from forming in your custard later on. Once that’s mixed, set it aside for a moment.
Step 2: In a separate bowl, gently whisk together the 4 large egg yolks and the 2 cups of half-and-half. You want to incorporate them well, ensuring the yolks are fully blended into the creamy liquid without any streaks. This mixture will form the rich base of our key lime custard, and the egg yolks are key for that luxurious texture we’re aiming for.
Step 3: Now, it’s time to bring these components together over heat. Place the saucepan with the sugar and cornstarch mixture over medium heat. Gradually whisk the egg yolk and half-and-half mixture into the saucepan. Keep whisking continuously as you do this. It’s crucial to keep everything moving to temper the eggs and prevent them from scrambling.
Step 4: Continue to cook and whisk this mixture constantly over medium heat. You’ll notice it starting to thicken as the cornstarch activates. Bring the mixture to a gentle boil, and once it starts to bubble, let it bubble for exactly 1 minute while you keep whisking. This minute of boiling is essential for activating the cornstarch fully and ensuring a thick, stable custard. Once that minute is up, immediately remove the saucepan from the heat.
Step 5: Off the heat, whisk in the 3 tablespoons of butter until it’s fully melted and incorporated, adding a beautiful sheen and richness to the custard. Then, stir in the 2 tablespoons of key lime zest and the 1/2 cup of freshly squeezed key lime juice. The zest will release its fragrant oils, and the juice will provide that signature tartness. Stir until everything is smoothly combined, filling your kitchen with a delightful citrus aroma.
Step 6: Allow this luscious key lime custard to cool down a bit before you proceed. Set the saucepan aside for about 10 minutes. This brief cooling period helps prevent the hot custard from softening the graham crackers too much right away and makes it easier to handle.
Step 7: While the custard cools, prepare your pan. Line an 8×8 inch square baking dish with plastic wrap, leaving some overhang on the sides. This overhang will make it much easier to lift the finished cake out of the dish later. Make sure the plastic wrap fits snugly into the corners of the dish.
Step 8: Now it’s time to build the foundation of your icebox cake! Arrange your graham crackers on the bottom of the prepared baking dish. I found that fitting them in rows worked well; for my 8×8 pan, I used about 3 crackers across and then broke apart some to fill in any gaps at the ends. The goal is to create a solid, even layer of crackers that will soften beautifully.
Step 9: Spoon about 3/4 cup of the slightly cooled key lime custard over the graham cracker layer. Use a spatula or the back of a spoon to gently spread the custard evenly, ensuring it covers all the crackers all the way to the edges. This creates the first luscious layer of our cake.
Step 10: Repeat the layering process. Add another layer of graham crackers over the custard, then spoon another 3/4 cup of custard on top and spread it. Continue this pattern two more times, alternating layers of graham crackers and custard, until you have used up the custard and ended with a final layer of graham crackers on top. This layering is what gives the icebox cake its structure and character.
Step 11: Once all the layers are assembled, cover the top of the baking dish securely with plastic wrap. Place the entire dish in the freezer and let it freeze for at least 8 hours, or preferably overnight. This extended chilling and freezing time is crucial for the cake to set properly and develop that characteristic icebox texture. It’s where the magic of “no-bake” truly happens!
Step 12: When you’re ready to serve, carefully remove the frozen cake from the freezer. Use the plastic wrap overhang to lift the entire cake out of the baking dish and place it onto your serving plate or platter. Let the cake rest and thaw at room temperature for about 1 hour before slicing and serving. This allows the cake to soften slightly, making it easier to cut and enjoy the full creamy texture.
Step 13: While the cake is thawing, whip up the topping. In a chilled bowl, combine the 1 cup of heavy whipping cream with the 1/4 cup of powdered sugar. Using an electric mixer (or a whisk and some serious arm power!), beat the cream and sugar together until soft peaks form. Be careful not to overbeat; you want a lovely, airy whipped cream, not butter!
Step 14: Once the cake has thawed for an hour and is sliceable but still nicely chilled, spread the fresh whipped topping evenly over the top surface. If you like, garnish the cake with a little extra key lime zest or some thin slices of fresh lime for a beautiful presentation. Now, slice it up and serve this dreamy dessert!
Chef’s Tips for a Perfect Result
- Use fresh key limes for the best flavor. While regular limes can work, key limes offer a more distinct and floral citrus note that is essential for this cake.
- Don’t skip the simmering time for the custard. Boiling the cornstarch mixture for a full minute is crucial to ensure it thickens correctly and doesn’t taste starchy.
- Chill your bowl and beaters before making the whipped cream. This helps the cream whip up faster and achieve a lighter, fluffier consistency, just like in my early baking days!
- Ensure the cake is fully frozen before beginning to thaw. A well-frozen base makes for cleaner slices and a better texture contrast with the thawing exterior.
- Adjust the lime juice to your taste. If you prefer a tangier cake, add an extra tablespoon or two of lime juice to the custard.
- Embrace the softening time. Letting the cake thaw for about an hour is key to achieving that perfect icebox cake texture where the crackers are tender but not mushy.
Variations and Substitutions
- Lemon Zest and Juice: If key limes are hard to find, you can absolutely substitute them with regular lemons! The flavor will be similar, though perhaps a bit less tropical. Use the zest from about 2-3 lemons and 1/2 cup of fresh lemon juice.
- Graham Cracker Alternatives: Feel free to experiment with other crunchy bases like vanilla wafers, digestive biscuits, or even shortbread cookies for a different flavor profile and texture.
- Low-Carb Option: For a lower-carbohydrate version, swap the graham crackers for finely crushed almond flour or coconut flour mixed with a little melted butter and a sugar substitute. Use a sugar substitute in the custard and whipped cream as well.
- Vegan Adaptation: To make this vegan, replace the egg yolks and half-and-half with a thick, plant-based custard base (like coconut cream mixed with cornstarch and sweetener) and use a dairy-free whipped topping. Ensure your graham crackers are also vegan.
- No-Cornstarch Custard: If you prefer not to use cornstarch, you can try thickening the custard with a more significant amount of egg yolks, but be extra careful not to scramble them. It will result in a richer, almost crème brûlée-like texture.
How to Serve and Pair
This No-Bake Key Lime Icebox Cake is incredibly versatile when it comes to serving. For a beautiful presentation, allow the cake to thaw for the recommended hour, then invert it onto a lovely serving platter. Top generously with the homemade whipped cream and garnish with a sprinkle of finely grated lime zest or a few thin slices of fresh lime. The contrast of the white cream against the pale green cake is always stunning.
It’s perfect for almost any occasion, from casual summer barbecues and family reunions to elegant dinner parties or even just a special weeknight treat. Pair it with a light, refreshing beverage like iced tea, sparkling water with a squeeze of lime, or a crisp white wine (for those who enjoy it). For an extra touch of indulgence, serve a slice alongside a scoop of vanilla bean ice cream or a few fresh berries.
Storage and Reheating
Refrigerator
Leftover No-Bake Key Lime Icebox Cake will keep well in the refrigerator for up to 3 days. Make sure to store it in an airtight container or cover the serving platter tightly with plastic wrap. This helps prevent it from absorbing any odors from other foods and keeps its creamy texture intact.
Freezer
If you have more cake than you can eat within a few days, you can freeze the whole cake (before applying the final whipped cream topping, if desired) or individual slices. Wrap tightly in plastic wrap and then in a layer of aluminum foil. It can be stored in the freezer for up to 2 months. Thaw overnight in the refrigerator before serving.
Room Temperature
This cake is best served chilled and is not intended for extended periods at room temperature. Due to the creamy custard and dairy components, it should not be left out for more than 1-2 hours to avoid spoilage.
Reheating
Reheating is not typically necessary or recommended for this no-bake dessert, as it is designed to be served cold and slightly thawed. If you find a slice is too frozen, simply allow it to sit on the counter for a bit longer to reach your desired consistency. Avoid microwaving it, as this will likely result in a melted, unappealing mess.
Nutritional Values
- Calories: Approximately 350-450 per serving
- Protein: 3-5g
- Carbohydrates: 40-55g
- Fat: 20-30g
- Fiber: 1-3g
Approximate values.
Frequently Asked Questions (FAQ)
Can I use regular limes instead of key limes in this icebox cake?
Yes, you can absolutely use regular limes if key limes are unavailable. While key limes offer a unique, floral tang, regular limes will provide a delicious citrusy flavor that works beautifully in this recipe. You might need slightly more juice from regular limes to achieve the same intensity of flavor.
How do I know when my No-Bake Key Lime Icebox Cake is done and ready to serve?
Your cake is ready when it has been frozen for at least 8 hours or overnight, and it has a firm, sliceable consistency. After thawing for about an hour, it should be firm enough to hold its shape but tender and creamy, with softened graham cracker layers.
My custard didn’t thicken properly. What went wrong?
This usually happens if the cornstarch wasn’t fully activated by boiling or if the mixture wasn’t whisked constantly. Ensure you bring the custard to a simmer and let it bubble for a full minute while whisking vigorously. Using the correct ratio of cornstarch to liquid is also essential.
Can I make this No-Bake Key Lime Icebox Cake a day or two in advance?
Absolutely! This is the perfect make-ahead dessert. You can assemble the entire cake, freeze it, and then let it thaw for the final hour on the day you plan to serve it. This makes entertaining so much less stressful!
What are some creative ways to customize or serve this key lime icebox cake?
You can get creative by adding a layer of crushed ginger snap cookies to the bottom for a spicy kick, or swirl in some raspberry or mango puree for a fruity twist. Garnish with toasted coconut flakes or finely chopped pistachios for added texture and visual appeal.
CONCLUSION
This No-bake Key Lime Icebox Cake is a truly wonderful dessert for any occasion, offering a delightful balance of creamy sweetness and tangy citrus that’s incredibly refreshing. It’s a testament to how simple ingredients and a little chill time can create something so spectacularly delicious. Once you try this effortlessly chic and flavorful cake, you’ll understand why its signature key lime tang makes it utterly irresistible and a guaranteed favorite.
Print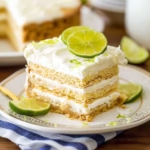
Decadent No-Bake Key Lime Icebox Cake
- Prep Time: 20
- Total Time: 240
- Yield: 8 servings 1x
- Category: desserts
- Method: No-Bake
- Cuisine: American
- Diet: Vegetarian
Description
A chilled, layered dessert featuring a graham cracker base soaked in key lime custard and topped with whipped cream. No oven required—effortless summer indulgence with bright, tangy lime flavor.
Ingredients
2 cups crushed graham crackers
1/2 cup milk
3 large egg whites
3/4 cup granulated sugar
2 cups heavy cream
1 tablespoon key lime zest
1/2 cup key lime juice
1 teaspoon vanilla extract
Instructions
Combine crushed graham crackers with milk to create a moist crumb mixture
Press the mixture into a 9-inch springform pan and chill for 10 minutes
In a bowl, whisk egg whites and 1/2 cup sugar until stiff peaks form
Fold in key lime juice and zest
Spread the custard layer over the chilled crust
Beat heavy cream with remaining sugar and vanilla until stiff peaks form
Top the cake with the whipped cream layer
Refrigerate for 4 hours before slicing
Notes
Use fresh key lime juice for authentic tartness
Chill for at least 4 hours for optimal texture
Covering cake prevents excess crust softening
Key limes can be substituted with regular limes plus an extra teaspoon of juice for intensified flavor
Nutrition
- Serving Size: 1 slice
- Calories: 235
- Sugar: 34g
- Sodium: 80mg
- Fat: 14g
- Saturated Fat: 8g
- Carbohydrates: 28g
- Fiber: 1g
- Protein: 5g
- Cholesterol: 70mg


