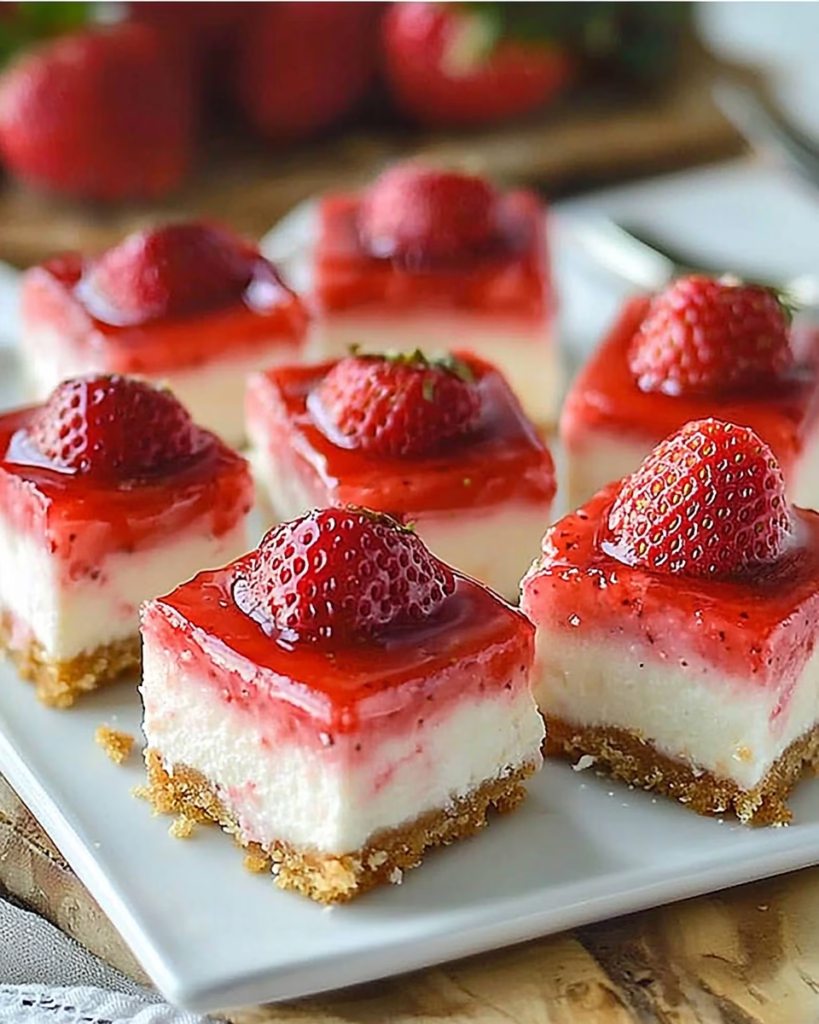
What is No-Bake Strawberry Cheesecake Bars?
No-Bake Strawberry Cheesecake Bars are a luscious, no-hassle dessert that brings the iconic flavors of classic cheesecake into a convenient bar form. Think of them as a cross between a slice of old fashioned New York cheesecake and a tender fruit tart—every layer melts into the next with minimal effort. These bars bypass the need for an oven entirely, relying instead on the chill of the refrigerator to set their creamy texture. The crust is crisp and buttery, the filling is rich yet light, and the strawberry topping is sweet, tangy, and full of real fruit flavor.
The beauty of this dish lies in its simplicity. With just a handful of pantry staples and fresh strawberries, it becomes a showstopping dessert for gatherings, lunchboxes, or quiet evening treats. It’s a recipe born for home cooks who love the idea of indulgence but don’t want to spend hours in the kitchen. The layers work together to create a textural journey: first the crackle of graham cracker crust, then the velvety silk of a cream cheese and heavy cream filling, finished with the juicy freshness of simmered strawberries. It’s a celebration of contrasts that make each bite memorable.
Reasons to Try No-Bake Strawberry Cheesecake Bars
These bars are more than just a shortcut—they’re a revelation. When life pulls you in a dozen directions, spending 25 minutes in the kitchen to create a dessert that feels like a bakery masterpiece is pure magic. No need to preheat an oven, worry about cracks forming during baking, or even turn on the stove once the base is ready. They’re perfect for beginners, parents preparing after-school snacks, and anyone craving something decadent with zero kitchen stress. The no-bake method preserves the creamy, dreamy texture that can be lost in the heat of an oven.
What makes them truly special is their flexibility. Leftover crust can be portioned out for mini cheesecake cups; a thicker strawberry layer can become a summer picnic centerpiece. They’re forgiving enough for a first-time recipe tryer and exciting enough for a dinner party. You don’t have to be a dessert savant to nail these bars—just grab your ingredients and follow along. And when your friends ask where you bought them, you’ll smile and share the secret that’s now in your kitchen repertoire.
Ingredients Needed to Make No-Bake Strawberry Cheesecake Bars
For the crust:
- 1 ½ cups graham cracker crumbs (about 12 graham crackers, crushed in a plastic bag with a rolling pin)
- ⅓ cup granulated sugar (for subtle sweetness and binding)
- ½ cup unsalted butter, melted (use high-quality butter for deeper flavor)
For the cheesecake filling:
- 2 cups cream cheese, softened (room temperature ensures smooth folding after whipping the cream)
- 1 cup powdered sugar (easier to dissolve in no-bake recipes than granulated)
- 1 teaspoon vanilla extract (preferably pure, not imitation)
- 2 cups heavy cream (creates that pillowy, airy texture in the filling)
For the strawberry topping:
- 2 cups fresh strawberries, hulled and chopped (about 12-15 medium berries)
- ¼ cup granulated sugar (adjust to preference, or use a sugar-free alternative)
- 1 tablespoon lemon juice (brightens flavor and mimics alcohol’s acid for preservation)
Instructions to Make No-Bake Strawberry Cheesecake Bars – Step by Step
Step 1:
Begin your crust by crushing graham crackers into fine crumbs. Pulse the crackers in a food processor for a few seconds, or place them in a bag and roll over with a wine bottle until the texture resembles sand. Combine the crumbs with granulated sugar in a medium bowl. The sugar adds sweetness but also helps bind the mixture. Now pour in melted butter—this is the trick to achieving that buttery sheen and stability. Stir until the butter coats the crumbs, creating what bakers call a “wet sand” consistency. If the mixture feels dry, add a teaspoon of melted butter at a time until it binds nicely.
Step 2:
Using the back of a spoon or your palms, press the crumb mixture firmly into the bottom and up the sides of your 9×9-inch baking dish. I like to use the handle of a wooden spoon to create even pressure, ensuring the crust holds up to the thick filling later. Smooth the top as best as you can for a professional presentation. This step is where patience pays off—if the crust isn’t packed tightly, the layers might collapse when sliced. Once pressed to perfection, pop the crust into the refrigerator while you work on the filling. Chilling this base now helps it set slightly before adding the next layer.
Step 3:
For the filling, beat your softened cream cheese in a large bowl with an electric mixer using paddle attachment. Avoid overprocessing—this should be smooth, not whipped into curds. Add powdered sugar gradually, letting the mixer incorporate sweetness evenly. A teaspoon of vanilla extract is your shortcut to bakery-level depth; I often taste a pinch of salt at this stage too (not in the original recipe) to cut the sweetness. In a separate bowl, whip the heavy cream until it forms stiff peaks. Be gentle with this step—overwhipping leads to a grainy texture. Fold the cream into the cream cheese base with a spatula, working slowly to maintain airiness while combining the two. The final mixture should feel silky, as if you’re handling thick cloud cover.
Step 4:
Spread the cheesecake layer over your chilled crust with a rubber spatula. This is the moment you almost taste the dessert in its purest form—fresh, cold, and creamy all in one motion. Flatten the top gently, using the back of a spoon for subtle texture details if desired. This chilled foundation needs time to firm up, but trust the process: it’ll harden more once the strawberry topping is added. While the filling sets up slightly in the fridge, start simmering your strawberry layer.
Step 5:
In a saucepan, combine chopped strawberries with granulated sugar and a squeeze of lemon juice. Turn on medium heat and stir occasionally, watching for the transformation as the berries release their juices and reduce into a glossy, jam-like texture. This gentle cooking process concentrates their flavor without turning into stewed fruit. Once cooled, drizzle the strawberry topping over the cheesecake filling. Even if you think the fruit isn’t fully set, it will thicken slightly as it chills. Refrigeration is non-negotiable here—four hours is the baseline, but overnight is always better when possible.
Step 6:
When cutting, let a thin chef’s knife rest gently on the surface first. Run your knife through the bars while using firm downward pressure to avoid distortion. I find a warm (almost to the touch in summer) knife slices cleanly, then wiping it clean between cuts for crisp edges. Dust each bar with powdered sugar and add a fresh strawberry slice to the top for decoration. You’ll be surprised how this no-bake dessert holds together with just the right amount of chill—no rubber bands or parchment covers needed for clean slicing.
Chef’s Tips for a Perfect Result
- Chill components before assembling: A pre-chilled crust and filling prevent the layers from merging when the strawberries are added warm.
- Use stabilized whipped cream: Add 2-3 drops of corn syrup when whipping to prevent weeping in the fridge overnight.
- Adjust sugar based on strawberry ripeness: Riper berries need less added sugar to balance the sourness.
- Press a silicone mold into the crust to prevent cracking from expansion: A small silicone mold makes the most of this.
- Let the filling firm up slightly before adding strawberries: This creates clean, non-mucky layers that set properly.
Variations and Substitutions
- Vegan Option
- Replace cream cheese with a vegan block cheese (e.g., Kite Hill) and substitute melted butter with coconut oil;
- Heavy cream can be swapped for coconut cream or vegan whipped topping;
- The texture will be slightly denser but retains the creamy essence;
- Use agave or maple syrup instead of granulated sugar for a cleaner taste.
- Dairy-Free Alternative
- Opt for almond flour crust instead of graham crackers to suit tree nut allergies;
- Use dairy-free cream cheese (e.g., Tofutti) and cashew milk whipped into firm peaks;
- Gelatin or agar is optional for firmer layers but not required;
- Chia seed “custard” can blend with dairy-free cream for a unique texture.
- Budget Swap
- Substitute cream cheese with Neufchâtel (less calories, more affordable in some regions);
- Use frozen strawberries (thawed and drained) for peak flavor at a lower cost;
- The filling remains stable but has a milder flavor profile;
- Try low-fat milk in place of heavy cream—cheesecake will be lighter but less rich.
- Gluten-Free Version
- Replace graham crackers with gluten-free gingersnaps or almond flour-cinnamon mixture;
- Check that all binders (sugar, butter) are certified gluten-free; read labels carefully;
- Garnish with edible glitter or crushed rice cakes for decorative sparkle without gluten;
- Use a silicone-lined dish for naturally gluten-free handling.
How to Serve and Pair
These bars sing in simplicity best. Serve at room temperature where the cream cheese softens slightly, and the strawberry sauce feels like warm lava across the tongue. For a fancier touch, drizzle the strawberry layer with a bit of melted chocolate just before serving to create marbled patterns. Pair each bar with chilled sparkling water, unsweetened iced tea, or a tangy kombucha to refresh the palate after all that cream.
When assembling a dessert table, place them next to shortbread cookies and lemon sorbet for contrasting textures. They’re equally happy as a morning treat with coffee or a weekend brunch companion with mimosas. Use a sharp knife and paper straws for an at-home bakery aesthetic—watch how guests reach for seconds with wide eyes.
Storage and Reheating
Refrigerator
Keep assembled bars refrigerated in an airtight container for up to 5 days. Place parchment paper between layers if stacking to prevent sticking. The flavor peaks by the second day but remains safe until the fifth. For best results after refrigeration, store in a container no deeper than 3 inches for even air flow.
Freezer
You can freeze the bars for up to 2 weeks if individually wrapped in aluminum foil and sealed in a plastic bag. They’re best when thawed for 4 hours at room temperature before eating. Freeze in a single layer to prevent texture damage from stacking. Avoid refreezing once thawed—they’ll retain moisture too aggressively in the second round.
Room Temperature
Unassembled crust and filling will soften in 5 minutes at room temperature. Keep the bars tightly wrapped at room temperature for up to 30 hours (not recommended for full assemblies). They maintain best flavor when briefly set out for serving, then returned to refrigerator afterward.
Reheating
Reheating compromises the dessert’s delicate structure, but if you must warm them, wrap a portion loosely in parchment paper and place on a baking sheet in a 250°F oven for 10 minutes until serving temperature is just slightly above fridge cold. Avoid microwaving entirely—as the cream cheese warms, it’ll weep liquid and never regain its dreamy consistency. If serving warm, pre-drizzle the strawberry sauce after reheating for structural integrity.
Nutritional Values
Per bar (based on serving 9 large bars):
- Calories: 230
- Protein: 5g
- Carbohydrates: 18g
- Fat: 16g
- Fiber: 2g
Approximate values.
Frequently Asked Questions
Can I substitute graham crackers with other crumbs?
If graham crackers aren’t available, use crushed vanilla wafers (dust crumbs for extra sweetness) or oats blended with ground cinnamon. Both options absorb butter equally well but add unique flavor notes: vanilla vinaigrette or a nutty, wholesome twist.
How do I know if the filling is ready to spread?
The filling is ready when it becomes glossy and stiff enough to hold peaks when lifted off the spatula. It should flow like soft whipped cream when spooned but retain the shape you press from the bowl. If it feels soupy, refrigerate it for 10–15 minutes first.
Why is my crust crumbling when I slice?
Underpacked crust is usually the culprit. Press the mixture until you feel firm pressure and hear the crumbs settle. If already assembled, gently press a cooled, assembled bar back into shape using a small bowl as a mold. Overtime, the filling will firm up and stabilize the base.
Can I prepare components ahead of time?
Absolutely! Crust lasts up to a day refrigerated, and the filling maintains for 4 hours. Simmer the strawberry topping just before assembly unless planning to freeze the fruit layer separately. For advanced prep, chill fully assembled bars covered with plastic wrap for up to 20 hours (no more, or the fruit may melt the filling).
What if I want a fruitier layer or use a seasonal berry?
Raspberry or blueberry work beautifully. For more intensity, reduce the berries and puree until smooth. If using berries like blackberries that don’t release as much juice, add a tablespoon of cornstarch during cooking to thicken the syrup and create a stable topping without overcooking delicate fruit.
Conclusion
No-Bake Strawberry Cheesecake Bars prove that magic exists in the kitchen without a stove. The crust’s toasty sweetness, the filling’s silken embrace, and the strawberry layer’s juicy bite combine like a warm hug after a long week. Grab a paring knife and a chilled bar, or share them with family at the Sunday table. Their signature flavor? The way ripe strawberries cut through cream cheese with such clean, bright elegance that every bite feels like springtime.
Print
No-Bake Strawberry Cheesecake Bars
- Prep Time: 25
- Total Time: 25
- Yield: 16 bars 1x
- Category: desserts
- Method: Chilling
- Cuisine: American
- Diet: Dairy-Free
Description
A quick, no-bake dessert combining a buttery graham cracker crust, creamy cheesecake filling, and vibrant strawberry topping. Perfect for gatherings or easy indulgence with minimal effort.
Ingredients
1 ½ cups graham cracker crumbs
⅓ cup granulated sugar
½ cup unsalted butter, melted
2 cups cream cheese, softened
1 cup powdered sugar
1 cup heavy cream, chilled
½ tsp vanilla extract
2 cups strawberries, fresh or frozen
¼ cup granulated sugar
1 tbsp lemon juice
1 tbsp cornstarch
Instructions
In a bowl, mix graham cracker crumbs, ⅓ cup sugar, and melted butter. Press into an 8×8-inch pan.
In another bowl, beat cream cheese until smooth. Add powdered sugar and mix until creamy. Gently fold in chilled whipped heavy cream and vanilla.
Spread the cheesecake mixture over the crust, smoothing the surface.
In a saucepan, combine strawberries, ¼ cup sugar, lemon juice, and cornstarch. Cook until thickened. Let cool, then spread over the cheesecake layer.
Chill for at least 4 hours or overnight before slicing.
Notes
For best results, use room temperature cream cheese.
Pressing the crust evenly is key for clean slices.
Substitute cornstarch with arrowroot powder for a glossy topping.
Store in an airtight container for up to 5 days.
Can be frozen for up to 2 months; thaw before serving.
Nutrition
- Serving Size: 1 bar
- Calories: 230
- Sugar: 12g
- Sodium: 90mg
- Fat: 16g
- Saturated Fat: 9g
- Carbohydrates: 25g
- Fiber: 1g
- Protein: 4g
- Cholesterol: 55mg