
What is Patriotic Oreo Balls?
Patriotic Oreo Balls are a whimsical dessert that brings a bold splash of red, white, and blue to any table. These bite-sized treats layer crushed Oreo cookies with creamy cheese filling and are coated in vibrant candy melts to resemble miniature American flags. The recipe blends classic comfort (Oreos and cream cheese) with a festive design, making it ideal for Fourth of July, holidays, or political get-togethers. Their origins as a modern, DIY dessert highlight the joy of transforming everyday ingredients into something special—proof that even a humble cookie can spark celebrations when creativity meets the kitchen.
Each ball starts with Oreo crumbs and cream cheese, creating a dense, buttery center that’s both sweet and tangy. The red and blue candy melts encase the mixture in smooth, glossy layers, while white star confetti adds the final patriotic flourish. What makes them stand out isn’t just the colors but the contrast of textures: crusty, creamy, and crunchy in one bite. They’re a testament to how food can be both a technical marvel and a heartfelt gesture, perfect for impressing guests without endless prep.
Reasons to Try Patriotic Oreo Balls
There’s a reason these patriotic confections keep showing up at summer cookouts and cozy family gatherings. First, their festive appearance turns heads: who wouldn’t want to serve something that looks like it leaped straight from a confetti cannon? Second, they’re surprisingly simple to make. With a food processor, hand mixer, and some candy melts, you’ll have 30 crowd-pleasing bites in just a few hours. Third, they’re incredibly versatile—you can tweak the colors, coatings, or shapes to match any occasion. Whether you’re a seasoned baker or a first-time decorator, these balls blend ease with elegance, proving that impressive desserts don’t require advanced pastry know-how.
Busy home cooks will love this recipe’s prep-ahead flexibility. Chill the Oreo balls in the fridge while you handle last-minute guests or fold laundry. Beginners will gain confidence learning to work with food processors and candy melts, while families can enjoy making them together. They’re also a safe bet for nearly every palette: the Oreo base is familiar, the cream cheese adds richness without being overwhelming, and the coatings stay subtle rather than cloying. Best of all, they make sharing stories over snacks feel effortless—perfect for backyard barbecues or lazy summer evenings with loved ones.
Ingredients Needed to Make Patriotic Oreo Balls
1 lb 2.12 oz Family Size Oreo Cookies
8-ounce block cream cheese, softened to room temperature
12-ounce bag red candy melts
12-ounce bag blue candy melts
1/3 cup Ghirardelli white melting wafers
White star confetti sprinkles for topping
Parchment-lined baking trays
Food processor or high-speed blender
Hand mixer or stand mixer
Double boiler or microwave-safe bowl
Fork and small piping bag (sturdy for melting wafers)
Bowls for candy melts and melted oil/sprinkles
Instructions to Make Patriotic Oreo Balls – Step by Step
Step 1: Start by lining your baking trays with parchment. This is a detail I learned the hard way—when I forgot the parchment early on, my first batch looked like a sticky mess. Softening the cream cheese in advance is crucial; I once rushed it and created cold clumps that refused to blend. Once everything is ready, pop those Oreos into the food processor. Pulse until the dough resembles fine crumbs. Add a touch more sugar if you want an extra-sweet base, or skip it for the classic Oreo flavor.
Step 2: With the Oreos in the processor, transfer them to a large bowl. Add the softened cream cheese gradually, letting the mixer do the work. The texture should feel thick and malleable, like playdough. If the mixture is too dry, add a teaspoon of softened butter at a time. Too wet? Work in more Oreo crumbs. After my first batch turned out crumbly, I realized the secret to balance is tasting as you go—adjust sweetness to match your crowd.
Step 3: Scooping is the next fun stage. Using a 1.5-inch scooper ensures uniformity, though hand-rolled balls add a rustic charm. Gently roll the dough between your palms, then place on the baking trays in a single layer. Chill them for 2 hours; the cold firmness is vital for handling the coatings. If you’re short on time, a 15-minute blast in the freezer substitutes well, though I’ve found refrigeration yields a smoother finish.
Step 4: Melt the blue candy melts in a double boiler, stirring often to avoid streaks. Work in batches: dip each orb halfway with a fork, coating it fully. Let excess drip off, then sprinkle confetti stars while the melts are still tacky. Pro tip: I keep an extra tray of sprinkles nearby—I once forgot and ended up with a half-starred mess. Repeat this with red candy melts on the second tray.
Step 5: For the white lines resembling flags, melt the Ghirardelli wafers and load into a piping bag. Drizzle gentle crosshatches over the red-coated ones. Don’t rush—the wafers cool and set in minutes, but working too fast creates uneven lines. Return them to the fridge for 10 minutes to finish solidifying before serving. Let the balls rest in the fridge until ready to eat; this keeps them firm without melting.
Chefs Tips for a Perfect Result
- Room-temperature cream cheese is non-negotiable: If it’s stiff, the mixture will be gritty. I microwave it for 15 seconds at a time, but even better is letting it sit near the oven for an hour or two.
- Chill properly: Skipping the fridge step leads to messy coatings. When I forgot this step once, the red candy melts slid off like rain from a leaky rooftop. The 2-hour chill makes all the difference.
- Use separate melt batches: Don’t combine red and blue candy melts in the same bowl. A leftover drop of blue can accidentally tint the red layer. I now work with two separate double boilers for maximum precision.
- Work in small batches: If you try to coat too many at once, the melts will overheat to greasy goop. I stick to coating 8–12 at a time, rotating between colors and decorations as the first batch sets.
- Invest in quality candies: Cheap candy melts seize when melted and lose their shine. Ghirardelli and Brach’s are my go-tos; they flow smoothly and dry to a glossy finish that makes the patriotic stripes pop.
- Refrigerate until serving: These balls love being chilled. Warm temperatures ruin their crisp finish, which is a lesson I learned the third time I brought them to a summer picnic only to find them weeping.
Variations and Substitutions
Vegan Option: Swap standard Oreo cookies for vegan versions and replace cream cheese with a store-bought vegan cheese alternative. Note that firmness might differ slightly, so chill them 5–10 minutes extra. Flavor remains rich and bold, with the added satisfaction of being plant-based.
Gluten-Free Alternative: Use gluten-free Oreos to keep the treat accessible to more guests. Beyond that, no adjustments are needed; the crumb texture stays flawless, and the patriotic theme remains untouched. It’s a win-win for inclusivity and crunch.
Low-Carb Version: Replace Oreos with almond flour or coconut flour blends. The cream cheese adds natural fat content, keeping the mixture cohesive. They sacrifice a bit of classic sweetness but gain a satisfying nutty backbone that feels festive but guilt-free.
Budget Swap: Use homemade red and blue icing mixed with food gel instead of candy melts. They won’t set as firmly (chill for 30+ minutes), but the colors look just as vibrant, and the texture remains delightfully soft. It’s a cost-effective option that still sparkles on a patriotic platter.
How to Serve and Pair
These patriotic bites beg to be centered on a vibrant red-white-and-blue display. Arrange them on a platter, alternating colors or placing stars on alternating balls for a flag-inspired mosaic. They shine alongside cold beverages—try pairing with refreshing lemonade or iced tea to balance the richness. For a festive touch, serve with a tall glass of chilled milk, letting the stars shimmer under bright lights as guests dig in.
They’re also excellent for themed parties. Add them to a picnic table with BBQ ribs and coleslaw, or bring a jar to a summer potluck. For holiday evenings, serve them on a silver tray with ice cubes to create an elegant spread. The key is to let their bold colors steal the spotlight without clashing with heavier menu items.
Storage and Reheating
Refrigerator: Keep finished Patriotic Oreo Balls in an airtight container for up to 5 days. They stay firmest when refrigerated, with the candy melts retaining their shape longer than at room temperature. I recommend freezing the uncoated balls for longer storage.
Freezer: For up to a month, place uncoated Oreo balls into a freezer-safe container. Separate layers with parchment to prevent sticking. Thaw for an hour in the fridge before proceeding with coatings—frozen dough is tricky to handle.
Room Temperature: If serving within an hour, they’re safe but soften faster. Store in a cool, shaded spot to prevent melt drips. For outdoor events like fireworks shows, keep them covered with a breathable cloth until guests arrive.
Reheating: These aren’t meant to be reheated, but if warmed for soft texture, use a toaster oven at 300°F for 10 seconds at a time. Avoid microwaves—they’ll melt the candy coatings. For best results, serve chilled or at room temperature within an hour of preparation.
Frequently Asked Questions
Q1: Can I substitute another cookie for the Oreos?
A: Yes! Sugar cookies maintain the same crumb texture, while chocolate sandwich cookies keep the richness. Avoid graham crackers unless you’re willing to experiment with extra butter—crumb firmness matters here.
Q2: How do I know when the Oreo balls are done coating?
A: Once the candy melts fully cover the ball and set to a glossy finish. They’re ready when you can lift the fork and feel no stickiness—usually 10–15 seconds in the melts, followed by 30 minutes at room temperature or fridge chilling.
Q3: My candy melts are seizing. How do I fix that?
A: Seizing happens when candy overheats or encounters moisture. Rescue it by adding 1–2 teaspoons oil (shortening works best) and stirring until smooth. If too many particles persist, replace with fresh candy melts for a clean finish.
Q4: Can I prepare these in advance?
A: Absolutely—make the Oreo dough a day ahead, chilled in the fridge. The coatings can go on 4–6 hours before serving if stored in the fridge covered with plastic wrap. Just drizzle the white lines 10–15 minutes before serving to avoid smudging.
Q5: Should I refrigerate before guests arrive?
A: Cold is best for serving. Chilling firming the layers prevents drooping and maintains the star patterns. Let the balls rest for at least an hour in the fridge before placing them on a serving plate—your guests will thank you for the sharp patriotic presentation.
Conclusion
Patriotic Oreo Balls are a delicious celebration of colors, textures, and shared joy. They’re not just sweet treats—they’re edible storytelling pieces that bring people together. Try making a batch and let the white star confetti spark conversation, laughter, and a craving for more. With their flag-inspired design and creamy bite, you’ll find it hard to keep them on the tray and not in your mouth!
Print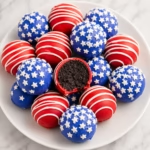
Patriotic Oreo Balls
- Prep Time: 20
- Total Time: 50
- Yield: 30 bite-sized balls 1x
- Category: desserts
- Method: No Bake
- Cuisine: American
- Diet: Vegetarian
Description
Festive bite-sized dessert balls with crushed Oreo and cream cheese centers, coated in red, white, and blue candy melts. Perfect for patriotic celebrations or summer gatherings.
Ingredients
4 cups crushed Oreo cookies
8 oz cream cheese, softened
12 oz red candy melts
12 oz blue candy melts
1/3 cup Ghirardelli white melting wafers
White star confetti sprinkles
Parchment-lined baking trays
Food processor
Hand mixer
Instructions
Crush Oreo cookies in a food processor until fine crumbs form (about 10-15 seconds)
In a mixing bowl, combine crushed Oreo crumbs with softened cream cheese using a hand mixer until smooth
Spoon mixture into 1-inch-sized balls and place on prepared baking trays
Chill in refrigerator for 30 minutes to firm
Melt red and blue candy melts in separate microwave-safe bowls, stirring until smooth
Working one at a time, dip Oreo balls into red candy melt, let drip slightly, then into blue candy melt for alternating stripe effect
Melt white melting wafers for final drizzle and sprinkle with star confetti
Let set at room temperature for 15 minutes before serving
Notes
Use a cookie scoop for uniform sizing
To prevent clumping, keep Oreo mixture chilled during shaping
Candy melts should be melted in 30-second intervals and stirred carefully to avoid overheating
Store in single layer on parchment paper in the fridge for up to 3 days
Nutrition
- Serving Size: 1 ball
- Calories: 90
- Sugar: 6g
- Sodium: 30mg
- Fat: 5g
- Saturated Fat: 3g
- Carbohydrates: 10g
- Fiber: 1g
- Protein: 2g
- Cholesterol: 5mg


