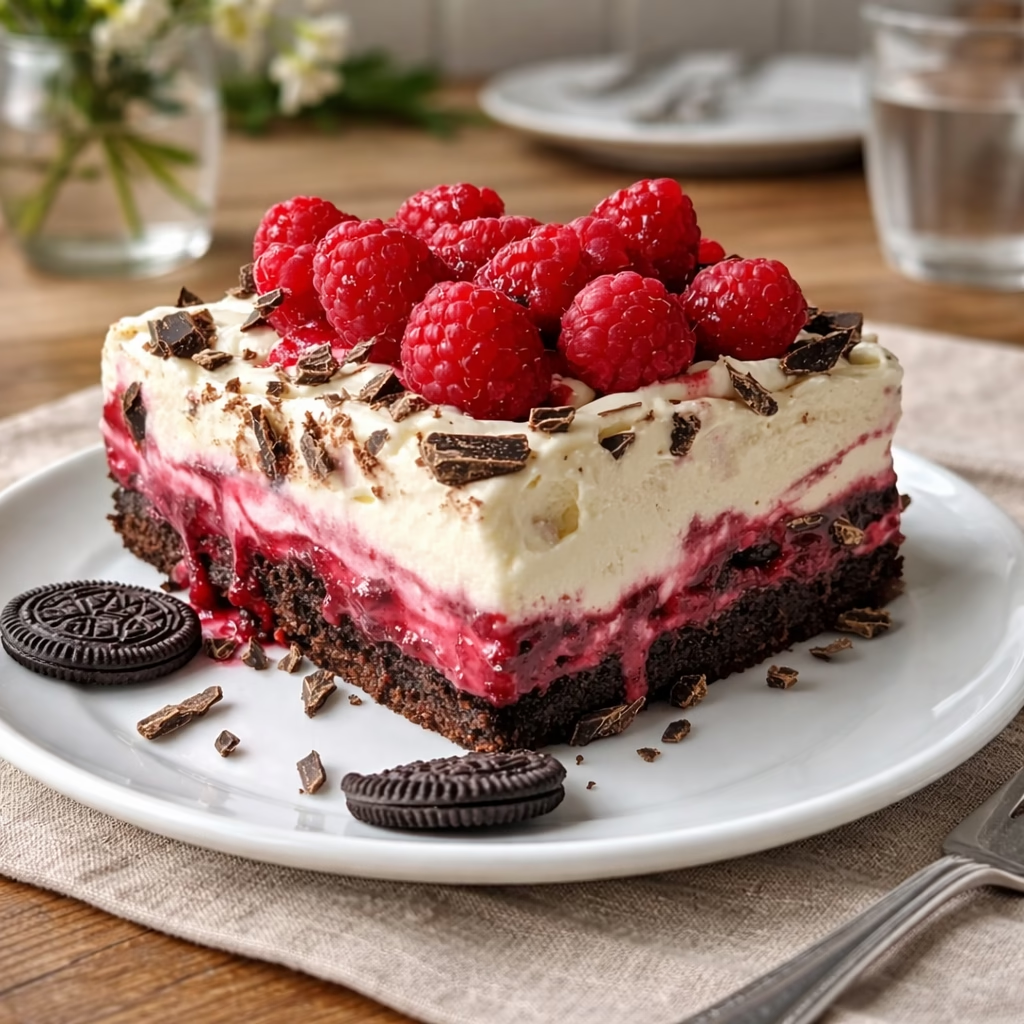
Raspberry Chocolate Lasagna Dessert isn’t your average sweet — it’s a bold, playful twist on layering chocolate and tart fruit into a no-bake marvel that feels like indulgence without the stress. I first stumbled on this recipe during a chaotic week when my friends dropped by unannounced, and my chocolate obsession collided with a half-bowl of frozen raspberries. The result? A dessert that became our table’s saving grace and now, my personal go-to for lazy Sundays or last-minute gatherings. This Raspberry Chocolate Lasagna Dessert works its magic through a buttery Oreo crust, silky chocolate pudding, and a zesty raspberry cream cheese layer that balances richness with refreshment — proof that dessert can be both comforting and clever.
Let’s talk about the layers again, because they’re what make this recipe unforgettable. The Oreo base gives a nutty crunch that cradles the dense chocolate pudding, which softens into the raspberry cream cheese’s bright, tangy kiss. I love how the Cool Whip adds a whisper of lightness to both textures, tying the layers together while letting each shine. This isn’t a dessert that demands culinary precision — it’s a happy accident with staying power. And for anyone who’s ever stood in a store aisle wondering how to use up that half-finished bag of Oreos or a stash of raspberries, this will feel like a eureka moment in your own kitchen.
What is Raspberry Chocolate Lasagna Dessert?
While traditional lasagna layers pasta, meat, and cheese, this dessert version trades savory comfort for sweet delight. Born from a love of no-bake recipes, it’s a modern American creation that plays with texture and flavor like building a flavor skyscraper. Think of it as a dessert that does double duty — satisfying your chocolate cravings while delivering a juicy raspberry jolt. The recipe draws from the popularity of chocolate pudding desserts but elevates it with a creamy, slightly tangy cheescake middle that mimics the bittersweet contrast of a classic cherry tart.
At its core, this dessert is about simplicity and impact. You start with crushed Oreo cookies for the crust, which provide a sweet, nutty foundation. The chocolate pudding layer gives a rich, fudgy texture that contrasts beautifully with the airy Cool Whip. The raspberry cheescake isn’t just sweet — it carries a hint of acidity that prevents the dessert from becoming overwhelming. Together, these layers create something familiar yet thrillingly new, ideal for any time you want to impress without heating up the kitchen.
What makes it truly special? The texture dance between the crisp crust and squishy layers feels like dessert theater. The raspberries aren’t just for looks — they simmer gently into the cheescake, creating pockets of juicy goodness that burst between spoonfuls. And because this is a no-bake creation (I learned the hard way to avoid turning on the oven during summer heat), you can enjoy it anytime, even while folding laundry or watching the kids play.
Reasons to Try Raspberry Chocolate Lasagna Dessert
This dessert deserves a spotlight because it solves a common kitchen dilemma: how to make a showstopper without hours of preparation. I’ve hosted summer parties where I made this the night before and simply chilled it overnight. By morning, it looked like it belonged in a bakery rather than my fridge. Whether you’re a time-crunched parent, a beginner baker testing their skill, or someone who just loves the joy of layering flavors, this recipe becomes your secret weapon.
Beyond the effort-saving design, this dessert is deeply satisfying for home cooks. The layers teach a beautiful lesson about contrast — when dense meets light, bitter meets sweet, and texture meets flavor, you create something that tastes like your love of cooking paid off. I especially adore it for family dinners that need an extra flourish, or when I want to recreate the magic of a restaurant dessert on my own terms. And for anyone new to no-bake recipes, this isn’t a test of technique — it’s a triumph of just mixing things right and letting science do the rest.
Ingredients Needed to Make Raspberry Chocolate Lasagna Dessert
Here’s what you’ll need to build this no-bake delight:
Oreo cookies – 20-25 (the classic ones work best — if you have chocolate or flavored Oreos, let creativity guide you here)
Butter – 6 tablespoons, melted (I find organic unsalted butter gives the best flavor)
Chocolate pudding mix – 1 package (check for vanilla-free versions if you prefer natural flavor)
Milk – 1 cup for pudding, 2 tablespoons for raspberry layer (whole milk adds the richest texture)
Cool Whip – ½ cup for chocolate layer, 1 cup for raspberry layer (store-bought or homemade — both work)
Cream cheese – 8 ounces, softened (full-fat for that dreamy tang)
Sugar – ½ cup (adjust if your Cool Whip or pudding is already sweet)
Vanilla extract – 1 teaspoon (real vanilla extract gives it that finishing touch)
Raspberries – ½ cup, fresh or frozen (defrost frozen berries with a splash of milk if they’ve hardened)
Instructions to Make Raspberry Chocolate Lasagna Dessert – Step by Step
Step 1: Begin by crushing the Oreos into fine crumbs. I use the food processor trick — pulse the cookies until they resemble wet sand. Then add the melted butter slowly while pulsing, because over-melting can make the crust collapse. Once combined, press the mixture firmly into an 8×8-inch glass dish. Use the back of a spoon or a flat-bottomed jar to create an even crust (skip the rolling pin, it just makes a mess). Freeze this layer for 10 minutes to firm it up. Don’t skip this step — the next layers rely on a stable base.
Step 2: While the crust sets, prepare the chocolate pudding. Whisk the pudding mix with slightly less milk than the package recommends — the ½ cup will balance richness and spreadability. Let it sit for a minute to thicken slightly before folding in half the Cool Whip. Gently mix until you get a marbled, silky texture with visible air bubbles. Spread this over the frozen crust and return the dish to the freezer for another 10-15 minutes. The cold helps define the layers and prevent the cheesecake from bleeding into the pudding.
Step 3: Move on to the raspberry layer by whipping the cream cheese with sugar until light and fluffy. Add the 2 tablespoons of milk and 1 teaspoon of vanilla gradually. The trick is to blend slowly — rushing this causes lumps. Once smooth, gently fold in the raspberries. You’ll notice them softening slightly, creating a pink, fruity emulsion. Add the remaining Cool Whip and mix just until you see faint raspberry streaks — over-whipping flattens their signature texture. Spread this gently over the chocolate pudding, creating a smooth top with minimal gaps to avoid a messy finish.
Step 4: Top the raspberry layer with the remaining Cool Whip, swirling with a small spatula for a marbled design. Now comes the best part — customization time. I often sprinkle with chocolate shavings, crushed candied raspberries, or a dusting of cocoa powder. Press a few whole raspberries into the top for a burst of freshness with every bite.
Step 5: The final act is chilling. I’ve learned this takes at least 4 hours, but ideally 8 — the longer refrigeration time lets the layers compress without becoming sticky or weepy. When lifting the dessert into a serving platter, I gently run a warm knife along the Pyrex dish to loosen it cleanly without losing the layers.
Chef’s Tips for a Perfect Result
• Use softened cream cheese: It blends 40% faster without tearing the Cool Whip layer. Test it by pinching a bit with your finger — it should indent slightly and spring back.
• Layer during colder phases: Refrigerating the chocolate pudding and crust before adding the next layer prevents mixing. My kitchen’s warmest hours (early afternoon) are when I avoid this step.
• Don’t over-mix the pudding layer: Stir it just until no dry mix remains. Over-mixing activates the starch too much, turning it gluey.
• Elevate the crust: Pressing a plastic wrap-lined dish makes cleanup easier. I also like adding a teaspoon of cocoa powder for a darker contrast (optional but rewarding).
• Freeze before chilling: Letting the initial layers set in the freezer for 10 minutes each gives structural integrity that prevents sagging later. It’s a quick step but makes all the difference.
Variations and Substitutions
- Vegan Option:
Replace cream cheese with vegan cheescake blend (try Tofutti brand) and use dairy-free Cool Whip substitutes. The texture will be firmer but equally indulgent. - Gluten-Free Alternative:
Substitute Oreos with almond flour, dates, and maple syrup for a gluten-free base. It’s sweeter overall but worth it for those avoiding gluten. - Low-Carb Version:
Use chocolate protein pudding mix and swap Cool Whip with whipped coconut cream. The fat ratio changes slightly, but the raspberry brightness remains unchanged. - Budget Swap:
Replace Oreo brand with store-brand cookies — you’ll see no difference in taste but save up to $1.50 per batch. Same for generic chocolate pudding and vanilla extract from a local grocery store. - Custom Flavors:
Swap raspberries with strawberries or blackberries for seasonal twists. If using frozen strawberries, add half a teaspoon of lemon juice to prevent a murky layer.
How to Serve and Pair
This dessert sings when paired simply. I love serving it with black coffee — the bitterness cuts through the chocolate like a clean palate wipe between bites. For a brunch crowd, place small squares in espresso cups alongside mini almond croissants. Presentation matters too — cut into perfect squares with a hot knife for clean edges that feel restaurant-ready.
When customizing, try adding crushed graham cracker dust on top, or layering a drizzle of melted white chocolate over the Cool Whip. For a showstopper twist, place a raspberry sorbet ball beside each slice for a tripled textural experience. My favorite? Serving it during Easter dinner with berry fruit tartlets on the side. The colors pop, the flavors harmonize, and everyone feels like a dessert connoisseur.
Storage and Reheating
Refrigerator:
Once assembled, wrap the Pyrex dish tightly in plastic wrap or transfer into a storage container. It’ll keep for 5 days without weeping — just check the top layer for slight softening over 3+ days. For best results, let the dessert rest at room temperature for 10 minutes before serving — the texture warms into just-set cool.
Freezer:
You can freeze the assembled dessert in its container for up to 1 month. Thaw it in the fridge overnight, then let it sit for an hour before slicing. Avoid thawing at room temperature unless you’re in a rush — the edges may become melty, breaking the layers apart.
Room Temperature:
Keep the dessert in a shaded area with an airtight lid for up to 4 hours maximum. This works best for small gatherings under 20 degrees F ambient temperature to avoid condensation on the layers.
Reheating:
This is 100% a cold dessert. To warm up a slice, microwave on defrost settings for 10-15 seconds to soften the layers — but you’ll lose the pudding’s integrity. Better to enjoy straight from the fridge where the textures stay true to their design.
Nutritional Values
- Calories: Approximately 280 per serving
- Protein: 4g from cream cheese and Oreo base
- Carbohydrates: 32g (mostly sugars from pudding and Cool Whip)
- Fat: 17g (7g saturated from butter and cream cheese)
- Fiber: 1g from raspberries
Approximate values.
Frequently Asked Questions
Can I swap the Oreo crust with graham crackers?
Yes, but graham cracker crusts lose crunch in the pudding layer. To prevent this, mix in 2 tablespoons of melted chocolate chips with the crumbs for structural stability.
How do I tell when the layers are properly set?
Gently lift the edge with a spoon — it should hold shape without crumbling. If you see liquid at the base, return to the fridge for another hour. Under-chilling leads to messy slices.
My Cool Whip looked curdled in the chocolate layer. Why?
This happens if the pudding isn’t fully combined before folding in Cool Whip. Make sure the pudding sits for 5 minutes first to thicken. For a smoother blend, use an electric mixer on the lowest speed during combination.
Can I make the layers the day before?
Absolutely. Prepare all layers up to 24 hours in advance. Refrigerate each layer in separate bowls until ready to assemble — this prevents moisture from the raspberry layer affecting the pudding texture.
How creative can I get with toppings?
Feel free to add chopped nuts, edible flowers, or even a chocolate ganache drizzle over the Cool Whip. For festive occasions, press crushed candy into each square before garnishing — it turns out like a miniature dessert masterpiece.
Conclusion
Raspberry Chocolate Lasagna Dessert balances chocolate’s classic comfort with raspberries’ cheeky brightness in a no-bake recipe designed for joy. With just a few ingredients and an oven-free promise, it’s the kind of dessert that makes home cooks grin as they serve it. Whether you’re a beginner testing kitchen confidence or a seasoned cook craving fuss-free indulgence, let the layers of this dessert remind you that sometimes the simplest ideas become your most cherished memories.
Print
Raspberry Chocolate Lasagna Dessert
- Prep Time: 30 minutes
- Cook Time: 0 minutes
- Total Time: 4 hours 30 minutes
- Yield: 8 servings
- Category: Dessert
- Method: No-Bake
- Cuisine: American
- Diet: Vegetarian
Description
A delightful no-bake layered dessert with a crunchy Oreo crust, rich chocolate pudding, and a tangy raspberry cheesecake layer topped with fluffy whipped topping.
Ingredients
- Oreo cookies: 20-25 cookies
- Butter: 6 tablespoons, melted
- Chocolate pudding mix: 1 package
- Milk: 1 cup for the pudding and 2 tablespoons for the raspberry layer
- Cool Whip: 1/2 cup for the chocolate layer and 1 cup for the raspberry layer
- Cream cheese: 8 ounces, softened
- Sugar: 1/2 cup
- Vanilla extract: 1 teaspoon
- Raspberries: 1/2 cup, fresh or frozen
Instructions
1. Crush the Oreo cookies and mix them with the melted butter. Press the mixture into an 8×8-inch dish and freeze for 10 minutes to set the crust.
2. Prepare the chocolate pudding using half the recommended milk amount, then fold in 1/2 cup Cool Whip. Spread the mixture over the chilled crust and freeze for 10 to 15 minutes.
3. In a bowl, mix the softened cream cheese, sugar, 2 tablespoons milk, and vanilla extract until smooth.
4. Fold in the raspberries and 1 cup Cool Whip, then spread the raspberry mixture over the chocolate layer.
5. Top with additional Cool Whip and decorate as desired.
6. Refrigerate for at least 4 hours before slicing and serving.
Notes
Use organic ingredients for the best flavor if available.
This dessert can be made a day ahead and tastes even better after chilling overnight.
Store leftovers in the refrigerator for up to 3 days.
Nutrition
- Serving Size: 1 slice
- Calories: 250-300
- Sugar: 15-20 grams
- Fat: 15-20 grams
- Trans Fat: 0 grams
- Carbohydrates: 30-35 grams
- Protein: 3-5 grams