Apple Pie Bars: Your new favorite fall treat is here, and it’s simpler than you ever imagined! There’s something undeniably comforting about the aroma of baked apples and warm spices, isn’t there? It takes me back to cozy afternoons spent in the kitchen, usually with a little bit of flour on my nose and endless curiosity about how simple ingredients could transform into something so wonderful. These Apple Pie Bars capture all the delicious essence of a classic apple pie, but in a wonderfully easy-to-handle bar form.
This recipe is born from those moments when the craving for a comforting dessert hits, but the thought of rolling out pie dough feels a bit daunting. We’ve all been there! The goal was to bottle up that pure, unadulterated apple pie magic – the tender, spiced apples, the buttery, crumbly crust – and present it in a way that’s accessible for everyone, even if your baking experience is just beginning or you’re short on time. These bars are proof that you don’t need to be a pastry chef to create something truly special.
What is Apple Pie Bars?
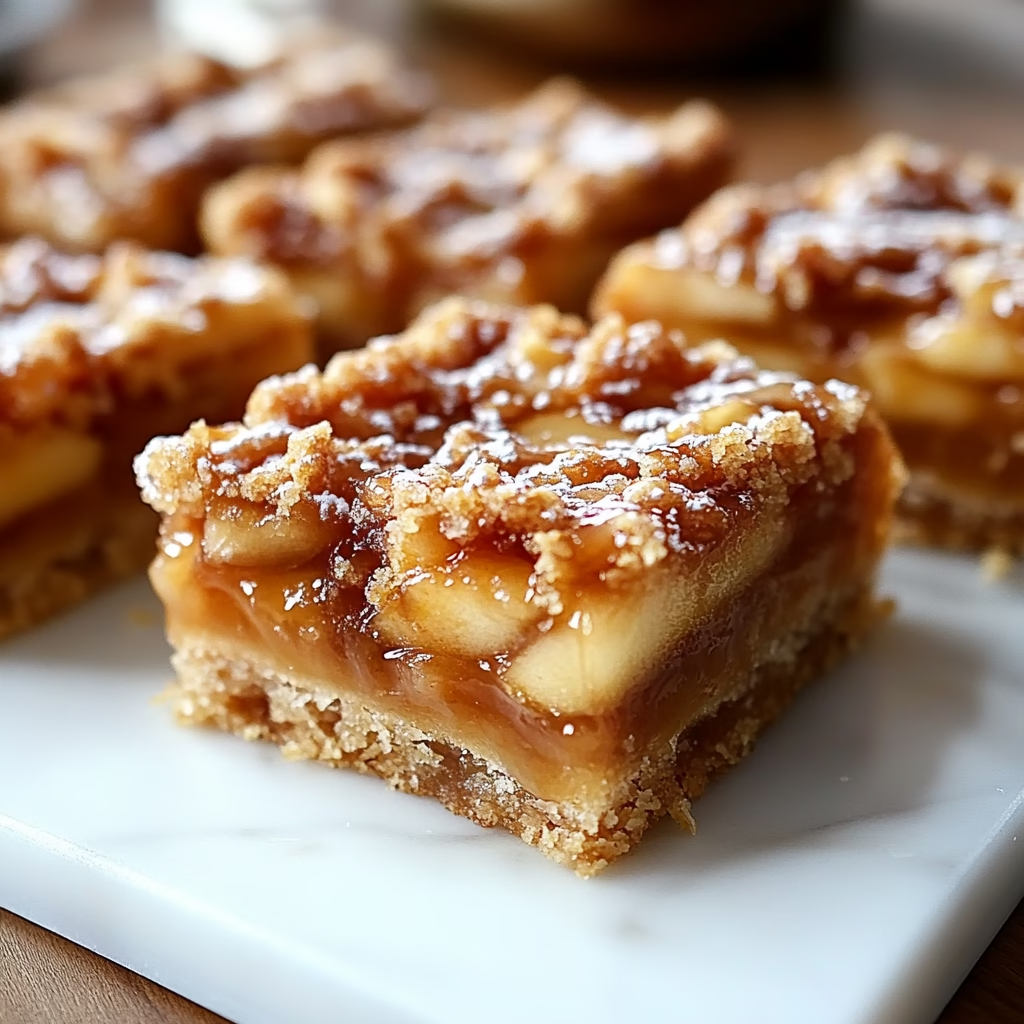
Apple Pie Bars are a delightful deconstruction of the beloved American classic, apple pie. Instead of a traditional double-crust pie, this recipe features a buttery, crumbly base and topping made from a simple flour and butter mixture, with a luscious layer of spiced apples baked in between. It’s like getting all the best parts of an apple pie – the sweet, tender apples, the warm cinnamon and nutmeg spices, and that irresistible shortbread-like crust – in a convenient, portable bar format. They’re incredibly forgiving and wonderfully adaptable, making them a go-to for anyone who loves the taste of apple pie without the fuss.
The beauty of apple pie bars lies in their simplicity and their comforting familiarity. They evoke the same sense of nostalgia and warmth as a traditional pie, often bringing to mind harvest seasons, family gatherings, or simple weeknight treats. The combination of the slightly tart apples, the sweet, warming spices like cinnamon and nutmeg, and the rich, buttery crumble topping creates a flavor profile that is universally loved. It’s a dessert that feels both rustic and refined, perfect for sharing with loved ones or simply enjoying yourself with a cup of tea.
Reasons to Try Apple Pie Bars
There are so many wonderful reasons to give these Apple Pie Bars a try. First and foremost, they are incredibly easy to make. The “crust” and “topping” are essentially the same crumble mixture, which you press half into the pan and sprinkle the rest over the apples. This eliminates the potential frustrations of rolling out pie dough, making it an ideal recipe for beginner bakers or anyone looking for a quick dessert fix. Plus, the flavor is absolutely divine. You get that authentic apple pie taste with perfectly tender, spiced apples and a buttery, crumbly texture that melts in your mouth.
These bars are also incredibly versatile and time-saving. They are perfect for potlucks, parties, bake sales, or simply a delicious after-dinner treat. Because they are in bar form, they are easy to transport and serve, requiring no plates or forks if you’re on the go. They’re fantastic for packed lunches, school snacks, or as an easy dessert for busy weeknights. If you’re a fan of apple pie but prefer a more manageable and less time-consuming dessert, these bars are tailor-made for you. They deliver maximum flavor with minimum fuss, making them a true kitchen hero!
Ingredients Needed to Make Apple Pie Bars
To craft these delightful Apple Pie Bars, you’ll need a few pantry staples and some lovely fresh apples. Here’s what you’ll want to gather:
- 2 1/2 cups all-purpose flour
- 1/2 cup granulated sugar
- 1/2 teaspoon salt
- 1 cup cold butter, cut into small cubes
- 4 cups thinly sliced apples (about 3-4 medium apples, a mix of varieties like Honeycrisp and Granny Smith is lovely)
- 1/2 cup packed brown sugar
- 1 1/2 teaspoons ground cinnamon
- 1/4 teaspoon ground nutmeg
- 1 tablespoon cornstarch
- 1 tablespoon fresh lemon juice (to brighten the apple flavor and prevent browning)
- 1 teaspoon vanilla extract
- Optional: Caramel sauce for drizzling
Instructions to Make Apple Pie Bars – Step by Step
Let’s get into the kitchen and whip up these delightful Apple Pie Bars! It’s a straightforward process that’s much more about gentle mixing and delicious transformations than anything complicated.
Step 1: Prepare the Pan and Oven
First things first, let’s get our baking environment ready. Preheat your oven to a steady 350 degrees Fahrenheit (175 degrees Celsius). This ensures the oven is at the perfect temperature when your bars are ready to go in, promoting even baking. Next, take a 9×13 inch baking pan and line it with parchment paper. Leaving some overhang on the sides is a helpful trick – it makes lifting the baked bars out of the pan so much easier later on. Simply lay the parchment so it lines the bottom and sides, creating a sling.
Step 2: Create the Crumbly Base and Topping
In a medium-sized mixing bowl, we’ll combine the dry ingredients for our crumble. Whisk together the all-purpose flour, granulated sugar, and salt. This simple blend forms the base of our delicious crust and topping. Now, add the cold, cubed butter to the flour mixture. Using a pastry blender, your fingertips, or even a food processor pulsed a few times, work the butter into the flour until the mixture resembles coarse crumbs, with some pea-sized pieces of butter still visible. This is key for that lovely, tender texture. Set aside about two-thirds of this crumb mixture to press into the pan; the remaining one-third will be our topping.
Step 3: Form the Base and Pre-Bake
Take the two-thirds portion of the crumb mixture you’ve set aside and evenly press it into the bottom of your prepared 9×13 inch pan. You want a nice, even layer that covers the entire base. Use the bottom of a glass or your hands to gently press it down firmly. Once pressed, place the pan in your preheated oven and bake it for about 15 minutes. This pre-baking step helps to set the crust, giving it a slightly crisp foundation before we add the apple filling.
Step 4: Prepare the Luscious Apple Filling
While the crust is pre-baking, we’ll prepare the star of our show: the apple filling. In a separate bowl, combine your thinly sliced apples. Add the packed brown sugar, ground cinnamon, ground nutmeg, cornstarch, fresh lemon juice, and vanilla extract. Gently toss everything together until the apple slices are evenly coated with the sugar, spices, and other flavorings. The lemon juice not only adds a hint of brightness but also helps keep the apples from turning an unappealing brown. The cornstarch is our thickening agent, ensuring a beautifully luscious, not watery, filling.
Step 5: Assemble the Bars
Once the crust has had its 15-minute head start in the oven, carefully remove the pan. Spread the prepared apple filling evenly over the pre-baked crust. Try to distribute the apples as uniformly as possible, ensuring each bar gets a good amount of fruit. Now, take the remaining one-third of the crumb mixture and sprinkle it evenly over the top of the apple layer. This creates that wonderful, crumbly topping reminiscent of a streusel or a deconstructed pie topping, adding texture and rich buttery flavor.
Step 6: Bake to Golden Perfection
Return the assembled pan to the oven. Bake for an additional 35 to 40 minutes, or until the topping is golden brown and the apple filling is bubbling gently around the edges. You’ll know they’re ready when you can smell that incredible aroma of baked apples and cinnamon filling your kitchen – it’s truly one of my favorite scents! Keep an eye on the topping to ensure it doesn’t get too dark; if it starts browning too quickly, you can loosely tent the pan with foil.
Step 7: Cool Completely and Serve
This is perhaps the hardest step, but it’s crucial for perfect bars: you must let them cool completely before slicing. Resist the urge to cut into them while they’re hot! As they cool, the filling will set up beautifully, allowing for clean, neat slices. I usually let them cool in the pan on a wire rack for at least an hour, and often a bit longer. Once they’ve cooled thoroughly, you can lift them out of the pan using the parchment paper overhangs. Slice them into squares or rectangles, and if you’re feeling extra indulgent, a drizzle of caramel sauce over the top is absolutely divine!
Chef’s Tips for a Perfect Result
- Use a mix of apple varieties: Combining tart apples like Granny Smith with sweeter apples such as Honeycrisp or Gala provides a more complex and balanced flavor in your filling.
- Keep your butter cold: For the crumbly topping and base, using very cold, cubed butter is essential. This creates pockets in the dough that melt during baking, resulting in a tender, flaky texture rather than a tough one.
- Don’t overwork the crumble mixture: When combining the butter with the dry ingredients, stop mixing as soon as you achieve a crumbly texture. Overmixing can lead to a tough crust.
- Press the base firmly: Ensure the bottom layer of crumble is pressed down evenly and firmly into the pan. This creates a solid base that holds the apple filling without becoming soggy.
- Cool completely before slicing: This is critical for clean cuts. Allowing the bars to cool allows the filling to set, preventing them from falling apart when sliced. Patience is key here!
- Adjust spices to your liking: Feel free to add a pinch of ground ginger or cloves along with the cinnamon and nutmeg for a more complex spice profile, especially if you love warm spices.
Variations and Substitutions
These Apple Pie Bars are wonderful as they are, but they’re also a fantastic canvas for your own creativity! Here are a few ideas to make them your own:
- Gluten-Free Alternative:
What to change: Replace the all-purpose flour with a good quality gluten-free all-purpose flour blend that contains xanthan gum.
How it impacts flavor or texture: The texture might be slightly different, sometimes a bit denser or crumblier depending on the blend used, but the flavor will remain wonderfully apple-pie-like. - Nutty Crunch Topping:
What to change: Add 1/2 cup of chopped pecans or walnuts to the reserved crumble mixture before sprinkling it over the apples.
How it impacts flavor or texture: Introduces a delightful crunch and a complementary nutty flavor that pairs beautifully with apples and cinnamon. - Oatmeal Addition:
What to change: For a chewier texture, incorporate 1/2 cup of rolled oats (not instant) into the crumble mixture along with the flour.
How it impacts flavor or texture: Adds a heartier texture and a slightly nutty, wholesome flavor to the topping, making it more like a traditional streusel. - Spiced Apple Filling Boost:
What to change: Add an extra 1/2 teaspoon of cinnamon and a pinch of ground ginger or cardamom to the apple mixture.
How it impacts flavor or texture: Creates a more intense, aromatic, and complex spiced apple flavor that really sings, especially on a chilly day. - Lemon Zest Zest:
What to change: Add the zest of half a lemon to the apple filling mixture. - How it impacts flavor or texture: Enhances the natural brightness of the apples and adds a subtle, fresh citrus note that cuts through the sweetness beautifully.
How to Serve and Pair
Served warm or at room temperature, these Apple Pie Bars are a true crowd-pleaser. For a classic presentation, slice them into neat squares and arrange them on a platter. A warm bar is particularly delightful on its own, but for an extra touch of indulgence, try a dollop of freshly whipped cream or a scoop of vanilla bean ice cream melting over the top. They also pair beautifully with a steaming cup of coffee, a comforting mug of chai tea, or a classic glass of milk. These bars are perfect for any occasion that calls for a touch of homemade charm, from casual family dinners and backyard BBQs to holiday gatherings and bake sale offerings.
Storage and Reheating
Once these delicious Apple Pie Bars have cooled, proper storage will keep them tasting fresh and delicious. They truly are best enjoyed within a few days of baking.
Refrigerator
Store any leftover Apple Pie Bars in an airtight container in the refrigerator for up to 4 days. This is the best method to maintain their freshness and prevent them from drying out, especially the apple filling.
Freezer
For longer storage, cool the bars completely, then slice them and place them in a single layer on a baking sheet until firm, about 1-2 hours. This prevents them from sticking together. Once firm, transfer the bars to a freezer-safe airtight container or heavy-duty freezer bag. They can be stored in the freezer for up to 3 months. It’s a good idea to separate layers with parchment paper to prevent sticking.
Room Temperature
Apple Pie Bars can be left at room temperature, covered loosely, for up to 2 days, provided your kitchen is cool and not humid. However, for optimal freshness and safety, refrigeration is generally recommended.
Reheating
To enjoy a warm Apple Pie Bar, you have a few options. For individual bars, a few seconds in the microwave can warm them up quickly, but be careful not to overheat, which can make the crust soggy. The best way to reheat is gently in a toaster oven or a conventional oven preheated to around 300°F (150°C) for 5-10 minutes, or until warmed through. If reheating from frozen, allow them to thaw slightly at room temperature before warming in the oven, which will help preserve the texture better than the microwave.
Nutritional Values
- Calories: Approximately 250 per bar
- Protein: Approximately 2g per bar
- Carbohydrates: Approximately 34g per bar
- Fat: Approximately 12g per bar
- Saturated Fat: Approximately 7g per bar
- Fiber: Approximately 2g per bar
- Sugar: Approximately 18g per bar
- Sodium: Approximately 90mg per bar
Approximate values.
Frequently Asked Questions (FAQ)
Can I substitute the apples in this recipe?
Yes, you can substitute the apples with other fruits like pears or even a mix of berries, but adjust the sugar and spices accordingly. Pears might require a bit less sugar and a longer baking time due to their higher moisture content.
How do I know when my apple pie bars are fully baked?
Your apple pie bars are fully baked when the topping is golden brown and you see the apple filling bubbling gently around the edges. A wooden skewer inserted into the apple layer should come out mostly clean, with maybe a few moist crumbs attached.
My apple pie bars turned out soggy, what went wrong?
Soggy bars often happen if the apples release too much liquid or if the bars were not cooled completely before slicing. Ensure you toss the apples with cornstarch and don’t skip the essential cooling step to allow the filling to set properly.
Can I make the Apple Pie Bars dough in advance?
You can prepare the crumb mixture (flour, sugar, salt, butter) a day ahead and store it in the refrigerator. Keep the butter very cold until ready to use, pressing it into the pan when you’re ready to assemble and bake.
What’s the best way to customize my apple pie bar recipe?
Customizing is easy by adding ingredients like chopped nuts or oats to the crumble topping, or incorporating other spices like ginger or cardamom into the apple filling. You can also add a touch of zest to the apples or serve them with caramel or a sprinkle of powdered sugar.
CONCLUSION
These Apple Pie Bars are a truly comforting and delicious treat, offering all the beloved flavors and aromas of classic apple pie in a wonderfully simple bar format. Give these easy bars a try for a delightful dessert that’s perfect for any occasion, big or small. The irresistible blend of tender, spiced apples and buttery crumble makes them a guaranteed favorite that you’ll want to make again and again.
Print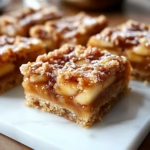
Apple Pie Bars: Your New Favorite Fall Treat
- Prep Time: 20 minutes
- Cook Time: 55 minutes
- Total Time: 1 hour 15 minutes
- Yield: 16 bars 1x
- Category: Dessert
- Method: Baking
- Cuisine: American
- Diet: Vegetarian
Description
These easy apple pie bars are quick, simple, and so delicious! A healthy dessert idea that’s perfect for fall events or cozy nights.
Ingredients
- 2 1/2 cups all-purpose flour
- 1/2 cup granulated sugar
- 1/2 teaspoon salt
- 1 cup cold butter, cubed
- 4 cups thinly sliced apples
- 1/2 cup brown sugar
- 1 1/2 teaspoons cinnamon
- 1/4 teaspoon nutmeg
- 1 tablespoon cornstarch
- 1 tablespoon lemon juice
- 1 teaspoon vanilla extract
- Optional: caramel sauce for drizzling
Instructions
1. Preheat oven to 350°F and line a 9×13-inch pan with parchment paper.
2. Mix flour, sugar, and salt in a bowl. Cut in cold butter until crumbly.
3. Press 2/3 of the mixture into the pan and bake for 15 minutes.
4. In another bowl, toss apples with brown sugar, cinnamon, nutmeg, cornstarch, lemon juice, and vanilla.
5. Spread apple filling over the crust and sprinkle the remaining crumble on top.
6. Bake for 35-40 minutes until golden and bubbly.
7. Cool completely before slicing. Drizzle with caramel if desired.
Notes
Use a mix of apple varieties for balanced flavor.
Chill the butter for a better crumb texture.
Cool fully before slicing to keep the bars intact.
Great for freezing; separate layers with parchment paper.
Nutrition
- Serving Size: 1 bar
- Calories: 250
- Sugar: 18g
- Sodium: 90mg
- Fat: 12g
- Saturated Fat: 7g
- Unsaturated Fat: 4g
- Trans Fat: 0g
- Carbohydrates: 34g
- Fiber: 2g
- Protein: 2g
- Cholesterol: 30mg


