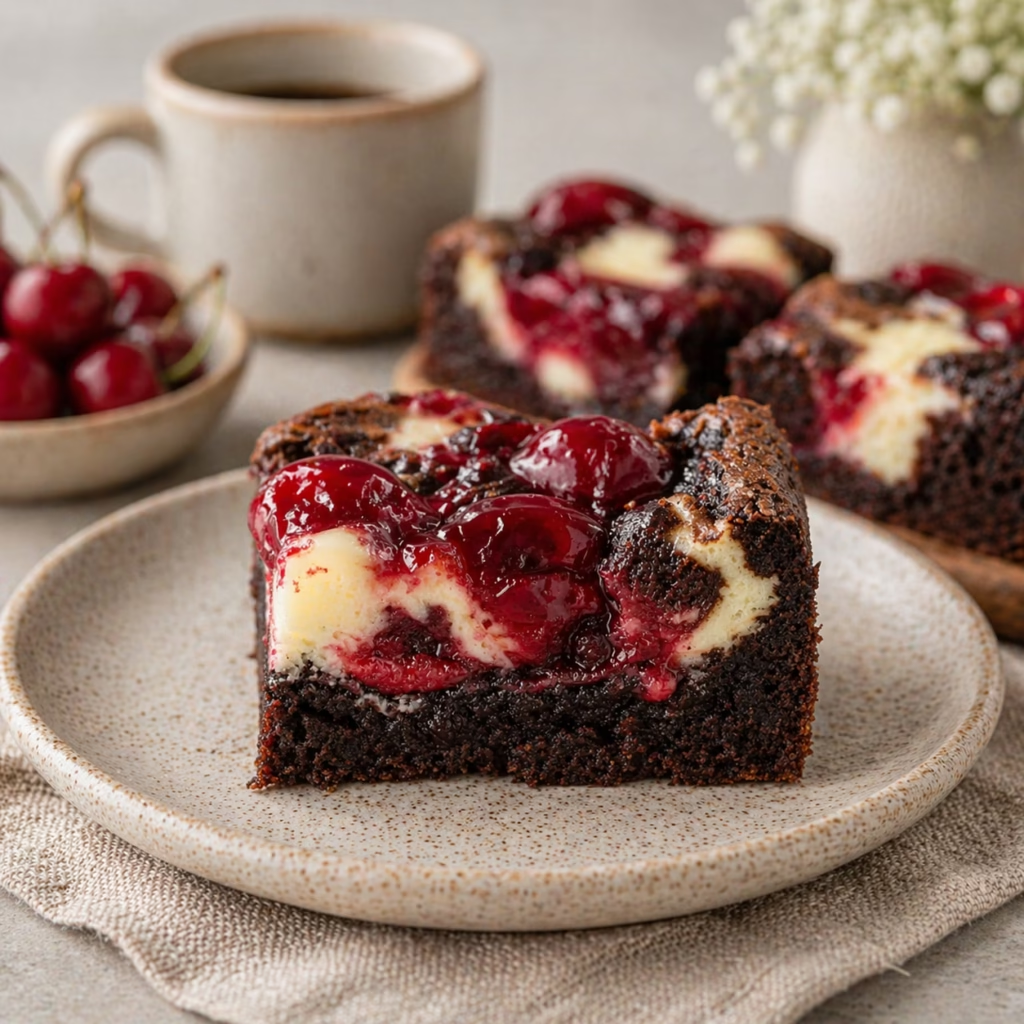
Cherry cheesecake brownies bring together the fudgy richness of classic brownies with the creamy tang of cheesecake and the sweet burst of fresh cherries—this is dessert innovation at its finest. Whether you’re a longtime brownie enthusiast or a cheesecake lover, this layered treat will redefine your expectations of comfort baking. Soft and chewy chocolate squares rest beneath a silky cheese layer, while hand-placed whipped cherries add a tangy finish that lingers like a sweet memory.
What makes cherry cheesecake brownies truly special is how each component contrasts and complements the others. The brownie base offers a deep, bittersweet chocolate backbone, while the cheesecake layer introduces a luscious, velvety texture. The inclusion of cherries—either fresh or preserved—adds natural acidity that brightens the richness. No matter how you layer them, these brownies transform a simple recipe into a conversation starter during dessert time.
What is Cherry Cheesecake Brownies?
Cherry cheesecake brownies are a modern dessert that fuses three beloved elements into one indulgent form. This creation likely evolved from classic New York-style cheesecake bars and fudge brownies, both staple items in American kitchens since the mid-20th century. Bakers began experimenting with layering techniques in the 1990s, inspired by restaurant-tiered desserts that balanced bold flavors and textures in a single bite. Today, the cherry on top (literally) is often fresh or candied fruit that adds a burst of brightness.
The structure typically features three distinct layers: a dense chocolate brownie base, a smooth cheesecake filling, and a topping of whole or crushed cherries. Unlike traditional brownies that rely on a single layer, this recipe uses the stacking method to create dimension. The cherry component isn’t just for show—it acts as a natural sweet-and-sour element that keeps each bite from feeling cloying.
Reasons to Try Cherry Cheesecake Brownies
These brownies appeal to bakers of all skill levels while securing a permanent spot at your dessert rotation. Beginners will appreciate the ready-made brownie mix, which cuts prep time to a minimum, while experienced cooks can elevate the recipe by incorporating fresh cherries or house-made cheesecake. The dish also functions as a versatile canvas—one that can support seasonal changes by swapping out fruit fillings or altering the brownie base to match holidays and events.
For time-pressed foodies, the 45-minute total preparation-to-oven time makes these brownies suitable for spontaneous baking sessions or last-minute party catering. The recipe doesn’t require specialized equipment like a food processor or stand mixer, relying instead on common kitchen tools like a hand mixer and 9×13-inch baking pan. The result? A dessert that feels far too sophisticated for its simplicity, making it both family-friendly and impressive for guests.
Ingredients Needed to Make Cherry Cheesecake Brownies
- 18-ounce family-size brownie mix (check packaging for flour type if making gluten-free)
- 3 large eggs, at room temperature (for better emulsification)
- ½ cup vegetable oil (neutral flavor; canola or safflower work well)
- ¼ cup water (adds moisture without excess sugar)
- 1½ cups cherry pie filling, or crushed fresh cherries with juice (alternatively use cherry jam)
- 8-ounce cream cheese, softened for 30 minutes (for smooth texture)
- ¾ cup powdered sugar (helps stabilize the cheese filling)
- ½ teaspoon pure vanilla extract (adds depth to the cheesecake layer)
- ¼ cup heavy cream (lightens the cheesecake texture)
- 1 tablespoon all-purpose flour (prevents curdling in the topping)
Instructions to Make Cherry Cheesecake Brownies – Step by Step
Step 1: Prepare the Brownie Base
Start with your oven preheating to 350°F (175°C) while you gather ingredients. Choose a 9×13-inch baking dish, and either grease it heavily or line the bottom and sides with parchment paper for easy slicing. The parchment paper ensures clean layer separation, especially between the brownie and cheesecake. Mix the brownie batter per the box instructions, but for optimal results, mix wet ingredients first: blending oil, eggs, and water until fully emulsified before adding dry components. This creates a denser, fudgier texture than dry-first mixing.
Once the batter is smooth and glossy, pour it directly into the prepared pan. Use a rubber spatula to spread the mixture evenly across the bottom. The goal is an even base that covers the entire surface—this supports the cheesecake layer effectively later. After pouring, slide the dish to the front oven rack so the heat can reach it; this promotes even baking for the first stage.
Step 2: Bake and Cool the Brownie Layer
Bake the brownies at 350°F for 20-25 minutes until the edges pull slightly from the pan and the center shows a cake-like texture but remains moist. A toothpick inserted should come out with a few crumbs. Avoid overbaking, as the brownie’s texture becomes chewy rather than fudgy beyond the indicated times. Once baked, let the pan rest on a cooling rack for about 10 minutes before moving to the next step. This initial cooling allows the textural structure to set just enough to hold the cheesecake layer without collapse.
Step 3: Add the Cheesecake Filling
While the brownies cool, prepare the cheesecake layer. In a large bowl, beat the softened cream cheese using a hand mixer until it’s completely creamy, with no visible graininess. This smooth consistency is crucial for a believable cheesecake texture. Gradually add the powdered sugar, pausing to scrape down the bowl after each addition. Then add the vanilla extract and heavy cream, mixing again until the texture is lightened but still thick enough to pour without being runny.
Maintain a smooth indoor temperature (60-70°F) while this mixing occurs. Warmer cream cheese can split during mixing, creating an unappealing texture. Once the cheesecake is ready, spoon the mixture into the brownie layer and distribute it evenly using a spatula. Alternatively, you can use a squeeze bottle for more controlled layering, especially if making smaller portions in a 9×13 pan.
Step 4: Top with Cherries and Final Baking
Cherries come last, so prepare them now. If using jarred cherry pie filling, ensure it’s well drained to avoid making the cheesecake soggy. Alternatively, you can use fresh cherries pitted and gently crushed. Spread the cherry topping evenly over the cheesecake layer, then lightly swirl with a toothpick for visual appeal. While some recipes skip a second bake step, these brownies benefit from a short 10-minute rebake at 300°F to set the cheesecake and soften the cherries. This creates a smooth, creamy layer beneath the fruit topping without re-browning the already done brownie base.
Chef’s Tips for a Perfect Result
- Use room-temperature eggs: This ensures full integration into the rest of the batter for a smooth texture.
- Avoid overmixing the brownie dough: After adding dry ingredients, mix just until no streaks remain for a denser fudge quality.
- Create a chill time: Let the cheesecake layer chill in the fridge for at least one hour before adding cherries to prevent over-beating agitation.
- Test doneness with texture, not color: The brownie layer should remain fudgy but baked; center sinkage is acceptable here.
- Use parchment for easy slicing: Cutting into warm brownies will warp layers, so ensure the pan is fully cooled.
Variations and Substitutions
Vegan Option
- Replace cream cheese with vegan cream cheese (store-bought or homemade using agar-agar and cashews).
- Use a vegan brownie mix or substitute the mix’s flour with 1 cup almond flour mixed with ½ cup cocoa powder and ½ cup sugar.
- Top with caramelized cherries or vegan cherry jam for a similar flavor profile.
Gluten-Free Alternative
- Opt for a certified gluten-free brownie mix (many mainstream brands now offer this option).
- Rub xanthan gum through the dry brownie mix to help maintain these structural elements in gluten-free variants.
- Use a cherry topping that isn’t pre-made (check labels for hidden gluten) or make a homemade cherry reduction.
Budget Swap
- Use a local bulk bin for brownie mix—reduced packages can be cost-effective and avoid preservatives.
- Totally skip the brownie mix and make a 3-ingredient base using melted butter, sugar, and flour for a fresher take.
- Use seasonal cherries instead of canned to reduce sugar content and support local growers.
How to Serve and Pair
These brownies sing best when served at room temperature, but they also offer compelling options when chilled or warmed. For a casual family gathering, individual squares work well in a dessert platter alongside berries or doodles of whipped cream. In more formal settings, cut them into elegant rectangles and arrange them on a vintage dessert tray for a country clubhouse feel.
Pair cherry cheesecake brownies with full-bodied coffees like dark roast or bold espresso to match the chocolate intensity. For a refreshing twist, serve them chilled with a scoop of vanilla or cherry ice cream that gently contrasts the fudginess. If hosting a brunch or weekend getaway, offer a mix with other baked goods like lemon scones or cobbler for a balanced spread.
Storage and Reheating
Refrigerator
Store leftovers in an airtight container for up to 4 days. The refrigeration dries out the brownie layer slightly, so best to consume within the first 3 days for optimal fudginess. Place parchment paper between slices to prevent sticking, and always seal the container tightly in the fridge to avoid absorbing other aromas.
Freezer
Freeze unbaked brownie batter (or pre-chilled brownie layer with cheesecake) in the pan for up to 3 months. Wrap tightly in two layers of plastic wrap and an oven-safe bag to prevent freezer burn. When serving, defrost in the fridge for 6-8 hours or at room temperature for 2-3 hours depending on your slice size.
Room Temperature
These brownies can stay at room temperature for up to 2 hours in a cool (70°F or less) kitchen. If the room temperature exceeds this, refrigeration is essential to prevent texture breakdown in the cheesecake layer.
Reheating
For a warm serving, place slices in an oven at 350°F for 30 seconds to 1 minute. This dries out the texture slightly but maintains the layer structure. Alternatively, microwave in 10-second bursts at 50% power, resealing in parchment to retain moisture. Avoid heating for long periods or at high power, which can melt the cheesecake into a soupy mess.
Nutritional Values
- Calories: 320 per serving
- Protein: 10g
- Carbohydrates: 45g
- Fat: 12g
- Fiber: 3g
Approximate values.
Frequently Asked Questions
Can I use fresh cherries instead of cherry pie filling?
Yes—fresh cherries (pitted and lightly crushed) make a great alternative, especially when in season. The natural juice they release adds moisture and flavor that canned versions can’t match.
How do I tell when the brownie layer is fully baked?
The brownies are done when the edges shrink slightly from the pan and a toothpick comes out with just a few moist crumbs. Avoid waiting for a clean toothpick—it results in a cake-like texture.
Why is my cheesecake layer separating from the brownie
This often occurs when the brownie is underbaked. Make sure the brownie layer is baked to at least 20 minutes, as underbaked doughs can’t support the cheesecake.
Can I prepare the brownie base the night before?
Absolutely. Prepare the baked brownie layer and let it cool completely. Store in an airtight container in the fridge for up to 24 hours before adding cheesecake and cherries.
What’s the best way to serve on a coffee table?
Cut into small 2-inch squares and arrange on a tiered stand with paper straws for elegant coffee hour snacking. Direct serve from a large rectangular cutting board for a casual dining party.
Conclusion
Cherry cheesecake brownies are a perfect harmony of textures and flavors in one treat. These fudgy chocolate squares transition smoothly into a tangy cheese layer and finish with a burst of cherry sweetness—a trifecta that elevates a simple dessert into a cherished family favorite. Try this recipe and taste why these brownies have become a staple for curated home gatherings and cozy kitchen evenings.
Print
Cherry Cheesecake Brownies
- Prep Time: 15
- Cook Time: 30
- Total Time: 45
- Yield: 24 brownie bars 1x
- Category: desserts
- Method: Baking
- Cuisine: American
- Diet: Vegetarian
Description
A fudgy chocolate base layered with tangy cheesecake and sweet tart cherries, creating a decadent dessert that balances richness and brightness. Perfect for chocolate lovers with a soft spot for creamy textures.
Ingredients
1 cup all-purpose flour
1 cup unsalted butter, softened
1 1/2 cups sugar
2 large eggs
1 tsp vanilla extract
3/4 cup cocoa powder
1/2 tsp baking powder
3/4 cup sour cream (alcohol-free)
8 oz cream cheese, softened
1/4 tsp salt
1/2 cup cherries, stemmed and halved (fresh or maraschino)
2 tbsp cherry juice (from canned cherries, alcohol-free)
Instructions
Preheat oven to 350°F (175°C)
Line a 9×13-inch baking pan with parchment paper
In a bowl, whisk flour, baking powder, and cocoa powder
Add softened butter and sugar; mix until smooth
Beat in eggs one at a time, then stir in vanilla
Pour batter into the pan and spread evenly
Bake 20-22 minutes until set
Let cool completely
In a separate bowl, whip cream cheese, sour cream, and salt until smooth
Spread over cooled brownie layer
Top with cherries and drizzle with cherry juice
Chill for 30 minutes before cutting into 24 bars
Notes
Use cherry gelatin (halal-certified) for a cherry layer alternative
For richer flavor, toast the flour lightly before mixing
Storage: Keep refrigerated in an airtight container for up to 3 days
Nutrition
- Serving Size: 1 brownie bar
- Calories: 265
- Sugar: 22g
- Sodium: 240mg
- Fat: 16g
- Saturated Fat: 9g
- Carbohydrates: 29g
- Fiber: 1g
- Protein: 4g
- Cholesterol: 50mg