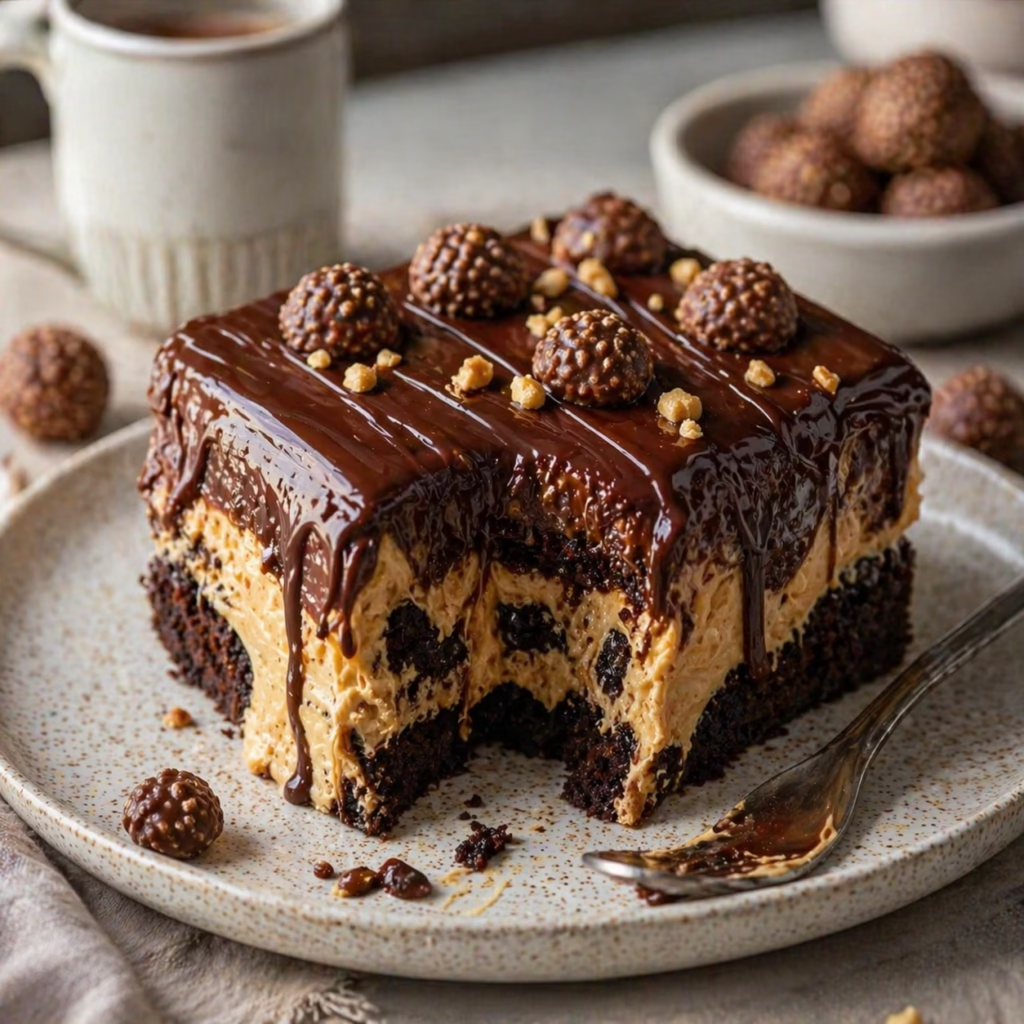
Reese’s Peanut Butter Earthquake Cake isn’t just a dessert—it’s an event. Every bite feels like a mini celebration in your mouth, with rich chocolate and peanut butter layers that melt into a luscious, syrupy swirl. The name says it all: this cake cracks open like a tremor after baking, revealing a molten center that’s just the right balance of fudgy and creamy. Whether you’re a casual snack lover or a home baker seeking bold flavors, this cake makes a lasting impression. Think of it as peanut butter cups grown up, dressed in a chocolate cake toasting with sweetened condensed milk and a hint of chaos. It’s the kind of dessert that sparks conversation, laughter, and the inevitable “pass me another slice” moment.
What makes this cake special isn’t just the ingredients—it’s the way they collide. The chocolate cake base soaks up the intensity of peanut butter cups and chocolate chips, while the sweetened condensed milk adds a silky sweetness that binds everything together. When sliced, the center caves in dramatically, creating that signature “earthquake” effect. It’s dessert with drama, and it’s impossible to resist.
What is Reese’s Peanut Butter Earthquake Cake?
Reese’s Peanut Butter Earthquake Cake is a bold reinterpretation of the classic peanut butter cup. It layers a moist chocolate sponge with chopped peanut butter cups, chocolate chips, and a drizzle of sweetened condensed milk for a luscious, semi-frozen center. The cake is baked in a single layer, allowing the ingredients to melt and mingle, resulting in a gooey, fudgy texture that erupts in the middle when sliced. Originally born from food bloggers experimenting with peanut butter and chocolate, this cake has become a cult favorite for those who crave decadent, one-bite wonder flavors.
The key to its uniqueness lies in the balance of textures and flavors. The cake batter is light and airy, contrasting with the dense, nutty peanut butter and melted chocolate. The sweetened condensed milk acts as both a binder and a secret weapon, creating that soft, custard-like core. It’s not just a dessert—it’s a textural symphony that makes you stop and savor each bite. If your kitchen smells as if an earthquake of joy has struck, you’re on the right track.
Reasons to Try Reese’s Peanut Butter Earthquake Cake
Why settle for a ordinary cake when your dessert can be a full-blown flavor explosion? Reese’s Peanut Butter Earthquake Cake is perfect for anyone who craves richness without pretension. Imagine this cake at your next family gathering, baking in the oven, filling your home with the warm aroma of chocolate and peanut butter. It’s a crowd-pleaser that speaks to both casual snackers and serious dessert enthusiasts. The best part? It’s not complicated. You don’t need a culinary degree to make it—just a few pantry staples and a little patience.
This cake is ideal for beginners because the boxed cake mix does most of the heavy lifting. The layers form themselves, and the ingredients handle the magic. It’s also a lifesaver for busy weeknights or last-minute desserts. Need to feed a chocolate-loving crowd? Bake this cake. Need a quick pick-me-up for yourself? Chop up a few Reese’s cups, mix the batter, and let the oven do the rest. Plus, it’s incredibly versatile—you can tweak the sweetness, swap ingredients, or even make it vegan. It’s a dessert that grows with your creativity.
Ingredients Needed to Make Reese’s Peanut Butter Earthquake Cake
1 box (450 g) chocolate cake mix
1 cup (240 ml) water
1/2 cup (120 ml) vegetable oil
3 large eggs
1 cup (250 g) creamy peanut butter
1 cup (170 g) Reese’s peanut butter cups (chopped)
1 cup (175 g) chocolate chips
1 cup (240 ml) sweetened condensed milk
1/2 cup (60 g) powdered sugar
Prep Tips: Chop the Reese’s cups into small wedges to ensure even distribution throughout the batter. Use a food processor for finer chocolate chips to prevent large chunks. If you don’t have sweetened condensed milk, try replacing it with a mix of equal parts heavy cream and evaporated milk, sweetened with sugar. For a richer flavor, melt the chocolate chips with a splash of cocoa before adding them to the batter.
Instructions to Make Reese’s Peanut Butter Earthquake Cake – Step by Step
Step 1: Preheat your oven to 350°F (175°C). While the oven warms up, grab a silicone spatula and a large mixing bowl. This is your moment to set the tone for chaos. Grease a 9×13-inch baking dish thoroughly—no corners left dry. I prefer a high-sided glass dish because it heats evenly, but a metal pan works too.
Step 2: Pour the chocolate cake mix into the bowl. Measure the water carefully—this is the foundation of your layers. Adding just the right amount ensures the batter is moist but not runny. Add the vegetable oil and eggs. Don’t rush this step. Scrape down the bowl every 30 seconds to make sure everything integrates smoothly. Once combined, mix at medium speed for 2 full minutes. You’ll know it’s done when the batter glistens like a storm cloud and holds a ribbon on the spatula when you lift it.
Step 3: Now for the fun part. Fold in the chopped Reese’s cups and chocolate chips. This is where your kitchen becomes a sensory playground—the scent of melted chocolate and peanut butter starts dancing around you. The goal is an even distribution, but don’t overdo it—some chunks are intentional chaos. Pour half the batter into the baking dish. Use the spatula to spread it into an even layer, not too thick and not too thin.
Step 4: Here’s the trick that creates the earthquake effect. Drizzle the sweetened condensed milk over the first layer of batter. This isn’t just a topping—it’s the lava that will later flow into the cake’s heart. Work quickly but gently, letting the milk pool slightly in the middle. This is where your dessert goes from good to legendary.
Step 5: Pour the remaining batter on top of the condensed milk. This second layer acts like a protective shell, sealing in the gooey center. Smooth it out with the spatula, keeping the center slightly raised. The goal is a slight hill in the center that will dome and collapse during baking. This is your cake’s seismic plate, ready to rupture in a glorious display of flavor.
Step 6: Bake for 30–35 minutes. Don’t be tempted to open the oven too soon—patience here is key. When you’re ready to test, insert a toothpick midway. If it comes out with moist crumbs or a thin, custard-like streak (not wet or runny), you’re good. The cake should feel firm on the edges but soft in the center. Let it rest in the pan for 10 minutes before slicing. Resist the urge to cut into it too soon—this is a dessert that rewards patience.
Chef’s Tips for a Perfect Result
- Use room-temperature eggs: They incorporate better into the batter for a lighter texture.
- Don’t skip the mixing time: Undermixing leads to uneven layers, while overmixing dries out the center.
- Use a glass baking dish: It retains heat well and helps create a more even crack in the middle.
- Chill the cake for 15 minutes before serving: The center firms up slightly, making it easier to slice cleanly.
- Double the sweetened condensed milk if you prefer an extra gooey center.
Variations and Substitutions
Gluten-Free Option: Use a gluten-free chocolate cake mix to keep it safe for gluten-sensitive guests. The texture will remain fudgy, but avoid cross-contamination when mixing.
Vegan Alternative: Replace the eggs with applesauce (3/4 cup) and use a vegan chocolate cake mix. Swap condensed milk for coconut milk and dairy-free chocolate chips.
Low-Sugar Version: Replace 50% of the sweetened condensed milk with unsweetened coconut milk and reduce the peanut butter by 1/4 cup. Adjust sweetness to taste.
Budget Swap: Swap Reese’s cups with homemade peanut butter cups or chopped chocolate-hazelnut candies for a cost-effective twist.
Spice Swap: Add a pinch of cinnamon or a splash of coffee to the batter for a deeper, spiced chocolate flavor.
How to Serve and Pair
Serve this cake warm—straight from the oven, preferably. Dust with powdered sugar for a classic touch, or drizzle with a peanut butter glaze for extra decadence. Pair it with a scoop of vanilla ice cream to balance the richness. For a more sophisticated bite, cut into bite-sized squares and serve with hot chocolate. If it’s a casual snack, a fork and a napkin are all that’s needed. Present it on a rustic wooden board or a vintage dessert platter to let its drama shine.
Storage and Reheating
Refrigerator: Store leftover slices in an airtight container for up to 3 days. The center may firm slightly, but it will regain its gooeyness when warmed.
Freezer: Wrap the entire cake tightly in plastic wrap, then in aluminum foil. Freeze for up to 3 months. Thaw in the fridge overnight before reheating.
Room Temperature: Keep it covered at room temperature for up to 24 hours. The center may become too runny if left unchilled.
Reheating: Place slices on a baking sheet and heat at 300°F (150°C) for 10–15 minutes until the center is warm but not dry. Alternatively, use a microwave in 30-second bursts, covering with a damp paper towel to retain moisture.
Nutritional Values
Per Serving (10 servings):
• Calories: 350
• Protein: 5g
• Carbohydrates: 48g
• Fat: 17g
• Fiber: 2g
*Approximate values.
Frequently Asked Questions
Q1: Can I substitute the peanut butter with almond or cashew butter?
Yes! Almond or cashew butter works well, but the flavor will be nuttier and less creamy than peanut butter. For the best earthquake effect, stick to creamy peanut butter with a smooth texture.
Q2: How do I know when the cake is done baking?
Insert a toothpick into the center. If it comes out with moist crumbs or a thin, custard-like streak (not runny), the cake is ready. Overbaking will dry out the center.
Q3: My cake didn’t crack in the center. Why?
This usually happens if the condensed milk isn’t drizzled evenly or if the batter is overmixed. Next time, concentrate the sweetened condensed milk in the middle and avoid overmixing the cake batter.
Q4: Can I prepare this cake ahead of time?
Absolutely. Assemble the cake up to 24 hours in advance and refrigerate. Bake before serving for the best texture and flavor.
Q5: What’s the best way to serve this cake to a crowd?
Cut the cake into small squares and serve warm with whipped cream or a peanut butter drizzle. The gooey center is best shared in a casual, family-style setting.
Conclusion
Reese’s Peanut Butter Earthquake Cake is a bold, satisfying dessert that brings joy with every bite. Its gooey center, balanced flavors, and easy construction make it a must-try for any home baker. Whether you’re feeding a family or treating yourself to a moment of chocolatey indulgence, this cake is a reminder that simple ingredients can create unforgettable magic. Embrace the chaos—and enjoy the earthquake.
Print
Reese’s Peanut Butter Earthquake Cake
- Prep Time: 15
- Cook Time: 30
- Total Time: 45
- Yield: 12 slices 1x
- Category: desserts
- Method: Baking
- Cuisine: American
- Diet: Vegetarian
Description
A rich, molten dessert combining chocolate cake, peanut butter cups, and sweetened condensed milk. Each slice reveals a fudgy, chaotic center that promises an unforgettable flavor explosion.
Ingredients
1 box chocolate cake mix (plus oil and eggs if required by the box)
2 cups chopped peanut butter cups
1 cup chocolate chips
1 (14 oz) can sweetened condensed milk
2 cups all-purpose flour (if cake mix is dry powder)
1 cup unsalted butter, softened
2 large eggs
1 tsp baking powder
1 tsp vanilla extract
Instructions
Preheat oven to 350°F (180°C). Grease a 9×13-inch baking dish.
Prepare the chocolate cake batter according to the cake mix package instructions (mixing dry ingredients with wet ingredients).
In a bowl, combine the cake batter with butter, eggs, baking powder, and vanilla extract. Fold in 2 cups chopped peanut butter cups and 1 cup chocolate chips.
Press half of the batter into the prepared baking dish, creating a slightly mounded base. Spread 1/2 cup of the remaining batter over the top to form a ring 1-2 inches wide around the center.
Pour the sweetened condensed milk into the center of the ring. Top with the remaining peanut butter cup batter, pressing firmly to seal over the condensed milk.
Bake for 25-30 minutes or until the edges are set but the center still jiggles slightly. Allow to cool completely before slicing for the signature ‘earthquake’ effect.
Notes
For strongest molten center, do not overbake. Leftovers can be stored in an airtight container at room temperature for up to 3 days.
Use high-quality peanut butter cups for best flavor and texture.
For dietary adjustments, use vegetable oil instead of butter.
Nutrition
- Serving Size: 1 slice
- Calories: 450
- Sugar: 38g
- Sodium: 250mg
- Fat: 22g
- Saturated Fat: 12g
- Carbohydrates: 56g
- Fiber: 2g
- Protein: 6g
- Cholesterol: 45mg